Oh, the sheer joy of creating an amigurumi rainbow butterfly! 🌈🦋 There’s something truly magical about transforming a ball of yarn into a delightful, colorful creature. The vibrant blend of colors captures the essence of a rainbow, infusing each loop and stitch with a sense of wonder and playfulness. Whenever I sit down to design one, I feel like a kid in a candy store, picking out the most vivid hues to bring my tiny butterfly to life. It’s a creative process that never ceases to surprise and delight me, and I can’t help but smile as I watch it take shape.
The process of crafting a rainbow butterfly amigurumi is a captivating journey. It all starts with selecting the perfect yarn—soft, vibrant, and full of potential. Then, with my trusty crochet hook in hand, I set about bringing my vision to life. Each stitch is a step closer to creating a whimsical creature that seems to flutter with its own unique personality. As I work, I often find myself lost in the rhythm of crocheting, with the bright colors dancing before my eyes, filling the room with a joyful energy. It’s immensely satisfying to see the wings take form, each color merging into the next, creating a harmonious spectrum that never fails to brighten my day. 🌟
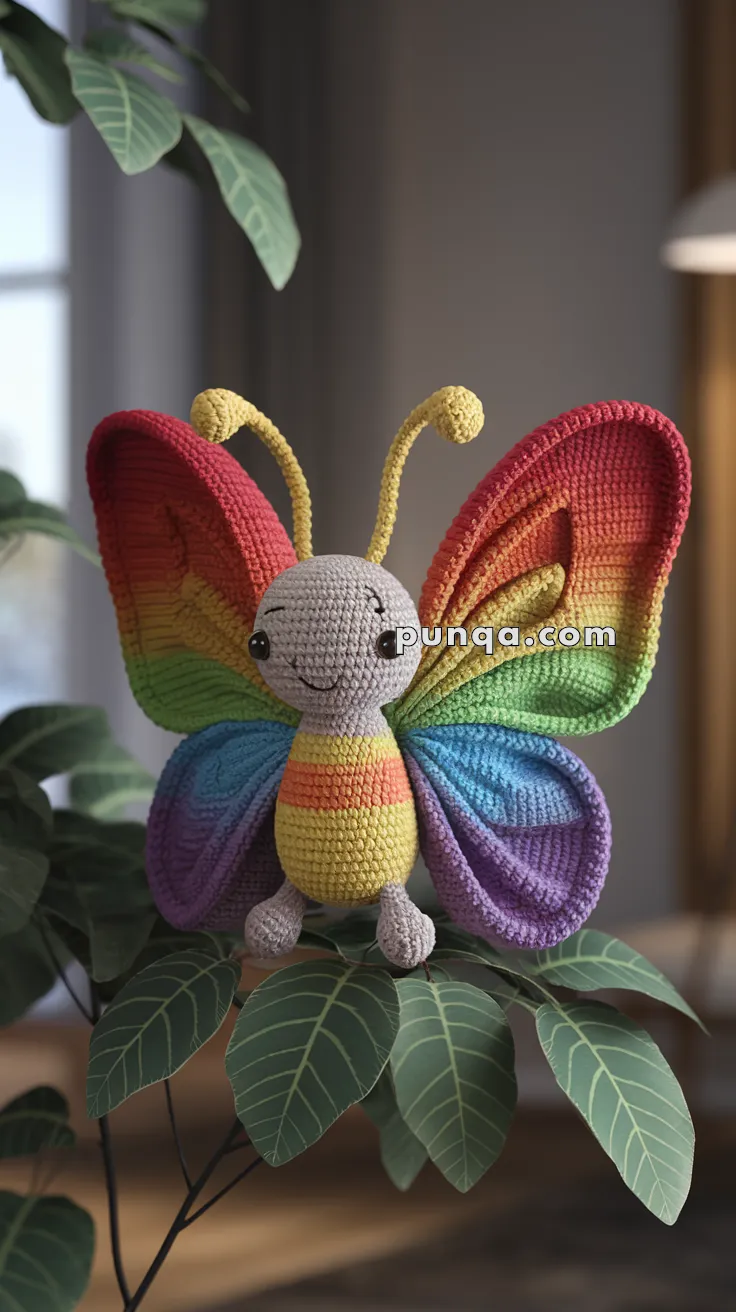
🦋 Rainbow Butterfly Amigurumi Crochet Pattern
This vibrant butterfly features oversized sculpted wings in a smooth rainbow gradient, a soft rounded grey head, a plump striped body, tiny rounded feet, and curved yellow antennae with bulb tips. The wings are dimensional and gently folded inward, giving the butterfly a lively, fluttering appearance while still allowing it to sit securely.
✨ Skill Level
Intermediate
Includes color striping, shaped wings worked in the round, partial stuffing for structure, and dimensional folding techniques.
📏 Finished Size
Approximately 24–26 cm (9.5–10 in) tall
Using DK yarn and a 2.75–3 mm hook.
🧶 Materials
Yarn (DK weight recommended):
-
Light grey – head and legs
-
Yellow – lower body and antennae
-
Red
-
Orange
-
Yellow (second shade if available for better gradient)
-
Green
-
Blue
-
Purple
Supplies:
-
9–10 mm black safety eyes
-
Polyester stuffing
-
Tapestry needle
-
Stitch markers
-
Black embroidery thread
-
Optional thin craft wire for antenna shaping
🧵 Abbreviations (US Terms)
MR – magic ring
sc – single crochet
inc – increase (2 sc in same stitch)
dec – invisible decrease
ch – chain
sl st – slip stitch
st(s) – stitch(es)
FO – fasten off
👤 Head (Light Grey)
The head is smooth and round, slightly larger than the body top.
R1: MR 6 (6)
R2: inc ×6 (12)
R3: (1 sc, inc) ×6 (18)
R4: (2 sc, inc) ×6 (24)
R5: (3 sc, inc) ×6 (30)
R6–12: sc around (30)
Insert safety eyes between R7–8, spaced 8 stitches apart.
R13: (3 sc, dec) ×6 (24)
R14: (2 sc, dec) ×6 (18) – begin stuffing firmly
R15: (1 sc, dec) ×6 (12)
R16: dec ×6 (6)
FO and close.
Facial Details
-
Embroider a soft curved smile centered below eyes.
-
Add tiny curved eyebrow stitches slightly above each eye.
Keep expression simple and sweet.
🌈 Body (Striped, Short and Rounded)
The body is compact and oval, with bold horizontal stripes.
Start from the bottom in yellow.
R1: MR 6 (6)
R2: inc ×6 (12)
R3: (1 sc, inc) ×6 (18)
R4–6: sc around (18) – Yellow
R7–8: sc around (18) – Orange
R9–10: sc around (18) – Red
R11–12: sc around (18) – Yellow
R13–14: sc around (18) – Green
R15: (1 sc, dec) ×6 (12)
R16: sc around (12) – Light grey for neck transition
Stuff firmly so body remains slightly plump.
FO leaving long tail and sew head securely to body.
Neck should be short and seamless.
🦶 Legs (Make 2 – Light Grey)
The feet are small, rounded, and slightly forward-facing.
R1: MR 6 (6)
R2: inc ×6 (12)
R3–4: sc around (12)
R5: (2 sc, dec) ×3 (9)
R6: sc around (9)
Lightly stuff bottom only.
Flatten top slightly before sewing to underside of body so legs angle gently forward.
🌼 Antennae (Make 2 – Yellow)
The antennae are curved with rounded bulb tips.
R1: MR 5 (5)
R2–11: sc around (5)
For rounded tip:
-
Add 2 extra increases on final round if desired, or
-
Wrap yarn tightly around tip to thicken it slightly.
Optional: Insert thin wire for shaping.
Sew evenly spaced on top of head, angled outward.
🦋 Upper Wings (Make 2)
The upper wings are large and wide, worked in the round and lightly stuffed along the outer curve only.
Color gradient from outer edge inward:
Red → Orange → Yellow → Green
R1: MR 6 (6)
R2: inc ×6 (12)
R3: (1 sc, inc) ×6 (18)
R4: (2 sc, inc) ×6 (24)
R5: (3 sc, inc) ×6 (30) – switch to orange
R6: (4 sc, inc) ×6 (36)
R7: (5 sc, inc) ×6 (42) – switch to yellow
R8: (6 sc, inc) ×6 (48)
R9: (7 sc, inc) ×6 (54) – switch to green
R10: sc around (54)
Lightly stuff only the outer curved section.
Do NOT overstuff.
Flatten slightly and FO leaving long tail.
🦋 Lower Wings (Make 2)
These are slightly smaller and rounder.
Color gradient:
Blue → Purple
R1: MR 6 (6)
R2: inc ×6 (12)
R3: (1 sc, inc) ×6 (18)
R4: (2 sc, inc) ×6 (24)
R5: (3 sc, inc) ×6 (30)
R6: (4 sc, inc) ×6 (36)
Add one more round sc around for fullness.
Lightly stuff outer edge only.
Flatten gently and FO.
✂️ Wing Shaping (Important for Photo Accuracy)
To create the dimensional folded effect:
-
Pinch the inner bottom edge of each wing.
-
Take 3–4 tight stitches across the pinched section.
-
This creates a natural inward fold.
-
Repeat for all wings.
The wings should curve toward the body slightly instead of lying flat.
🪡 Assembly
-
Sew upper wings high on back, slightly angled upward.
-
Overlap lower wings beneath upper wings.
-
Ensure inner folds face inward toward body.
-
Adjust positioning so butterfly appears balanced when seated.
Wings should be wide and sculptural, not floppy.
✨ Final Touches
-
Adjust antennae curve gently.
-
Massage stuffing for smooth body shape.
-
Shape wings evenly by hand.
Your rainbow butterfly is now complete — bold, dimensional, and full of joyful personality. Perfect for spring décor, nursery accents, or as a bright handmade gift. 🌈🦋