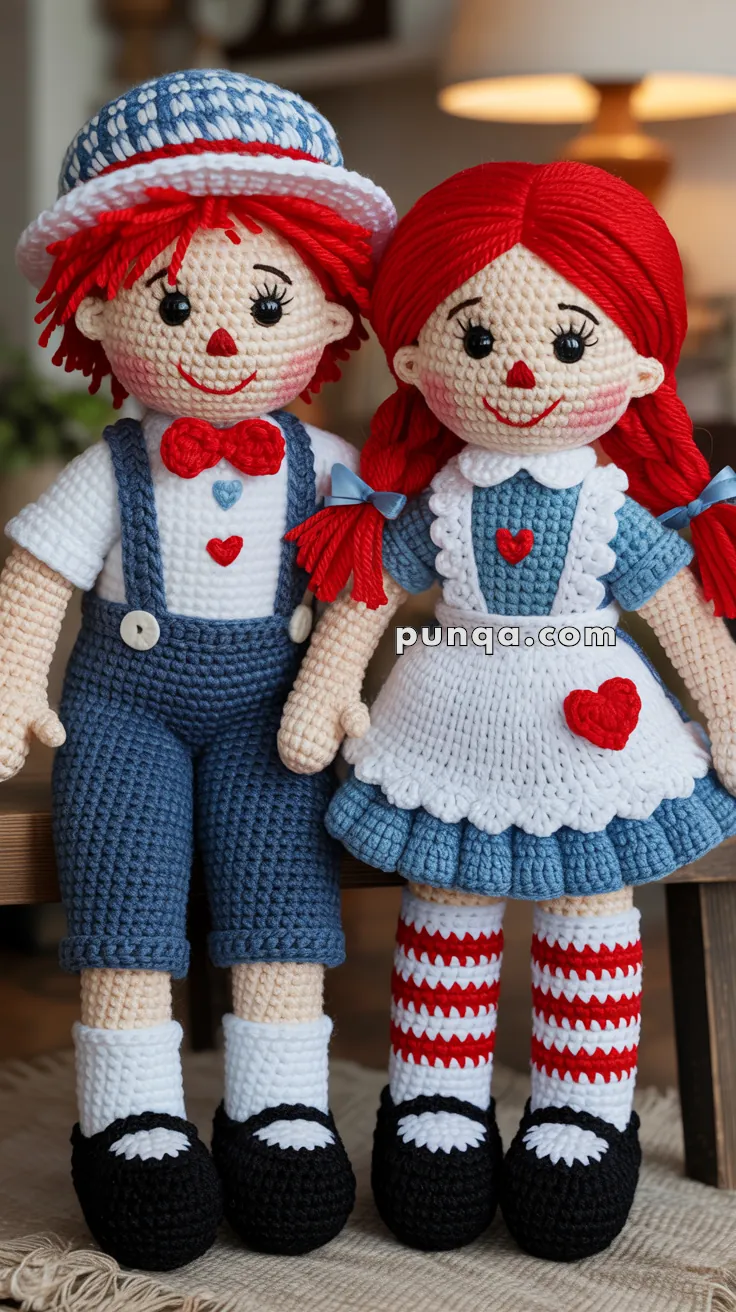
Step into a world of timeless charm with this Amigurumi Raggedy Ann & Andy Dolls crochet pattern! 🧵💖 These beloved childhood icons, with their button eyes, red yarn hair, and sweet stitched smiles, are ready to be lovingly recreated in yarn. Whether you’re reminiscing about your own treasured dolls or introducing their magic to a new generation, this pattern brings all the warmth and nostalgia of classic rag dolls—with a delightful handmade twist.
From their signature striped stockings to their vintage-inspired outfits, every detail is a joy to stitch and personalize. You can play with colors, add embroidered flourishes, or even tuck in a tiny heart to honor tradition. Perfect for gifting, decorating, or simply celebrating the enduring spirit of handmade toys, Raggedy Ann and Andy are more than just dolls—they’re a hug from the past, wrapped in yarn and stitched with love. 🧶❤️👫
🧶 Amigurumi Raggedy Ann & Andy Crochet Pattern
Bring vintage charm to life with this nostalgic Raggedy Ann & Andy crochet duo! From Ann’s sweet striped socks and ruffled apron to Andy’s playful overalls and cap, every stitch captures the warmth of handmade tradition. Perfect for collectors or anyone who loves the magic of childhood classics. 💕
✨ Skill Level
Intermediate – Includes shaping, color changes, and clothing assembly.
📏 Finished Size
Approx. 30–33 cm (12–13 in) tall using DK yarn and a 3 mm crochet hook.
🧵 Materials & Yarn Requirements (DK Weight)
Skin tone (light peach/beige): 130 g
Red (hair, hearts, bow tie, stripes): 120 g
White (apron, collar, shirt, socks, hat trim): 170 g
Blue (dress, overalls, hat): 180 g
Black (shoes, embroidery): 70 g
10 mm safety eyes (4 total)
2 small white buttons
Blue ribbon for braids
Polyester stuffing
3.0 mm hook
Tapestry needle, stitch markers
🔤 Abbreviations (US Terms)
MR – Magic Ring
sc – Single Crochet
inc – Increase (2 sc in same stitch)
dec – Decrease (sc 2 together)
ch – Chain
sl st – Slip Stitch
BLO – Back Loop Only
FLO – Front Loop Only
FO – Fasten Off
❤️ Raggedy Ann
🧍 Head
R1 MR 6
R2 inc x6 (12)
R3 (1 sc, inc) x6 (18)
R4 (2 sc, inc) x6 (24)
R5 (3 sc, inc) x6 (30)
R6 (4 sc, inc) x6 (36)
R7–16 sc around (36)
Insert eyes between R10–11, 7 sts apart.
Embroider:
• Small red triangle nose
• Curved red smile
• Black lashes
R17 (4 sc, dec) x6 (30)
R18 (3 sc, dec) x6 (24)
R19 (2 sc, dec) x6 (18)
Stuff firmly.
R20 (1 sc, dec) x6 (12)
R21 dec x6 (6) FO.
👂 Ears (2)
MR 6
(1 sc, inc) x3 (9)
1 round sc
Flatten and sew slightly below eye line.
💇 Hair & Braids
Cut approx. 90 strands of red yarn, 15 cm long.
Attach along a clear center part using lark’s head knots.
Divide into two thick low pigtails and braid each.
Tie with blue ribbon bows.
👗 Body Base
R1 MR 6
R2 inc x6 (12)
R3 (1 sc, inc) x6 (18)
R4 (2 sc, inc) x6 (24)
R5 (3 sc, inc) x6 (30)
R6–10 sc around (30)
Stuff as you go.
👚 Blouse & Puff Sleeves (Integrated)
Switch to white at R11.
R11–15 sc around (30)
Puff Sleeves (worked directly from body)
At each side (5 stitches):
Row 1 ch 1, turn, 5 sc
Row 2 inc, 3 sc, inc (7)
Row 3 sc across (7)
Row 4 (sc, dec) x2, sc (5)
FO and repeat opposite side.
This creates rounded puff sleeves.
💙 Dress Bodice
Attach blue at waist.
R16–18 sc around (30)
👗 Full Gathered Skirt
R19 (sc, inc) around (45)
R20 sc (45)
R21 (2 sc, inc) around (60)
R22–25 sc (60)
Scalloped Hem
Work in FLO of final round:
(sc, skip 1, 5 dc in next, skip 1) repeat.
FO.
🤍 White Collar
Ch 24
Row 1–2 sc
Row 3 (sc, skip 1, 5 dc in next, skip 1)
Shape into rounded collar and sew around neckline.
🤍 Apron
Skirt
Ch 36
Rows 1–4 sc
Rows 5–8 inc at both ends each row for flare
Add scalloped edge.
Bib
Ch 14
Work 10 rows sc
Attach bib to skirt.
Add long waist ties.
Sew small red heart on lower right side.
🧦 Legs & Striped Socks
Shoes (Black with White Toe Patch)
R1 MR 6
R2 inc x6 (12)
R3 (1 sc, inc) x6 (18)
R4 (2 sc, inc) x6 (24)
R5–6 sc
Switch center 8 sts to white for toe
Return to black
Shape heel down to 18 sts
Socks
White 2 rounds
Red 2 rounds
White 2 rounds
Red 2 rounds
White 2 rounds
Continue in skin tone for thigh.
💙 Raggedy Andy
🧍 Head & Hair
Head same as girl.
Cut 70 shorter red strands (10–12 cm).
Attach densely over scalp.
Trim slightly uneven for shaggy texture.
👕 Shirt
Work body to R10 in skin tone.
Switch to white:
R11–15 sc around (30)
👖 Overalls
Switch to blue:
R16–20 sc around (30)
Increase for hip fullness:
R21 (sc, inc) around (45)
R22–28 sc (45)
👖 Pant Legs
Divide evenly.
Each leg:
Work 22 sts in joined rounds
Work 18–20 rounds
Cuffs
Work 1 round in FLO
Next round loose sl st
Fold upward and tack down.
🎀 Suspenders
Ch 25 (make 2).
Sew crossed at back and attach to front waistband.
Add small white buttons at ends.
❤️ Bow Tie
Ch 6
3 rows sc
Wrap center tightly
Sew under chin.
🧢 Cap
R1 MR 6
R2 inc x6 (12)
R3 (1 sc, inc) x6 (18)
R4 (2 sc, inc) x6 (24)
R5 (3 sc, inc) x6 (30)
R6 (4 sc, inc) x6 (36)
R7–9 sc
Switch to white:
R10 FLO (sc, inc) around (54)
R11 sc
Embroider subtle decorative stitches.
🧵 Assembly
• Sew heads securely to bodies
• Attach arms slightly forward
• Position legs outward for balance
• Dress girl with blouse, collar, skirt, apron
• Dress boy with shirt, overalls, suspenders
• Attach cap and bow tie
• Add blush for warmth
🌟 Finishing Touch
Your Raggedy Ann & Andy crochet dolls are complete — full of nostalgic sweetness and handmade love. 💞
Ann’s ruffled apron and candy-cane socks pair perfectly with Andy’s tidy blue pants and checked cap, making them a timeless heirloom duo that will melt hearts for generations.


Grazie sono bellissimi tutti proverò a farne qualcuno grazie di nuovo sei bravissima
Thank you for it is nice