Welcome to the soft and snuggly world of amigurumi! 🐰✨ Today, I’m excited to share my free crochet pattern for a Rabbit Plushie—a cuddly and charming bunny perfect for gifting, décor, or simply adding an irresistibly huggable friend to your handmade collection! 🌸 Whether you love crafting adorable animal figures, enjoy making plushie-style designs, or simply want to stitch up a lovable rabbit companion, this pattern will guide you through creating a beautifully detailed bunny with floppy ears and a cozy shape! 🤍
This design embraces gentle textures and expressive details, making it a wonderful project for all skill levels! 🧶🌿 I’ve carefully outlined each step to ensure your Rabbit Plushie turns out just right—ready to snuggle into any space or become a cherished handmade gift! 🎁 So grab your hooks, pick out soft pastel tones or classic neutral shades, and let’s stitch up a delightful bunny full of warmth and charm! ✨
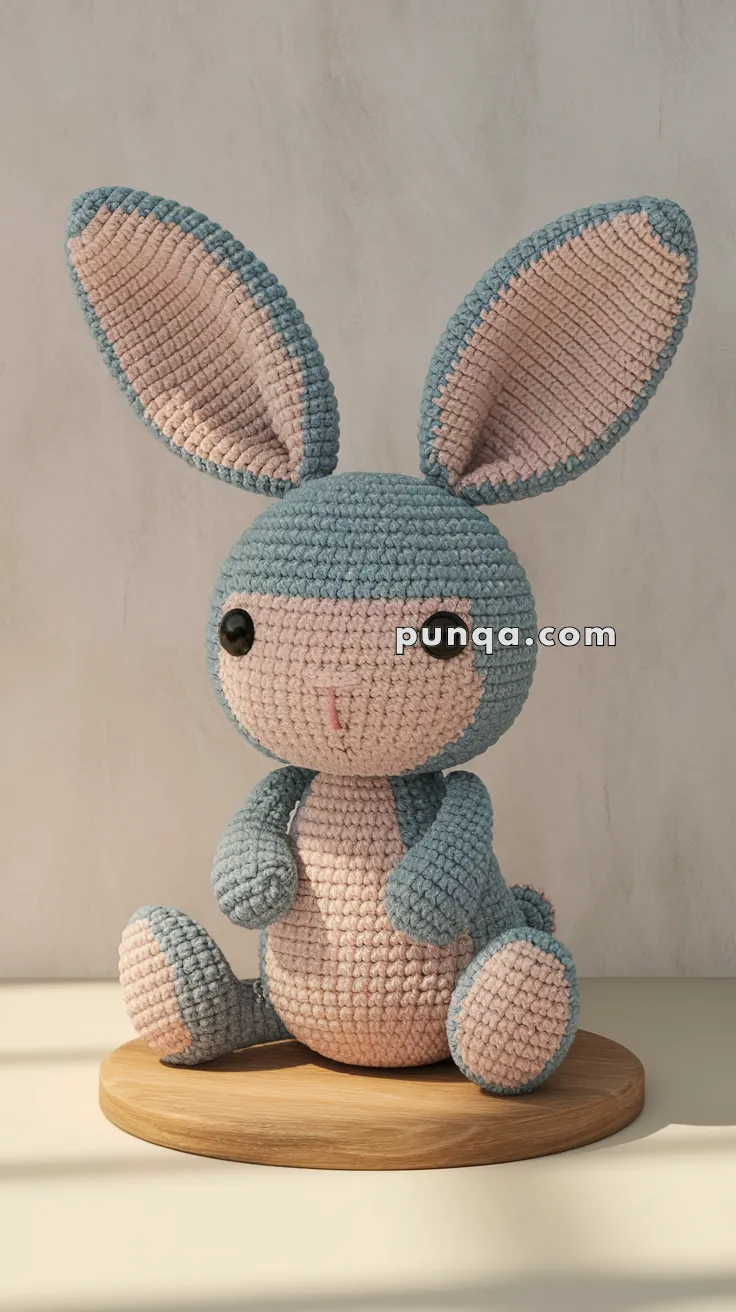
🐰 Amigurumi Bunny Plushie Crochet Pattern
Looking for a sweet and cuddly project to brighten your day? This beginner-friendly amigurumi bunny is perfect for gifting or decorating a nursery with handmade charm!
🧶 Skill Level: Easy – suitable for beginners
📏 Finished Size: Approx. 25–30 cm tall using plush/velvet yarn and a 4 mm hook
✂️ Materials
-
Velvet or chenille yarn in 2 colors:
-
Color A: Light blue (main body)
-
Color B: Light pink (belly, face, ear inside, paw pads)
-
-
4.0 mm crochet hook
-
14–16 mm safety eyes
-
Fiberfill stuffing
-
Stitch marker
-
Tapestry needle
-
Optional: pink embroidery floss for nose
🧵 Abbreviations (US Terms)
-
MR – Magic Ring
-
sc – Single Crochet
-
inc – Increase (2 sc in one stitch)
-
dec – Decrease (sc two stitches together)
-
sl st – Slip Stitch
-
st – Stitch
-
FO – Fasten Off
🧠 Head (Start with Color B – pink)
-
MR, 6 sc (6)
-
inc x6 (12)
-
(sc, inc) x6 (18)
-
(2 sc, inc) x6 (24)
-
(3 sc, inc) x6 (30)
-
(4 sc, inc) x6 (36)
-
(5 sc, inc) x6 (42)
8–14. sc around (42) -
(5 sc, dec) x6 (36)
-
(4 sc, dec) x6 (30)
Switch to Color A (blue) -
(3 sc, dec) x6 (24)
-
(2 sc, dec) x6 (18)
-
(sc, dec) x6 (12)
-
dec x6 (6)
FO, close hole, weave in yarn.
Insert safety eyes between Rounds 10–11, approx. 8 stitches apart.
🐰 Body (Color A)
-
MR, 6 sc (6)
-
inc x6 (12)
-
(sc, inc) x6 (18)
-
(2 sc, inc) x6 (24)
-
(3 sc, inc) x6 (30)
-
(4 sc, inc) x6 (36)
7–14. sc around (36) -
(4 sc, dec) x6 (30)
-
(3 sc, dec) x6 (24)
-
(2 sc, dec) x6 (18)
-
(sc, dec) x6 (12)
-
dec x6 (6)
Stuff firmly, FO and close.
🦵 Legs (Make 2 – Start with Color B for paw, switch to Color A)
-
MR, 6 sc (6)
-
inc x6 (12)
-
(sc, inc) x6 (18)
4–6. sc around (18) -
(sc, dec) x6 (12)
8–11. sc around (12)
Stuff lightly, FO and leave tail for sewing.
💪 Arms (Make 2 – Start with Color B, switch to Color A)
-
MR, 6 sc (6)
-
inc x6 (12)
3–5. sc around (12) -
(sc, dec) x4 (8)
7–10. sc around (8)
Stuff lightly, FO and leave tail for sewing.
👂 Ears (Make 2 of each color)
Inner (Color B)
-
Ch 6, sc in 2nd ch from hook and next 3, 3 sc in last ch, turn to other side, sc 3, 2 sc in last (12)
-
inc, sc 3, inc x3, sc 3, inc x2 (18)
-
sc around (18)
FO
Outer (Color A)
Repeat the same. Place inner and outer parts together and sc around edge using Color A to join. Leave tail for sewing.
🐇 Tail (Color A)
-
MR, 6 sc (6)
-
inc x6 (12)
-
(sc, inc) x6 (18)
-
sc around (18)
-
(sc, dec) x6 (12)
-
dec x6 (6)
FO, stuff lightly, sew to body.
😽 Face
-
Embroider the nose with pink yarn (a vertical stitch)
-
Add optional blush with soft pink yarn or pastel
-
Whiskers: Use white thread if desired
🧷 Assembly
-
Sew the ears to the top of the head
-
Sew head to body
-
Attach arms slightly downward from the head seam
-
Sew legs to the bottom sides
-
Sew tail to the back
-
Add final details
You’ve just completed your own soft and squishy bunny friend – great job! 🧵 Whether it’s for a child, a loved one, or just to keep for yourself, this handmade bunny is sure to bring smiles. 🐇💖