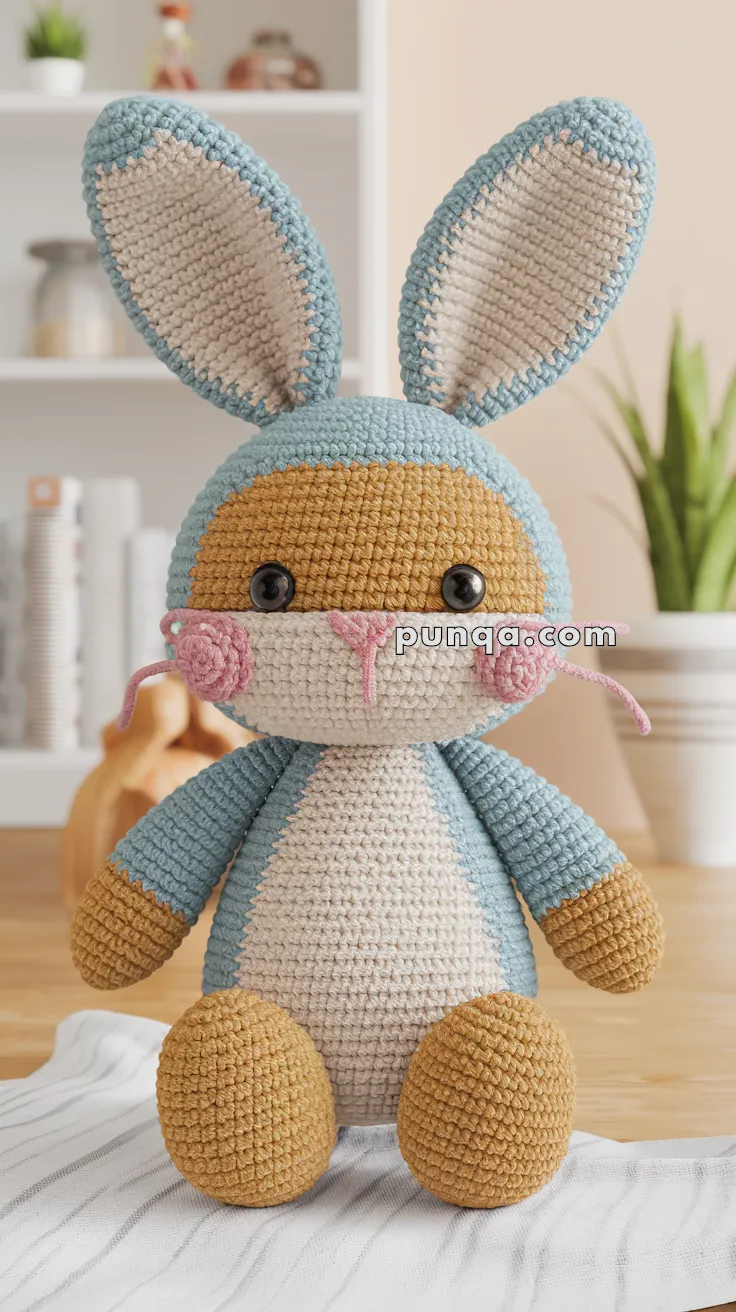
Say hello to the Amigurumi Rabbit Hopper, a snuggly little bunny that’s dressed to charm in the softest pastels! 🐰🧶 With his huggable body, big floppy ears, sweet pink cheeks, and cozy hoodie in baby blue, camel, and cream, Hopper is the perfect blend of comfort and cuteness. Whether you’re crafting for springtime, Easter, or adding a gentle touch to nursery decor, this bunny brings warmth and whimsy to every stitch.
Perfect for crocheters who love soft textures and playful details, this pattern invites you to create a plush companion full of personality and heart. Add a tiny carrot, stitch a matching hoodie for a friend, or perch Hopper among other woodland pals for a delightful display. The Amigurumi Rabbit Hopper is a joyful way to stitch up sweetness, serenity, and a sprinkle of handmade magic—one loop at a time! 🧵✨🌸
🐰 Amigurumi Rabbit Hopper Crochet Pattern
Meet Hopper, the irresistibly huggable amigurumi bunny with a soft pastel hoodie, big floppy ears, and sweet pink cheeks! His cozy color palette of baby blue, camel, and cream gives a warm handmade charm that’s perfect for springtime, Easter, or nursery decor.
✨ Skill Level
Beginner-to-Intermediate – Uses basic stitches, color changes, and simple shaping.
📏 Finished Size
Approximately 10–11 inches (25–28 cm) tall when using DK or light worsted yarn and a 3.0 mm hook.
🧶 Materials
Yarn (DK or light worsted weight):
-
Camel / Golden Brown – 40 g (face mask, arms, feet, back head)
-
Light Blue – 45 g (hood, outer ears, upper body, arms)
-
Beige / Cream – 30 g (belly, inner ears, muzzle)
-
Pink – 5 g (cheeks, nose, whiskers)
Tools & Notions
-
3.0 mm crochet hook
-
10–12 mm safety eyes
-
Tapestry needle
-
Stitch marker
-
Scissors
-
Poly-fiberfill stuffing
🧵 Abbreviations (US Terms)
MR = Magic Ring
sc = Single Crochet
inc = Increase (2 sc in same st)
dec = Decrease (sc 2 tog)
sl st = Slip Stitch
ch = Chain
FO = Fasten Off
🐇 Head – Golden Brown → Beige
1️⃣ MR 6 sc (6)
2️⃣ inc ×6 (12)
3️⃣ (1 sc, inc) ×6 (18)
4️⃣ (2 sc, inc) ×6 (24)
5️⃣ (3 sc, inc) ×6 (30)
6️⃣ (4 sc, inc) ×6 (36)
7–12️⃣ sc around (36) ← upper head in golden brown
13–18️⃣ switch to beige for snout area, sc around (36)
Place eyes between Rounds 10–11, 8 sts apart. Stuff firmly.
19️⃣ (4 sc, dec) ×6 (30)
20️⃣ (3 sc, dec) ×6 (24)
21️⃣ (2 sc, dec) ×6 (18)
22️⃣ (1 sc, dec) ×6 (12)
23️⃣ dec ×6 (6) → FO and close.
👂 Ears – (Outer Blue ×2, Inner Beige ×2)
Inner Ear (Beige)
1️⃣ ch 7; sc in 2nd ch from hook and next 4, 3 sc in last st.
Work on opposite side: sc 4, inc in last st (14)
2️⃣ (sc 5, inc) ×2 (16)
3️⃣ sc around (16)
4️⃣ inc at each curve corner → sc around (18)
5️⃣ sc around (18) ← added round for photo-length ears
FO, leave tail.
Outer Ear (Blue)
Repeat same pattern (through R5) in light blue.
Place inner ear on outer ear, whipstitch edges together.
Fold base slightly and sew to top of head angled slightly backward.
🧍 Body – Beige → Blue
1️⃣ MR 6 sc (6)
2️⃣ inc ×6 (12)
3️⃣ (1 sc, inc) ×6 (18)
4️⃣ (2 sc, inc) ×6 (24)
5️⃣ (3 sc, inc) ×6 (30)
6️⃣ (4 sc, inc) ×6 (36)
7–9️⃣ sc around in beige (36) ← elongated belly panel for photo accuracy
🔟 switch to light blue, R10–R15 sc around (36)
16️⃣ (4 sc, dec) ×6 (30)
17️⃣ (3 sc, dec) ×6 (24)
18️⃣ (2 sc, dec) ×6 (18)
Stuff firmly.
19️⃣ (1 sc, dec) ×6 (12)
20️⃣ dec ×6 (6) → FO and close.
💪 Arms (×2 – Blue + Brown Cuffs)
1️⃣ With golden brown: MR 6 sc (6)
2️⃣ inc ×6 (12)
3–4️⃣ sc around (12)
5️⃣ switch to light blue and sc around (12)
6–11️⃣ sc around (12)
Stuff lightly. FO with tail for sewing.
🦶 Legs (×2 – Golden Brown)
1️⃣ MR 6 sc (6)
2️⃣ inc ×6 (12)
3️⃣ (1 sc, inc) ×6 (18)
4–8️⃣ sc around (18) ← extra even round for fuller oval shape
9️⃣ (1 sc, dec) ×6 (12)
10–12️⃣ sc around (12)
Stuff and FO with long tail.
🩶 Belly Patch (Beige) (optional flat appliqué)
ch 7, sc in 2nd ch from hook and next 4, 3 sc in last st, work back along chain: sc 4, inc in last st (14)
Next round increase evenly to 18 sts.
FO and sew to front center of body (beige portion aligns with head color break).
💗 Cheeks & Nose (Pink)
Cheeks ×2
MR 6 sc (6)
R2 inc ×6 (12)
Stuff lightly for puffiness and FO with tail.
Sew below eyes, centered on beige snout area.
Nose & Whiskers
Embroider a small inverted triangle nose between cheeks with vertical line down.
For whiskers, ch 20 and attach ends beside nose for two thin cords per side.
🧵 Assembly
1️⃣ Sew head to body (center seam aligned vertically).
2️⃣ Attach arms at shoulder level slightly forward so they angle outward.
3️⃣ Sew legs to front bottom edge so bunny sits upright.
4️⃣ Sew ears with slight curve backward.
5️⃣ Add cheeks, nose, and whiskers.
6️⃣ Weave in all ends neatly.
💡 Pro Tips
-
For the soft plush look, use cotton blend yarn with a tight stitch tension.
-
Shape ears with light steam and pinch the bases until dry.
-
To make Hopper sit steadily, place a flat pebble or bead bag in the base before final stuffing.
🎨 Finishing Touch
Lightly blush cheeks with pink pastel (optional).
Steam the ears briefly to soften and shape if needed.
Your bunny’s blue hoodie look is complete — round face, long ears, and adorable puffed cheeks just like in the photo!
🐇 Hopper’s Personality
Hopper is the perfect balance of cute and comfort — a little woodland friend that feels both retro and modern. Whether you gift him for Easter or use him as nursery decor, his soft tones and gentle expression will make any heart melt.
Happy crocheting and enjoy watching your adorable Hopper come to life! 🧶💙