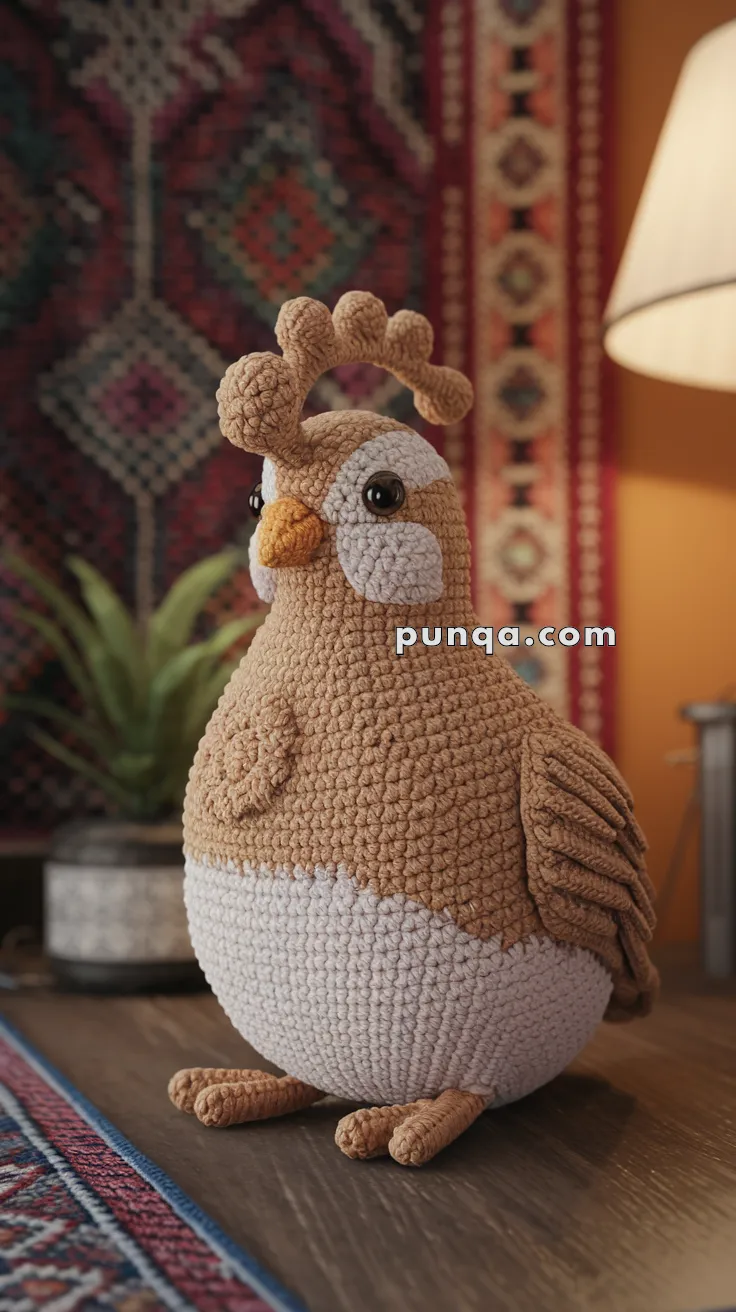
Meet the Amigurumi Quail, a tiny bundle of charm inspired by one of nature’s most endearing birds! 🐦🧶 With its plump little body, soft coloring, and signature topknot plume, this crochet cutie captures all the gentle personality of a real quail in a huggable handmade form. Whether nestled in a woodland-themed display, perched on a shelf, or gifted to a bird-loving friend, it’s a delightful way to bring a touch of nature indoors.
Perfect for crocheters who love sweet details and cozy shapes, this pattern invites you to play with soft yarns and subtle colorwork. Add a tiny egg, stitch up a whole covey of quail, or personalize your bird with a splash of whimsy. The Amigurumi Quail is a joyful way to stitch up serenity, sweetness, and a sprinkle of handmade woodland magic—one loop at a time! 🧵🌿
🪶 Amigurumi Quail Crochet Pattern
This delightful quail, with its round plush body and signature bobbled crest, captures the cozy charm of woodland life. Designed for plush yarn, this pattern creates a beautifully balanced bird with sculpted wings, textured details, and a graceful stance — perfect for display or gifting.
✨ Skill Level
Intermediate to Advanced – shaping, texture ridges, assembly precision.
📏 Finished Size
Approx. 8–10 inches (20–25 cm) tall when made with plush or velvet yarn and a 4 mm hook.
🧶 Materials
- Light brown yarn – Body, head, wings, crest (≈ 80 g)
- Soft beige yarn – Lower belly and face patches (≈ 40 g)
- Orange yarn – Beak (≈ 5 g)
- Small amount of black or dark brown yarn – Eye details
- 12 mm safety eyes (or embroidered eyes for small children)
- Polyfill stuffing
- 4 mm crochet hook
- Tapestry needle, stitch marker, scissors
- Optional: thin craft wire (for crest shaping and leg support)
🧵 Abbreviations (US Terms)
MR – Magic Ring
sc – Single Crochet
inc – Increase (2 sc in same st)
dec – Decrease (sc2tog)
ch – Chain
sl st – Slip Stitch
BLO – Back Loop Only
FO – Fasten Off
🪺 BODY + HEAD (Worked as One Piece)
Start with beige yarn for the lower belly.
R1: MR, 6 sc (6)
R2: inc × 6 (12)
R3: (1 sc, inc) × 6 (18)
R4: (2 sc, inc) × 6 (24)
R5: (3 sc, inc) × 6 (30)
R6: (4 sc, inc) × 6 (36)
R7: (5 sc, inc) × 6 (42)
R8: (6 sc, inc) × 6 (48)
R9–14: sc around (48)
Switch to light brown yarn.
R15–25: sc around (48)
R26: (6 sc, dec) × 6 (42)
R27: (5 sc, dec) × 6 (36)
R28: (4 sc, dec) × 6 (30)
R29: (3 sc, dec) × 6 (24) — begin firm stuffing
R30–31: sc around (24) → forms neck and start of head
R32: (2 sc, dec) × 6 (18)
R33: (1 sc, dec) × 6 (12) — stuff head well for shape
R34: dec × 6 (6) → FO, close tightly
💡 Shape note: The body and head form a smooth, continuous oval silhouette—no seam line between them. The beige section should make up about 60% of the total height.
🎭 FACE DETAILS
Face Patches (Make 2)
With beige yarn:
MR, 6 sc → inc × 6 (12) → (1 sc, inc) × 6 (18), FO.
Flatten slightly into oval shape.
Sew patches symmetrically below the eye line, curving gently toward the beak area. Eyes should sit centered over each patch.
Beak
With orange yarn:
MR, 4 sc → sc around → dec × 2 → FO.
Stuff lightly and sew between face patches, slightly below eye level.
Eyes
Insert 12 mm safety eyes between R29–R31, about 6 sts apart (centered above the face patches).
🪶 CREST (Bobble-Style – Make 5 Connected Bubbles)
With light brown yarn:
R1: MR, 6 sc (6)
R2: inc × 6 (12)
R3–4: sc around (12)
R5: (sc, dec) × 4 (8)
R6: sc around (8) → FO, stuff lightly.
Make 5 small bubbles and stitch them together side-by-side in a curved line.
Sew to the top of the head, angling backward at ≈45° to create a gentle C-shape curve.
(Optional: thread thin wire through the bubbles for a permanent curve.)
🪽 WINGS (Make 2)
With light brown yarn:
R1: MR, 6 sc (6)
R2: inc × 6 (12)
R3: (1 sc, inc) × 6 (18)
R4: (2 sc, inc) × 6 (24)
R5–8: sc around (24)
To form the feathered edge:
R9: Work [sl st, ch 3, sl st] in every 3rd st around (creates scalloped ridges). FO.
Stuff very lightly and sew wings at R18–R20 of the body, angling slightly downward and backward for a natural posture.
💡 Steam-blocking tip: Hold a steamer or iron 2–3″ above wings for 5–10 seconds to set the curved pleats.
👣 FEET (Make 2)
With light brown yarn:
R1: MR, 6 sc (6)
R2: inc × 6 (12)
R3–6: sc around (12)
Divide into three toes:
- Ch 5, sc back (4)
- Sl st into base, ch 5 again for middle toe, sc back (4)
- Repeat one more time for third toe.
Stuff the toes lightly and sew flat under the belly.
Space feet 2–3″ apart (toe tip to toe tip) for balance.
💡 Add thin wire inside the leg or toes for extra standing support.
🪻 TAIL (Textured Feathers)
With light brown yarn:
Ch 10 → sc in 2nd ch, hdc, dc × 4, hdc, sc, ch 1, rotate, work back in BLO.
Repeat for 3–4 feathers.
Sew them overlapping in a fan shape on the back base (slightly upward angle).
💨 STUFFING & SHAPING
- Stuff body firmly (especially the lower belly) for stability.
- Add a small weight (poly-pellets or a flat washer wrapped in fabric) inside the bottom to keep it standing upright.
- The head should be slightly softer for a natural dome.
✂️ FINISHING TOUCHES
- Optional: embroider a small nostril dot with dark yarn.
- Add subtle shading with fabric blush for realism.
- For a secure display: tack the feet to a small wooden slice or heavy felt base using invisible thread.
⚙️ TROUBLESHOOTING
Bird tips forward? → Add more weight to base or widen stance.
Crest bubbles don’t curve? → Insert thin wire or tack with invisible thread.
Wings lie too flat? → Re-fold BLO ridge sharply and steam-block again.
🕒 TIME ESTIMATE
Allow 8–12 hours total:
- 4–6 hours for body and head
- 2–3 hours for wings and crest
- 1–2 hours for assembly and finishing
🧶 Yarn Suggestions
For soft texture and structure:
- Bernat Velvet or Himalaya Dolphin Baby (plush look)
- Paintbox Simply Aran Cotton for crisp shaping
For delicate lace edge accents (optional), use Scheepjes Catona in fine cotton.
🌿 Final Display
Your amigurumi quail should stand naturally with its round body, bobbled crest curving gently backward, and wings tilted gracefully down its sides.
It’s a beautiful woodland accent — whether perched on a log slice, nestled among pinecones, or gifted as a symbol of peace and nature. 🪶💛