Oh, the joys of creating amigurumi! 🌟 There’s something absolutely enchanting about taking a simple ball of yarn and transforming it into a cuddly, lovable figure. One of my favorite creations has to be the “Punisher” amigurumi. With its stern look and unmistakable comic book appeal, it’s a fun project that blends both cuteness and toughness. The magic of amigurumi lies in its ability to bring characters to life stitch by stitch, and the Punisher is no exception. It’s a crafty challenge that keeps me hooked and eager to see the finished product, and I think you’ll find it just as delightful!
Embarking on the journey of crafting a Punisher amigurumi is like an adventure in yarn-land. The process begins by selecting the perfect yarn — something dark and mysterious, yet inviting. 🧶 Then, with a trusty crochet hook in hand, I follow a pattern that guides me through creating each segment of the figure, from the iconic skull emblem to the sinister scowl. It’s like piecing together a puzzle, where each stitch holds the promise of a recognizable feature. Adding those final touches, like the tiny weapon accessories or a detailed costume, always fills me with a sense of accomplishment and joy.
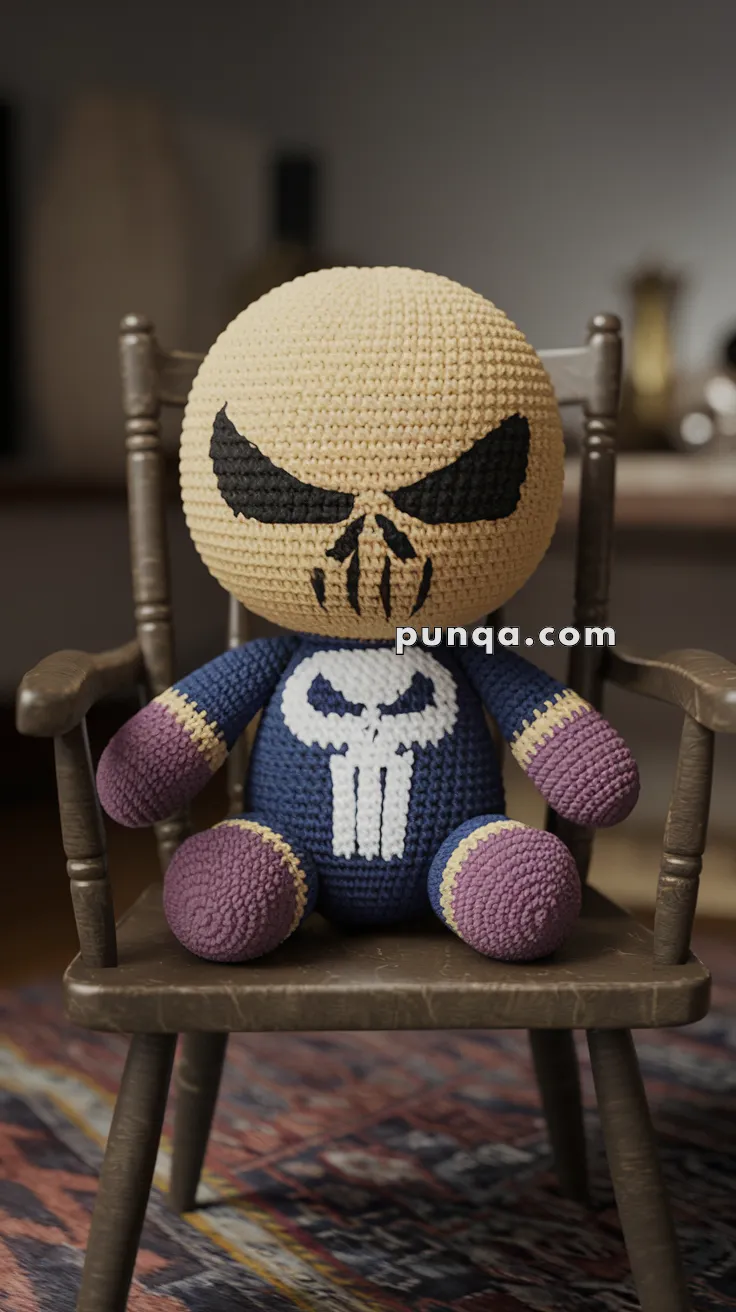
💀 Amigurumi Punisher-Inspired Doll Crochet Pattern
Channel the gritty charm of a classic antihero with this bold amigurumi doll! With a skull emblem on his chest, stern stitched eyes, and a no-nonsense design, this is the perfect piece for comic fans and collectors alike.
✨ Skill Level
Intermediate – Involves color changes, simple embroidery, and character-based detail.
📏 Finished Size
Approx. 22–25 cm (9–10 inches) tall using worsted-weight yarn and a 3.5 mm hook.
🧶 Materials
Yarn (Worsted weight):
-
Beige (Head)
-
Navy or deep blue (Body, arms)
-
White (Skull emblem, face lines)
-
Black (Eyes, skull details)
-
Purple or maroon (Hands and feet)
-
Yellow (Arm/leg edge accents)
Other Supplies:
-
3.5 mm crochet hook
-
10 mm safety eyes (optional, face can be embroidered instead)
-
Polyester stuffing
-
Tapestry needle
-
Stitch marker
🧵 Abbreviations (US Terms)
-
MR – Magic Ring
-
sc – Single Crochet
-
inc – Increase
-
dec – Decrease
-
ch – Chain
-
sl st – Slip Stitch
-
BLO – Back Loop Only
-
FO – Fasten Off
🧠 Head (Beige)
-
MR, 6 sc
-
inc x6 (12)
-
(1 sc, inc) x6 (18)
-
(2 sc, inc) x6 (24)
-
(3 sc, inc) x6 (30)
-
(4 sc, inc) x6 (36)
7–16. sc (36) -
(4 sc, dec) x6 (30)
-
(3 sc, dec) x6 (24)
-
(2 sc, dec) x6 (18)
Stuff firmly -
(1 sc, dec) x6 (12)
-
dec x6 (6), FO and close
Embroider black eyes as shown using triangle or crescent shapes starting from rounds 10–12. Optionally, stitch down the nose/skull pattern lines with black yarn at the center base of the face.
👕 Body (Navy)
-
MR, 6 sc
-
inc x6 (12)
-
(1 sc, inc) x6 (18)
-
(2 sc, inc) x6 (24)
5–10. sc (24)
11–17. sc (24) – add white skull emblem on chest using surface crochet or felt applique -
(2 sc, dec) x6 (18)
Stuff firmly -
(1 sc, dec) x6 (12)
-
dec x6 (6), FO and close
💀 Skull Emblem (White)
Option 1: Embroidered or Crocheted Surface Details
Use white yarn to:
-
Create oval skull
-
Add extended rectangle lines beneath (resembling teeth)
-
Outline top of skull with eyes and nose holes using black yarn
Option 2: Felt Appliqué
Cut white felt into a skull shape and glue or sew to chest
🦾 Arms (Make 2 – Navy → Yellow stripe → Purple)
Start with navy:
-
MR, 6 sc
-
inc x6 (12)
3–6. sc (12)
Switch to yellow: -
sc (12)
Switch to purple:
8–10. sc (12), lightly stuff
FO and sew to sides of body
🦵 Legs (Make 2 – Purple → Yellow → Navy)
Start with purple:
-
MR, 6 sc
-
inc x6 (12)
3–5. sc (12)
Switch to yellow: -
sc (12)
Switch to navy:
7–10. sc (12), stuff
FO and sew to bottom of body
🧷 Final Assembly
-
Sew head to body securely
-
Attach arms and legs
-
Embroider the skull lines if not using appliqué
-
Optional: Add belt or tiny ammo pouches using black yarn surface stitches
💡 Customization Ideas
-
Turn into a chibi superhero series by changing emblems and colors
-
Add a mini weapon accessory
-
Use glow-in-the-dark thread for the skull!
This tough little guy might be small, but he’s packed with character and comic-book charm! 🧶💀🦸♂️