Step into a world of magic and adventure with this Amigurumi Princess Jasmine crochet pattern! 🕌✨ With her flowing hair, elegant outfit, and adventurous spirit, this design brings the beloved Disney princess to life in yarn form. Whether you’re crafting for a Disney fan, a themed décor piece, or simply love character-inspired amigurumi, this FREE pattern is a fantastic addition to your collection.
Designed for intermediate crocheters, this pattern allows for customization in outfit details, facial features, and even tiny accessories like a miniature magic lamp or a jeweled tiara to enhance Jasmine’s regal charm. Choose classic teal and gold hues for an authentic look or experiment with bold shades for a creative twist! Whether displayed alongside Aladdin and Genie or gifted to a fellow crochet enthusiast, this amigurumi Princess Jasmine is sure to impress. Grab your hook, select your favorite yarn, and let’s bring this adventurous princess to life—one stitch at a time! 🧶✨
👑 Amigurumi Princess Jasmine Crochet Pattern
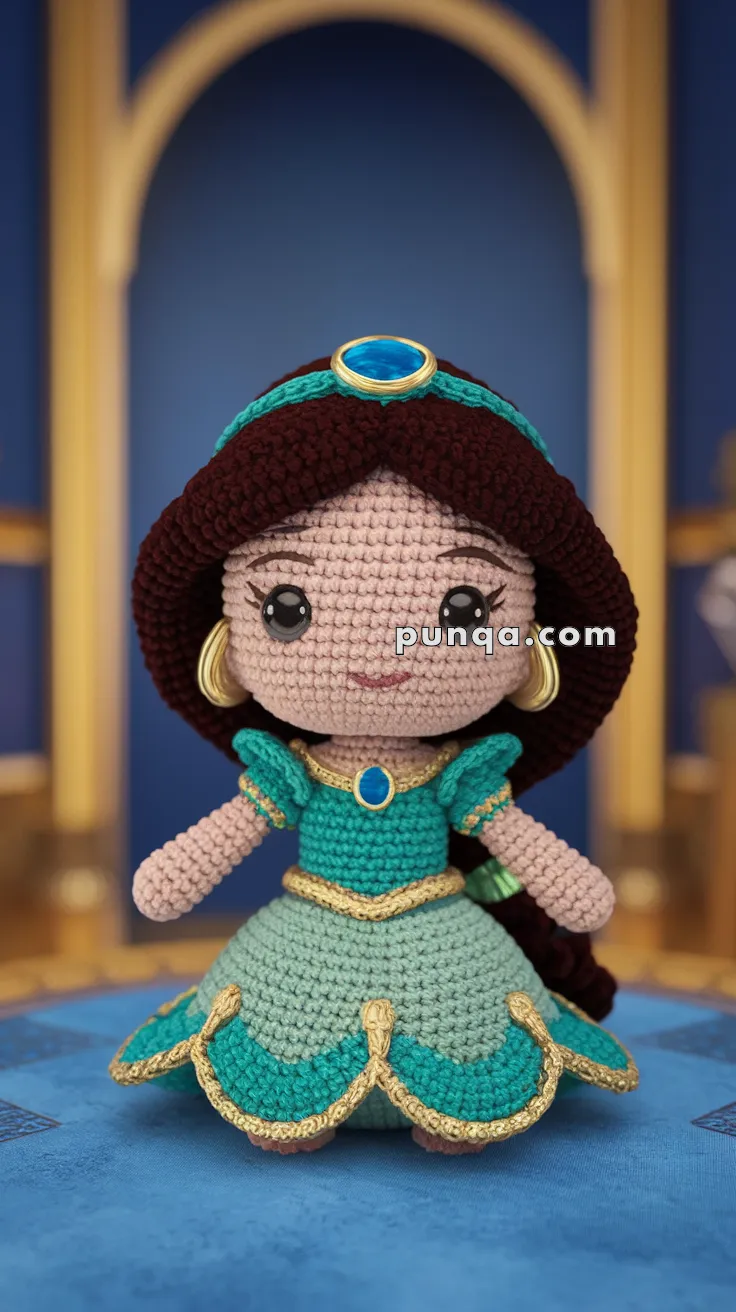
This elegant princess doll features a sculpted teal bodice, layered skirt with gold trim, long flowing hair, jeweled headband, necklace, and earrings. Her soft facial expression, big sparkling eyes, and graceful posture make her a perfect royal companion for any amigurumi collection.
✨ Skill Level
Intermediate
Includes shaping, layered garments, hair styling, and decorative embroidery.
📏 Finished Size
Approx. 20–22 cm (8–9 inches) tall
Using DK yarn and 2.5–3.0 mm hook
🧶 Materials
Yarn (DK / sport weight):
-
Skin tone (face, arms)
-
Teal (bodice, overskirt)
-
Mint green (underskirt)
-
Gold (trim, jewelry)
-
Dark brown (hair)
Other:
-
6–8 mm safety eyes
-
2.5–3.0 mm hook
-
Fiberfill stuffing
-
Tapestry needle
-
Stitch marker
-
Blue embroidery thread or bead (jewels)
🧵 Abbreviations (US)
MR – Magic Ring
sc – Single crochet
inc – Increase
dec – Decrease
ch – Chain
sl st – Slip stitch
FLO – Front loop only
BLO – Back loop only
FO – Fasten off
Worked in continuous rounds.
🌸 Head
With skin tone:
R1: MR 6
R2: inc x6 (12)
R3: (sc, inc) x6 (18)
R4: (2 sc, inc) x6 (24)
R5: (3 sc, inc) x6 (30)
R6: (4 sc, inc) x6 (36)
R7–13: sc around (36)
Insert safety eyes between R9–10, 7–8 sts apart.
R14: (4 sc, dec) x6 (30)
R15: (3 sc, dec) x6 (24)
R16: (2 sc, dec) x6 (18)
Stuff firmly.
R17: (sc, dec) x6 (12)
R18: dec x6 (6)
FO and close.
Embroider eyebrows and a small curved smile.
💇 Hair (Smooth Volume Cap + Back Curtain)
The hair in the photo is thick and smooth, not strand-based.
Hair Cap
With dark brown:
R1: MR 6
R2: inc x6 (12)
R3: (sc, inc) x6 (18)
R4: (2 sc, inc) x6 (24)
R5: (3 sc, inc) x6 (30)
R6: (4 sc, inc) x6 (36)
R7–13: sc around (36)
FO
Back Hair Curtain (for full volume)
Make 6 panels:
Ch 26
Row 1: sc across (25)
Row 2–16: sc across
FO
Sew panels side-by-side onto the back half of the hair cap.
Trim bottom evenly.
Sew hair cap securely onto head.
💎 Headband with Jewel
With teal:
Ch enough to wrap head
Row 1: sc across
FO
Sew around forehead.
Embroider or sew blue jewel at center.
👂 Earrings (Make 2)
With gold:
MR 6
Sl st around
FO
Flatten and sew to each side of head.
👗 Body (Standing Doll Base)
This doll has no visible legs. The skirt forms the base.
Start with skin tone (neck):
R1: MR 6
R2: inc x6 (12)
R3: (sc, inc) x6 (18)
R4: (2 sc, inc) x6 (24)
R5: (3 sc, inc) x6 (30)
Change to teal (bodice)
R6–10: sc around (30)
Gold trim round
R11: sc around (30)
Change to mint green (skirt)
R12: (4 sc, inc) x6 (36)
R13: (5 sc, inc) x6 (42)
R14: (6 sc, inc) x6 (48)
R15–18: sc around (48)
Stuff torso firmly.
R19: (6 sc, dec) x6 (42)
R20: (5 sc, dec) x6 (36)
R21: (4 sc, dec) x6 (30)
R22: (3 sc, dec) x6 (24)
R23: (2 sc, dec) x6 (18)
R24: (sc, dec) x6 (12)
R25: dec x6 (6)
FO and close.
👗 Underskirt (Mint Layer)
Attach mint yarn to FLO of R12.
R1: inc in each st (60)
R2–6: sc around (60)
FO
👗 Overskirt (Teal Scalloped Layer)
Attach teal to FLO of R11.
R1: (3 sc, inc) x10 (40)
R2–4: sc around (40)
Scallop edge:
(sl st, ch 3, 3 dc, ch 3, sl st) repeat around
Surface stitch gold trim along scallops.
💪 Arms (Make 2)
With skin tone:
R1: MR 6
R2: inc x6 (12)
R3–9: sc around (12)
Lightly stuff.
Flatten slightly and sew under bodice ruffles.
💎 Necklace
With gold:
Ch 12
Sl st to join
FO
Add blue jewel at center.
Sew around neck.
🪡 Assembly
-
Sew head to body
-
Attach arms
-
Attach hair
-
Add headband jewel
-
Add earrings and necklace
-
Shape skirt layers gently
💫 Done!
Your elegant Princess Jasmine amigurumi is ready to dazzle! Whether for a royal-themed collection or a treasured handmade gift, she’s sure to charm everyone who meets her.