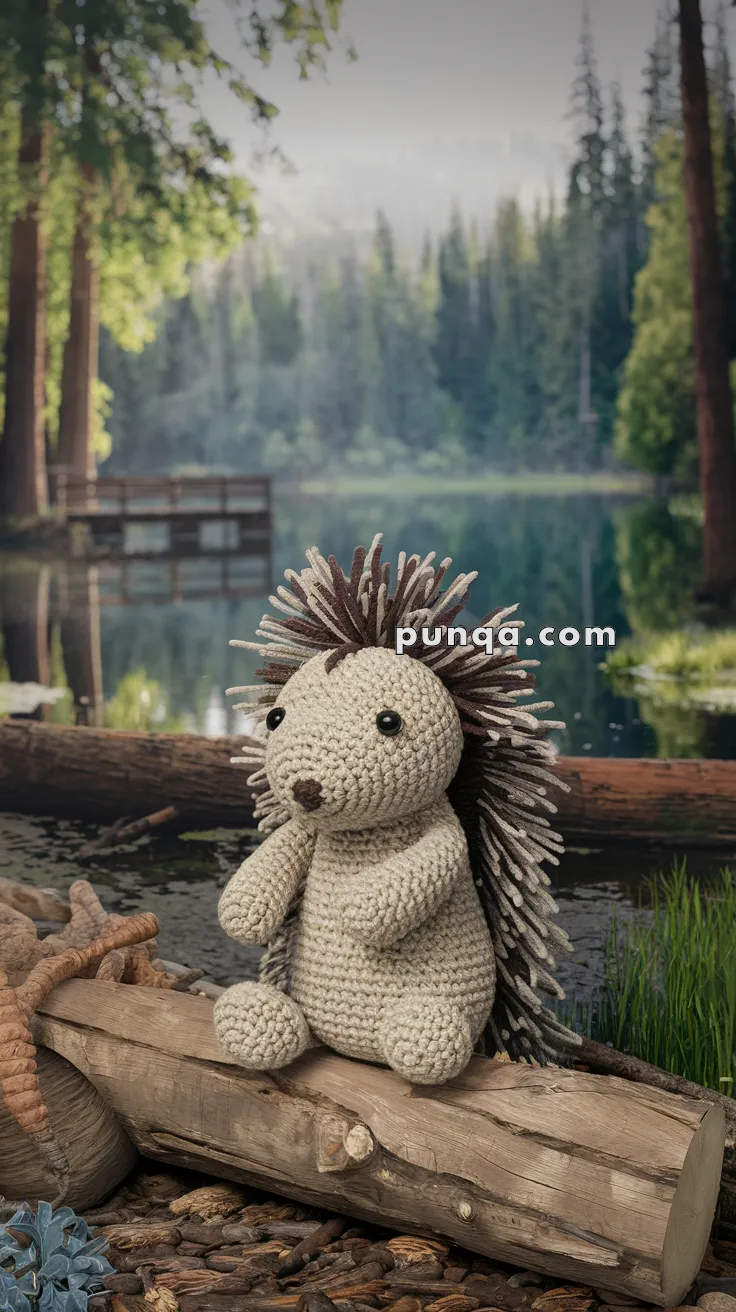
Bring the adorable charm of a Porcupine to life with this Amigurumi Porcupine crochet pattern! 🦔✨ With its soft, textured quills, tiny paws, and gentle expression, this design captures the essence of this delightful woodland creature in yarn form. Whether you’re crafting for a nature-inspired décor piece, a heartfelt gift, or simply love porcupine-themed amigurumi, this FREE pattern is a fantastic addition to your collection.
Designed for crocheters of all skill levels, this pattern allows for customization in quill textures, facial details, and even tiny accessories like embroidered markings or a miniature forest setting to enhance its personality. Choose classic earthy browns and creams for a realistic look or experiment with pastel hues for a whimsical twist! Whether displayed as part of a woodland setup or gifted to a fellow crochet enthusiast, this amigurumi porcupine is sure to impress.
Grab your hook, select your favorite yarn, and let’s bring this charming little critter to life—one stitch at a time! 🧶 🦔✨
🦔 Amigurumi Porcupine Crochet Pattern
Say hello to this soft and cuddly amigurumi porcupine — complete with playful yarn quills and a woodland charm! Whether you’re crafting for a woodland-themed nursery or a nature-loving friend, this little critter will quickly steal hearts.
✨ Skill Level
Intermediate – Involves shaping, limb assembly, and yarn fringe application for quills.
📏 Finished Size
Approx. 8–10 inches (20–25 cm) tall when using worsted weight yarn and a 3.5 mm hook.
🧶 Materials
-
Worsted weight yarn in:
-
Light Brown (Body, head, limbs)
-
Dark Brown and Cream/Beige (Quills)
-
Brown (Nose and optional eyebrows)
-
-
3.5 mm crochet hook
-
10 mm black safety eyes
-
Tapestry needle
-
Stitch marker
-
Polyfill stuffing
-
Scissors
🧵 Abbreviations (US Terms)
MR – Magic Ring
sc – Single Crochet
inc – Increase
dec – Decrease
sl st – Slip Stitch
FO – Fasten Off
ch – Chain
BLO – Back Loop Only
🦔 Head (Light Brown)
-
MR, 6 sc (6)
-
inc x6 (12)
-
(1 sc, inc) x6 (18)
-
(2 sc, inc) x6 (24)
-
(3 sc, inc) x6 (30)
-
(4 sc, inc) x6 (36)
7–13. sc around (36)
Insert safety eyes between rounds 10–11, approx. 8–9 stitches apart. -
(4 sc, dec) x6 (30)
-
(3 sc, dec) x6 (24)
-
(2 sc, dec) x6 (18)
Stuff firmly. -
(1 sc, dec) x6 (12)
-
dec x6 (6)
FO and weave tail through front loops, pull to close.
🧍 Body (Light Brown)
-
MR, 6 sc (6)
-
inc x6 (12)
-
(1 sc, inc) x6 (18)
-
(2 sc, inc) x6 (24)
-
(3 sc, inc) x6 (30)
6–14. sc around (30) -
(3 sc, dec) x6 (24)
16–17. sc around (24) -
(2 sc, dec) x6 (18)
19–20. sc around (18)
Stuff and FO, leaving tail for sewing.
🐾 Arms (Make 2 – Light Brown)
-
MR, 6 sc (6)
-
inc x6 (12)
3–6. sc around (12) -
(2 sc, dec) x3 (9)
8–11. sc around (9)
Lightly stuff and FO, leave tail to attach.
🦶 Legs (Make 2 – Light Brown)
-
MR, 6 sc (6)
-
inc x6 (12)
3–5. sc around (12) -
(2 sc, dec) x3 (9)
7–9. sc around (9)
Stuff and FO, leave tail to attach.
👃 Nose (Brown Yarn – Embroidered)
Use dark brown yarn to embroider a small oval-shaped nose centered between the eyes.
Optional: Add two small embroidered eyebrows with a few stitches above each eye.
🪶 Quills (Dark Brown + Cream Yarn Fringe)
Cut strands of dark brown and beige yarn approx. 6–7 cm long.
To attach quills:
-
Insert hook into a stitch on the back of the head/body (starting behind the ears).
-
Fold a yarn strand in half and pull loop through.
-
Pull the ends of the yarn through the loop and tighten (latch hook style).
-
Repeat over rows of stitches from the top of the head to mid-back.
Tip: Mix brown and cream yarn alternately to create texture and natural color.
Trim quills to desired spiky shape with scissors once applied.
🧵 Assembly
-
Sew head to body.
-
Attach arms on either side of the body.
-
Sew legs to bottom front of the body.
-
Fluff and trim the quills to desired fullness and shape.
💡 Customization Ideas
-
Use fuzzy yarn for a softer “fur” effect.
-
Add a small acorn or pinecone accessory to give your porcupine woodland vibes.
-
Create a loop on top to hang as woodland nursery decor!
This woodland porcupine is the perfect mix of cute and cozy — and makes a charming addition to your amigurumi forest friends collection! 🌲🦔