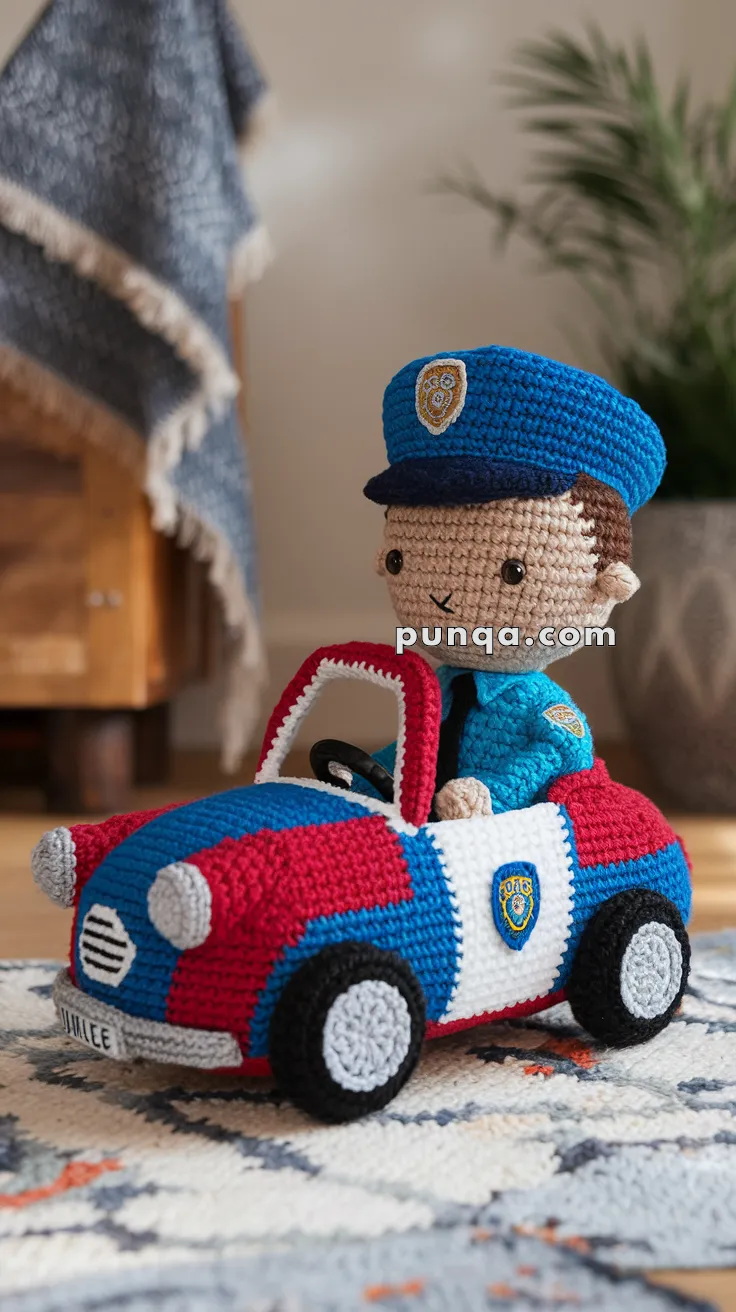
Speed into creativity with this Amigurumi Police Car crochet pattern! Whether you’re crafting for little ones who love emergency vehicles, adding a playful touch to your handmade collection, or simply enjoy making unique amigurumi designs, this free pattern lets you stitch up a charming police car bursting with personality. With its bold colors, flashing light details, and sturdy shape, this crochet police car captures the excitement of rescue missions and adventure in every stitch. Perfect for gifting to kids, decorating a themed nursery, or simply celebrating the joy of crochet, this amigurumi police car is ready to bring a touch of action-packed fun to your handmade collection! 🚔✨
Designed for customization, this pattern allows you to experiment with different color schemes, embroidered details, or even tiny accessories like a siren or miniature wheels for extra personality. Craft a classic black-and-white police cruiser, create a colorful version for a playful aesthetic, or even stitch up a full set of emergency vehicles for a fun display! Whether gifted as a thoughtful handmade keepsake, displayed as a quirky accent, or made simply for the joy of crafting, this Amigurumi Police Car is a creative and exciting project—perfect for bringing the thrill of the chase to every stitch! 🧶🚨
🚓 Amigurumi Police Car – FREE Crochet Pattern
Bring action-packed fun to your crochet collection with this adorable Police Car Amigurumi! Complete with a red-white-blue convertible car, oversized headlights, official badges, and a uniformed officer at the wheel, this project is a show-stopper for play or display.
✨ Skill Level
Advanced – Includes shaping, color changes, sewing of small parts, and decorative embroidery.
📏 Finished Size
Approx. 9 in (23 cm) long and 6 in (15 cm) tall using worsted yarn and a 3.5 mm hook.
🧶 Materials
-
Worsted Weight Yarn:
-
Color A: Blue (car base)
-
Color B: Red (hood, trunk, top sides)
-
Color C: White (doors, interior trim)
-
Color D: Black (wheels, seat, steering wheel)
-
Color E: Grey (headlights, rims, bumper)
-
Skin tone (officer head & hands)
-
Brown (hair)
-
Teal Blue (uniform shirt)
-
Navy (hat brim & pants)
-
Yellow (badges)
-
-
Other Supplies:
-
3.0–3.5 mm crochet hook
-
8–10 mm safety eyes
-
Polyfill stuffing
-
Felt pieces (optional for badges and license plate)
-
Tapestry needle
-
Thin plastic canvas or cardboard (optional for car base support)
-
Small keyring or plastic loop (optional steering wheel)
-
🧵 Abbreviations (US Terms)
MR = Magic Ring
sc = single crochet
inc = increase (2 sc in same st)
dec = decrease (sc2tog)
ch = chain
sl st = slip stitch
FO = fasten off
BLO = back loop only
🚗 Car Pattern
1. Car Base (Color A – Blue)
-
Ch 26, sc in 2nd ch from hook, sc across, 3 sc in last st.
-
Rotate, sc along other side of chain, 2 sc in final st (oval).
-
R2–4: sc around, inc at both ends each round.
-
R5–10: sc around without increases to form flat oval base.
-
FO.
(Optional: Insert a cardboard/plastic canvas oval for stiffness.)
2. Side Panels (Worked upward from base)
-
Attach yarn around base edge (approx. 65–70 sts).
-
Work in rounds upward:
-
R1–3: Blue (Color A)
-
R4–6: Switch to Red (Color B)
-
Door Panels: Switch to White (Color C) in middle section of each side.
-
Continue alternating so car body is red top, white sides, blue base.
-
-
Work 8–9 rounds total.
-
Leave car open-top (convertible style).
-
Stuff lightly as you go.
3. Hood & Trunk Panels (Color B – Red)
-
Ch 14, sc rows until width matches car body front/back.
-
Make 2 panels.
-
Sew one to the front (hood) and one to the back (trunk).
-
Stuff slightly for rounded shape.
4. Headlights (Make 2 – Grey, Color E)
-
MR, 6 sc.
-
Inc in each st (12).
-
(1 sc, inc) ×6 (18).
-
FO and stuff slightly.
-
Sew raised onto red hood, spaced evenly.
5. Wheels (Make 4)
-
With Black (Color D):
-
MR, 6 sc.
-
(inc) ×6 (12).
-
(1 sc, inc) ×6 (18).
-
-
Switch to Grey (Color E):
-
R4: sc around (18).
-
-
Make 2 pieces per wheel, sew together lightly stuffed.
-
Attach to car corners.
6. Seat (Color D – Black)
-
Ch 12, sc rows until square ~2″ (5 cm).
-
Make 2 pieces, sew together and stuff to form a padded block seat.
-
Sew inside car near back.
7. Steering Wheel
-
Option 1: Wrap black yarn around a small plastic ring, sew to dashboard.
-
Option 2 (all yarn):
-
MR, 6 sc.
-
(inc) ×6 (12).
-
BLO sc around to create rim.
-
FO and shape into a ring.
-
-
Sew to front interior.
8. Badges & License Plate
-
Embroider or applique a shield-shaped badge on each car door (navy with yellow outline and “016”).
-
Make a small white rectangle for license plate; embroider text (e.g., “JULLEE”).
-
Sew to car front.
👮 Police Officer
Head (Skin Tone)
-
MR, 6 sc.
-
(inc) ×6 (12).
-
(1 sc, inc) ×6 (18).
-
Work even for 6 rounds.
-
Insert safety eyes between rounds 4–5, 7 sts apart.
-
Embroider small smile.
-
Add short brown yarn stitches for hairline.
-
FO, stuff.
Hat
-
With Blue: MR, 6 sc.
-
(inc) ×6 (12).
-
(1 sc, inc) ×6 (18).
-
(2 sc, inc) ×6 (24).
-
Continue until ~30 sts around.
-
Work 2 rounds even.
-
With Navy: make brim: Ch 7, sl st across, attach to front.
-
Sew small embroidered/felt badge patch (shield shape, gold/yellow with “016”).
Body (Shirt – Teal, Pants – Navy)
-
Start with Teal: MR, 6 sc.
-
Increase to 18.
-
Work 6–7 rounds even.
-
Switch to Navy, work 4–5 rounds.
-
Stuff and FO.
-
Add embroidered patch on shirt sleeve (mini shield).
Arms (Make 2 – Teal)
-
MR, 6 sc.
-
Work 6–7 rounds.
-
FO, stuff lightly.
-
Sew to sides of body angled forward so they rest on steering wheel.
Assembly (Officer)
-
Sew head to body.
-
Add hat.
-
Position inside car seat.
-
Attach arms to steering wheel in “driving pose.”
✂️ Final Assembly
-
Attach wheels to car.
-
Sew headlights raised on hood.
-
Sew badges and license plate.
-
Place officer inside car, securing body and arms.
-
Adjust stuffing and shape.
🌟 Customization Ideas
-
Add a light bar on trunk with red & blue yarn (optional).
-
Make a female officer version with long hair.
-
Change badges to match your local police department.
-
Turn car into a fire truck or taxi with color swaps!
🎉 Finished Look
You now have a Police Car Amigurumi with Officer, complete with convertible design, padded seat, oversized headlights, official badges, and a proud officer at the wheel. Perfect for storytelling, playtime, or as a special handmade gift for someone in uniform. 🚨👮♀️