Bundle up for some cozy crafting with the Amigurumi Polar Bear, a sweet and snuggly crochet creation that’s perfect for wintertime fun! 🐻❄️🧶 With its soft white body, gentle expression, and cuddly shape, this chilly companion brings a heartwarming touch to your handmade collection. Whether it’s part of a snowy scene, a thoughtful gift, or a year-round buddy, this polar bear is sure to melt hearts wherever it goes.
Perfect for crocheters who love soft textures and seasonal charm, this pattern invites you to stitch up a creature full of warmth and personality. Add a tiny scarf, pair it with penguins or snowflakes, or create a whole arctic family for a festive display. The Amigurumi Polar Bear is a joyful way to stitch up winter magic, comfort, and a sprinkle of handmade charm—one loop at a time! 🧵❄️✨
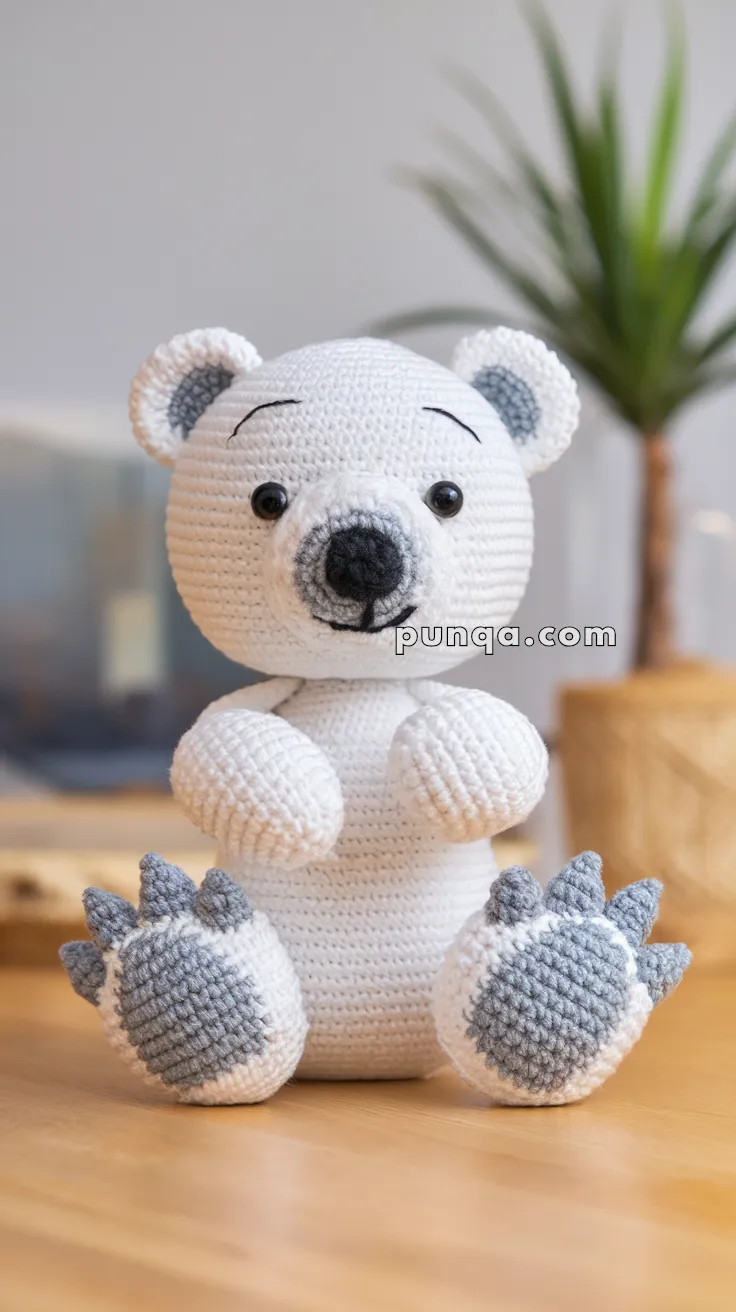
🐻❄️Amigurumi Polar Bear Crochet Pattern
Meet your new cozy winter companion — a charming Amigurumi Polar Bear with soft white fur, big grey paw pads, and a sweet expression that’s impossible to resist. This plush buddy is perfect for gift-giving or decorating your cozy space. Let’s bring this adorable arctic friend to life!
✨ Skill Level
Intermediate – You’ll work with shaping, color changes, and small detail sewing (ears, muzzle, paw pads).
📏 Finished Size
Approximately 22–24 cm (9–10 inches) tall using DK/light-worsted yarn and a 2.5–3 mm crochet hook.
🧶 Materials
Yarn (DK/Light-Worsted Weight):
-
White – Main body, arms, head, and feet
-
Light Grey – Inner ears, paw pads, claws, and muzzle edge
-
Black – Nose, mouth embroidery, and eyebrows
Tools & Supplies:
-
2.5 mm crochet hook
-
10 mm black safety eyes
-
Tapestry needle
-
Stitch markers
-
Fiberfill stuffing
-
Black embroidery floss
🪡 Abbreviations (US Terms)
-
MR – Magic ring
-
sc – Single crochet
-
inc – Increase (2 sc in next st)
-
dec – Decrease (sc 2 together)
-
sl st – Slip stitch
-
ch – Chain
-
BLO – Back loop only
🧵 Pattern Instructions
🩵 Head
With white yarn:
R1 – 6 sc in MR (6)
R2 – inc in each st (12)
R3 – (1 sc, inc) × 6 (18)
R4 – (2 sc, inc) × 6 (24)
R5 – (3 sc, inc) × 6 (30)
R6 – (4 sc, inc) × 6 (36)
R7 – (5 sc, inc) × 6 (42)
R8–R15 – sc around (42)
R16 – (5 sc, dec) × 6 (36)
R17 – (4 sc, dec) × 6 (30)
R18 – (3 sc, dec) × 6 (24)
R19 – (2 sc, dec) × 6 (18)
Stuff firmly.
Fasten off, leaving a long tail for sewing.
🪶 Tip: Before closing, position the safety eyes between R10–R11 with about 6 stitches apart.
🩶 Muzzle
With grey yarn:
R1 – 6 sc in MR (6)
R2 – (1 sc, inc) × 3 (9)
R3 – (2 sc, inc) × 3 (12)
R4 – sc around (12)
Switch to white yarn
R5 – (3 sc, inc) × 3 (15)
R6 – sc around (15)
Stuff lightly.
Embroider the nose and mouth in black thread as shown in the photo — rounded nose top with a curved smile line below. Sew muzzle centered on the head between R13–R16.
🐾 Ears (Make 2)
With grey yarn:
R1 – 6 sc in MR (6)
R2 – (1 sc, inc) × 3 (9)
Switch to white yarn
R3 – (2 sc, inc) × 3 (12)
R4 – sc around (12)
Flatten and leave a tail for sewing.
Attach symmetrically near the top sides of the head.
🤍 Body
With white yarn:
R1 – 6 sc in MR (6)
R2 – inc in each st (12)
R3 – (1 sc, inc) × 6 (18)
R4 – (2 sc, inc) × 6 (24)
R5 – (3 sc, inc) × 6 (30)
R6 – (4 sc, inc) × 6 (36)
R7–R12 – sc around (36)
R13 – (4 sc, dec) × 6 (30)
R14 – (3 sc, dec) × 6 (24)
R15 – (2 sc, dec) × 6 (18)
Stuff firmly and shape the chest round.
Fasten off and sew the head to the body.
🐾 Arms (Make 2)
With white yarn:
R1 – 6 sc in MR (6)
R2 – (1 sc, inc) × 3 (9)
R3–R8 – sc around (9)
Stuff lightly, flatten the end, and sew to sides of the body angled slightly forward as shown.
🐾 Feet (Make 2)
With white yarn:
R1 – 6 sc in MR (6)
R2 – inc in each st (12)
R3 – (1 sc, inc) × 6 (18)
R4 – (2 sc, inc) × 6 (24)
R5 – (3 sc, inc) × 6 (30)
R6–R7 – sc around (30)
R8 – (3 sc, dec) × 6 (24)
R9 – (2 sc, dec) × 6 (18)
Stuff firmly.
Flatten slightly at the top to create a base for sewing to the body.
🩶 Paw Pads (Make 2)
With grey yarn:
R1 – 6 sc in MR (6)
R2 – (1 sc, inc) × 3 (9)
R3 – (2 sc, inc) × 3 (12)
R4 – (3 sc, inc) × 3 (15)
R5 – (4 sc, inc) × 3 (18)
Sew the grey pad neatly to the foot’s sole. The pad should be centered, leaving a white rim around it as shown in the image.
🩶 Claws (Make 6)
With grey yarn:
Ch 3, sc in 2nd ch from hook, sl st in next ch (2 sts).
Fasten off, leaving a tail.
Attach three claws to each foot as shown, slightly curved and evenly spaced.
🧸 Assembly
-
Sew the head onto the body, ensuring it’s straight and snug.
-
Attach arms angled upward, as if the bear is waving.
-
Sew feet firmly to the base so that the bear sits upright.
-
Add eyebrows with black embroidery thread slightly curved for expression.
🌨 Finishing Touches
-
Adjust stuffing for roundness.
-
Use a small brush to fluff the yarn slightly for a softer texture.
-
Optional: Add a tiny crocheted scarf for a winter look!
💬 Final Thoughts
This Amigurumi Polar Bear radiates warmth despite its frosty origins. With soft textures, expressive details, and lovable proportions, it’s a delightful project to make and gift. Whether perched on a shelf or tucked in a child’s arms, this bear is sure to melt hearts!


