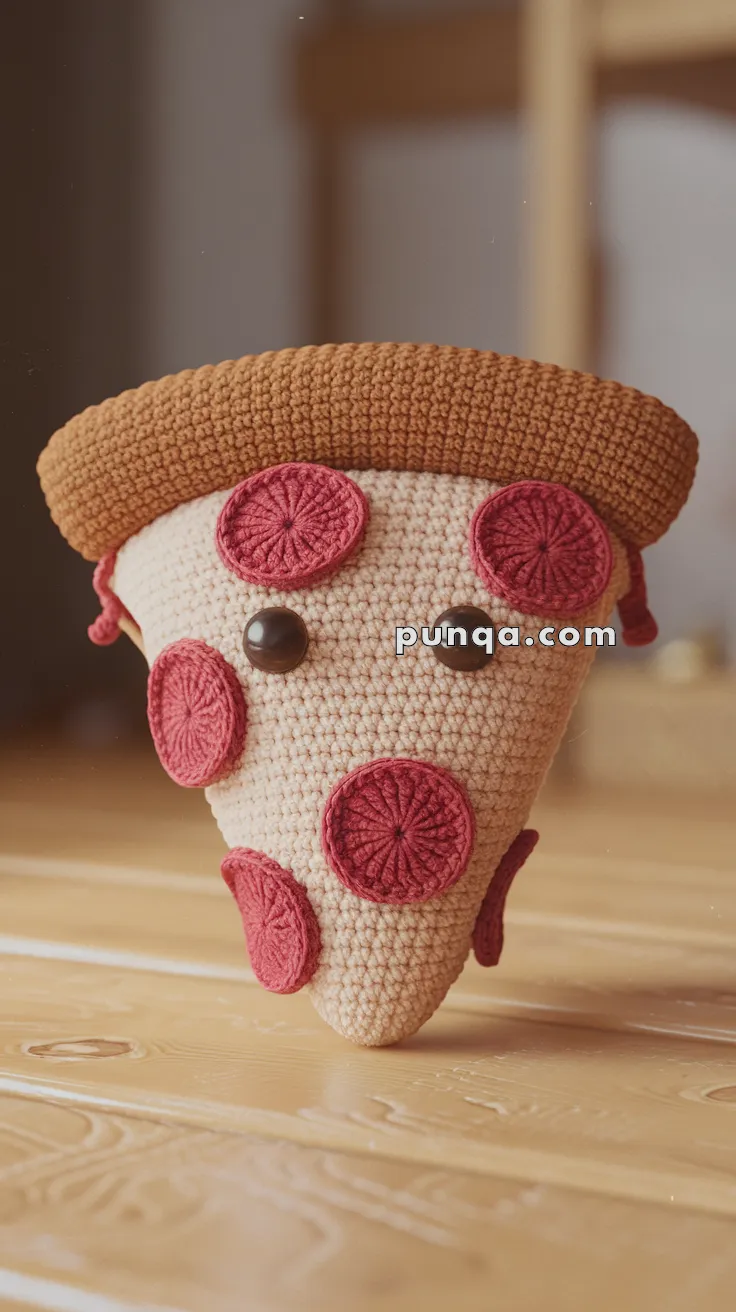
Welcome to the delicious and playful world of amigurumi! 🍕✨ Today, I’m excited to share my free crochet pattern for an Amigurumi Pizza Slice—a fun and quirky creation perfect for food lovers, kitchen décor enthusiasts, or anyone who enjoys crafting adorable and whimsical plush designs! 🧶 Whether you love stitching up tasty treats, experimenting with textured toppings, or simply want to add a cheesy pizza slice to your handmade lineup, this pattern will guide you through crafting a beautifully sculpted plush with a golden crust, melty cheese, and customizable toppings! 🍅
This design embraces warm yellows, rich reds, and intricate shaping to bring a mouthwatering and joyful presence to your crochet projects! 🧶✨ I’ve carefully outlined each step to ensure your Amigurumi Pizza Slice turns out just right—ready to brighten up your collection or become a treasured handmade gift! 🎁 So grab your hooks, pick out delicious hues, and let’s stitch up a fantastic pizza slice! 🍕
🍕 Amigurumi Pizza Slice Crochet Pattern
Craft your own cheesy companion with this adorable Amigurumi Pizza Slice! With a soft triangular shape, pepperoni “toppings,” plush crust, and an optional kawaii face, this fun and quirky piece is perfect for foodies, gifts, or playful decor.
✨ Skill Level
Beginner to Intermediate – Simple shaping, color changes, and sewing required.
📏 Finished Size
Approx. 6–7 inches (15–18 cm) tall using worsted yarn and a 3.5–4.0 mm hook.
🧶 Materials
-
Worsted weight yarn in:
-
Beige/Tan (pizza base)
-
Brown (crust)
-
Red/Burgundy (pepperoni)
-
Black or brown safety eyes (optional facial features)
-
-
Crochet hook: 3.5–4.0 mm
-
Polyfill stuffing
-
Tapestry needle
-
Stitch marker
🧵 Abbreviations (US Terms)
-
MR – Magic Ring
-
sc – Single Crochet
-
inc – Increase
-
dec – Decrease
-
ch – Chain
-
sl st – Slip Stitch
-
FO – Fasten Off
🍕 Pizza Slice Base (Beige)
Worked in rows as a triangle, then edged and sewn.
-
Ch 2
-
Row 1: 1 sc in 2nd ch (1)
-
Row 2: ch 1, turn, inc (2)
-
Row 3: ch 1, turn, inc, sc (3)
-
Row 4: ch 1, turn, inc, sc 2 (4)
6–16. Continue increasing at beginning of each row until you reach 18–20 stitches wide -
sc around entire triangle to clean edges
FO, leave a long tail for joining back piece
Make a second triangle the same size for the back.
🍞 Crust (Brown)
-
Ch length of pizza slice top (approx. 18–20 ch)
-
Row 1: sc in each ch
3–6. sc back and forth to create a short rectangle
FO, roll slightly and sew to top of pizza slice front
❤️ Pepperoni Toppings (Make 6–8 – Red/Burgundy)
-
MR, 6 sc
-
inc x6 (12)
-
(1 sc, inc) x6 (18)
-
sl st in next st, FO
Sew onto front of pizza slice randomly
Optional: use darker red yarn to surface stitch radiating lines
🙂 Optional Face
-
Insert safety eyes between rows 8–9, spaced 5–6 stitches apart
-
Embroider smile using black or brown yarn/thread
-
Blush can be added with pink felt circles or embroidery
🧵 Assembly
-
Align front and back triangles
-
sc around to join, starting from one side of the crust
-
Stuff as you go, especially near the tip
-
FO and weave in ends
-
Adjust pepperoni and face for symmetry
✂️ Finishing Touches
-
Shape crust and tip gently with fingers
-
Embroider any extra details (e.g. cheese drips or jalapeño slices)
-
Weave in all ends neatly
This cute and cheesy slice is perfect for gifting to pizza lovers or adding to your plush food collection. Customize toppings for your favorite style—veggie, supreme, or just extra kawaii! 🍕🧶💛