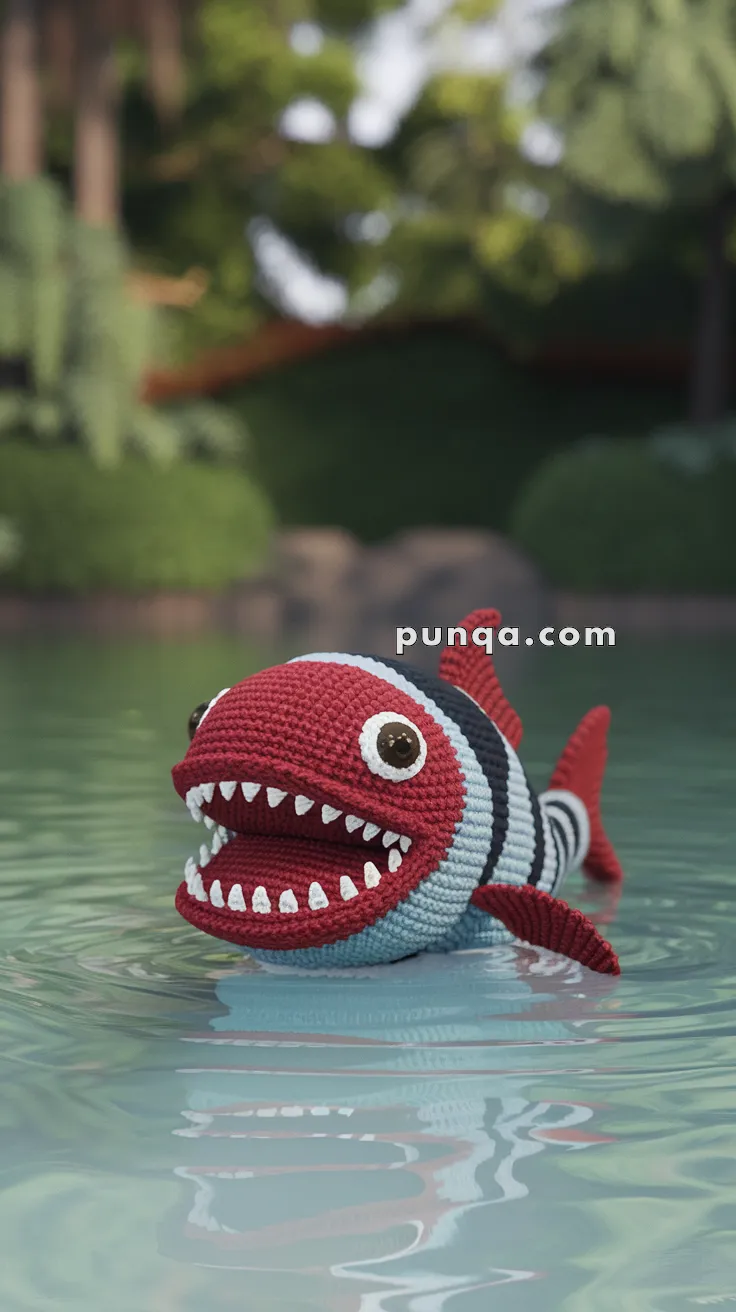
Bring the fierce charm of a Piranha to life with this Amigurumi Piranha crochet pattern! 🐟✨ With its sharp little teeth, sleek body, and bold personality, this design captures the essence of this fascinating aquatic predator in yarn form. Whether you’re crafting for a marine-inspired décor piece, a heartfelt gift, or simply love unique amigurumi, this pattern is a fantastic addition to your collection.
Designed for crocheters who enjoy shaping intricate details, this pattern allows for customization in fin textures, facial expressions, and even tiny accessories like embroidered bubbles or a miniature underwater scene to enhance its personality. Choose classic reds and silvers for a realistic look or experiment with vibrant hues for a playful twist! Whether displayed as part of an ocean-themed setup or gifted to a fellow crochet enthusiast, this amigurumi piranha is sure to impress.
Grab your hook, select your favorite yarn, and let’s bring this bold little swimmer to life—one stitch at a time! 🧶✨
🐟 Amigurumi Piranha Crochet Pattern
Add a splash of danger to your amigurumi collection with this adorable (yet toothy!) piranha! With bold stripes, wide eyes, and a mouth full of playful crochet teeth, this fun aquatic character is a quirky project for fans of fishy friends and fierce designs.
✨ Skill Level
Intermediate – Involves shaping, color transitions, and assembling separate mouth and fin pieces.
📏 Finished Size
Approximately 22–25 cm (9–10 in) long when made with worsted-weight yarn and a 3.5 mm hook.
🧶 Materials
-
Red yarn (80 g) – Head, mouth, fins, and tail
-
Light blue or aqua yarn (60 g) – Body
-
Black yarn (15 g) – Stripes
-
White yarn (15 g) – Teeth and eye whites
-
Brown yarn (a few grams) – Iris detail
-
3.5 mm crochet hook
-
12–15 mm safety eyes or yarn for embroidery
-
Fiberfill stuffing
-
Tapestry needle, scissors, stitch markers
🧵 Abbreviations (US Terms)
MR – Magic Ring sc – single crochet inc – increase (2 sc in same st) dec – decrease (sc2tog) sl st – slip stitch ch – chain FO – fasten off
(Work in continuous spiral unless otherwise noted.)
🧠 Head & Upper Body (Red → Blue with Stripes)
Start with red yarn (head):
R1 – 6 sc in MR (6)
R2 – inc ×6 (12)
R3 – (sc, inc) ×6 (18)
R4 – (2 sc, inc) ×6 (24)
R5 – (3 sc, inc) ×6 (30)
R6 – (4 sc, inc) ×6 (36)
R7–R12 – sc around (36)
Switch to light blue yarn (for body):
R13–R26 – sc around (36)
💡 Stripes: Using black yarn, embroider or surface-crochet 3 thick vertical stripes evenly spaced along both sides of the body.
Each stripe should extend from the top of the fish down toward the lower body (about 4–5 rounds tall).
Continue body shaping:
R27 – (4 sc, dec) ×6 (30)
R28 – (3 sc, dec) ×6 (24)
R29 – (2 sc, dec) ×6 (18)
R30 – (sc, dec) ×6 (12)
R31 – dec ×6 (6)
Stuff firmly and FO.
😮 Mouth (Top & Bottom Jaws – Red)
Upper Jaw:
R1 – 6 sc in MR (6)
R2 – inc ×6 (12)
R3 – (sc, inc) ×6 (18)
R4 – (2 sc, inc) ×6 (24)
R5 – (3 sc, inc) ×6 (30)
R6 – sc around (30)
Flatten to create a half-circle shape. FO.
Lower Jaw:
Repeat rounds 1–6 from the upper jaw. FO.
Slightly stuff each piece for shape and sew together along the inner edge to form an open mouth.
Attach the mouth assembly to the front of the head so that the top jaw overlaps slightly over the bottom.
🦷 Teeth (White – 20 Small Triangular Pieces)
For each tooth:
Ch 3, sc in 2nd ch from hook, sc in next (2). FO.
Make approximately 10–12 teeth for the top jaw and 8–10 for the bottom.
Sew teeth evenly along the inside edges of both jaws.
Tip: Keep teeth short and evenly spaced for the cartoon-like grin.
👀 Eyes
White base:
R1 – 6 sc in MR (6)
R2 – inc ×6 (12)
FO.
Sew to each side of the head, slightly behind the mouth corners.
Attach safety eyes in the center or embroider brown iris and black pupil details.
🐠 Side Fins (Make 2 – Red)
R1 – 6 sc in MR (6)
R2 – (sc, inc) ×3 (9)
R3 – (2 sc, inc) ×3 (12)
R4 – (3 sc, inc) ×3 (15)
R5 – sc around (15)
Flatten, FO, and sew symmetrically on each side just behind the head.
🦈 Dorsal Fin (Top Fin – Red)
R1 – 6 sc in MR (6)
R2 – (sc, inc) ×3 (9)
R3 – sc around (9)
R4 – (2 sc, inc) ×3 (12)
R5 – sc around (12)
FO and sew along the top center of the body, right above the first black stripe.
🐟 Tail Fin (Red)
Ch 8, sc in 2nd ch from hook and across (7)
Ch 1, turn, (1 sc, inc) ×3, sc (10)
Ch 1, turn, sc across (10)
Ch 1, turn, dec ×2, sc 6 (8)
FO and shape into a wide triangle.
Sew firmly to the back of the body, slightly fanning outward.
🧵 Assembly
✅ Sew top and bottom jaws to front of head
✅ Attach eyes evenly behind the mouth corners
✅ Add upper dorsal fin to top
✅ Sew side fins behind the first stripe
✅ Attach tail fin to rear
✅ Embroider or surface-crochet 3 black stripes
✅ Stuff mouth lightly for rounded shape
💡 Finishing Touches
-
Shaping: Firm stuffing keeps the mouth open and the head rounded.
-
Expression: Slightly tilt the eyes upward for a cheeky, mischievous look.
-
Fins: Flatten with your fingers to maintain sleek lines.
-
Stripes: For accuracy, space three black stripes evenly across the light blue body, ensuring they wrap around symmetrically.
🌊 Your Piranha Is Complete!
This fierce little fish is ready to swim into your heart—or your next handmade gift box! Whether for a child’s toy shelf or a quirky desk buddy, this piranha is pure fun with bite. 🦷🐟💦