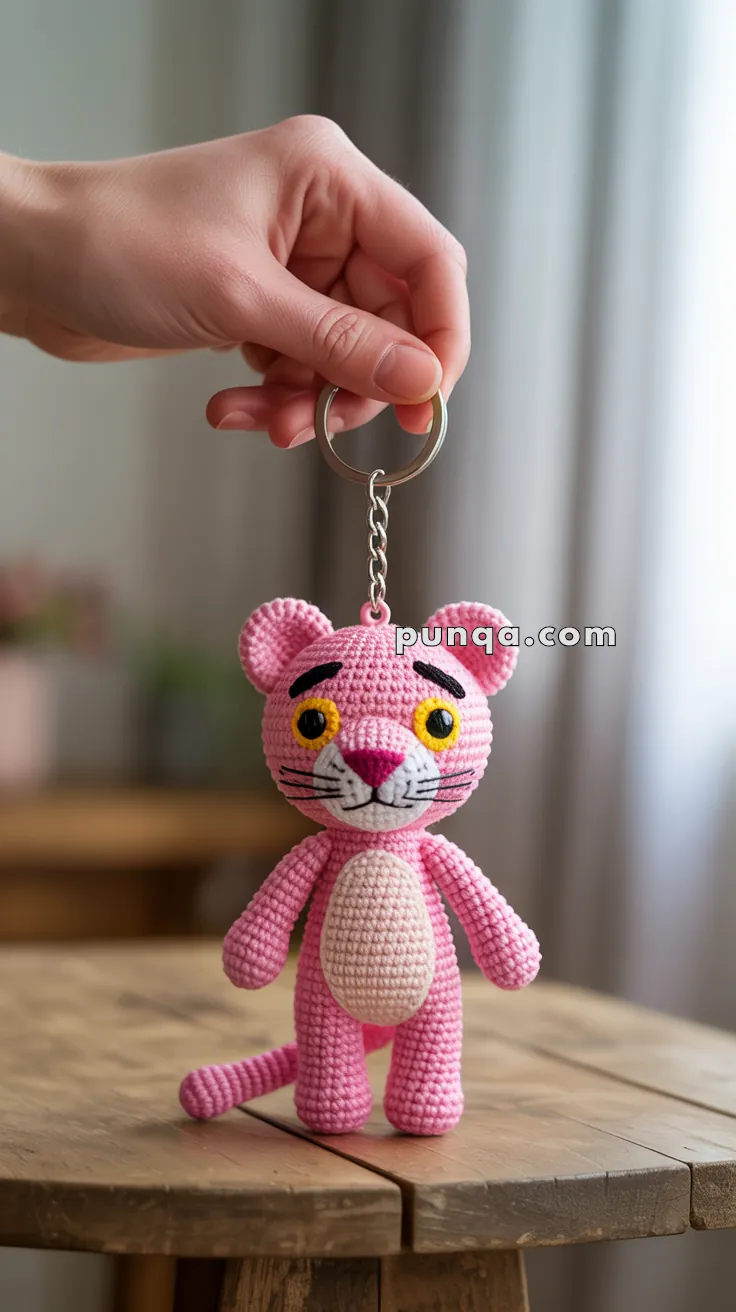
Add a dash of classic cool to your crochet collection with this Amigurumi Pink Panther Keychain pattern! With his sleek pink body, mischievous grin, and unmistakable charm, this mini version of the iconic feline is perfect for fans of retro cartoons, quirky accessories, or anyone who loves a pop of personality on their bag or keys. Whether you’re crafting a nostalgic gift or just want a pocket-sized panther to brighten your day, this keychain is sure to turn heads and spark smiles. 🧶💖🐾
Designed for fun and flair, this pattern invites you to explore bold colorwork, expressive features, and playful extras like a curled tail, tiny ears, or even a stitched-on smirk. Customize your panther with your favorite shades of pink or add a little sparkle for extra pizzazz. Whether clipped to a backpack, nestled in a gift basket, or starring in a handmade cartoon tribute, this Pink Panther Keychain Amigurumi is a joyful and satisfying project—perfect for stitching up a little handmade mischief, one loop at a time! ✨🎀🔑
🐾 Pink Panther Keychain Crochet Pattern
Hey there, crafty friends! Ready to create your very own Pink Panther keychain? This adorable little guy with his sleepy eyes and signature long limbs is about to become your new favorite amigurumi project. Whether you’re making him for yourself or as a gift for a cartoon-loving friend, this pattern will guide you through every stitch!
✨ What You’ll Need
Yarn: Fingering or sport weight yarn in the following colors:
- Pink (main color): ~25g / 90 yards
- Light pink or cream: ~5g / 20 yards
- Dark pink: tiny amount for nose
- Yellow: small amount / 5 yards
- White: small amount / 5 yards
- Black: small amount for embroidery
Other Supplies:
- 2.0–2.5mm crochet hook
- 6mm safety eyes (2)
- Polyfill stuffing
- Tapestry needle
- Stitch marker
- Keychain ring with chain
- Scissors
📐 Finished Size
Your Pink Panther will stand approximately 4–5 inches (10–12 cm) tall, perfect for hanging on keys, bags, or backpacks!
💪 Skill Level
This pattern is great for beginners who have some amigurumi experience. You’ll need to know basic stitches, simple embroidery, and how to assemble small parts.
📖 Stitch Guide (US Terms)
- MR = Magic Ring
- sc = single crochet
- inc = increase (2 sc in same stitch)
- dec = decrease (sc2tog)
- sl st = slip stitch
- ch = chain
- FO = fasten off
- ( ) ×6 = repeat the sequence in parentheses 6 times
- (12) = total stitch count at end of round
🎨 Let’s Get Started!
Head (Pink Yarn)
R1: MR, 6 sc (6)
R2: inc ×6 (12)
R3: (sc, inc) ×6 (18)
R4: (2 sc, inc) ×6 (24)
R5: (3 sc, inc) ×6 (30)
R6: (4 sc, inc) ×6 (36)
R7–12: sc around (36) – work 6 rounds even
R13: (4 sc, dec) ×6 (30)
R14: (3 sc, dec) ×6 (24)
👀 Eye Placement: Insert safety eyes between rounds 8 and 9, spacing them about 8 stitches apart.
R15: (2 sc, dec) ×6 (18)
R16: (sc, dec) ×6 (12) – stuff head firmly
R17: dec ×6 (6)
FO, leaving a tail. Close the opening.
Snout (Light Pink Yarn)
R1: MR, 6 sc (6)
R2: inc ×6 (12)
R3: (sc, inc) ×6 (18)
R4–5: sc around (18) – work 2 rounds even
FO, leaving a long tail for sewing. Stuff very lightly so it stays soft and flat. Sew to the lower center of the head, positioned below and slightly between the eyes.
Yellow Eye Irises (Make 2 – Yellow Yarn)
R1: MR, 6 sc (6)
R2: inc ×6 (12)
FO, leaving a long tail for sewing. Do not stuff. These will be sewn around the safety eyes to create the yellow iris effect.
Ears (Make 2 – Pink Yarn)
R1: MR, 6 sc (6)
R2: inc ×6 (12)
FO, leaving a tail for sewing. Do not stuff. Flatten each ear and sew them to the sides of the head around rounds 6–8, angled slightly outward and forward.
Body (Pink Yarn)
R1: MR, 6 sc (6)
R2: inc ×6 (12)
R3: (sc, inc) ×6 (18)
R4–10: sc around (18) – work 7 rounds even for a slim cylinder
R11: (sc, dec) ×6 (12)
R12–14: sc around (12) – work 3 rounds even
FO, leaving a tail for sewing. Stuff lightly, keeping the body slim and lanky.
Belly Patch (Light Pink Yarn)
R1: MR, 6 sc (6)
R2: inc ×6 (12)
FO, leaving a long tail. Do not stuff. Shape into an oval patch and sew it centered on the front of the body.
Arms (Make 2 – Pink Yarn)
R1: MR, 6 sc (6)
R2: (sc, inc) ×3 (9)
R3–12: sc around (9) – work 10 rounds even for long slim arms
FO, leaving a tail for sewing. Stuff very lightly (or not at all for extra floppiness). Flatten the top and sew to the sides of the body, just below where the head will attach.
Legs (Make 2 – Pink Yarn)
R1: MR, 6 sc (6)
R2: (sc, inc) ×3 (9)
R3–15: sc around (9) – work 13 rounds even for long slender legs
FO, leaving a tail for sewing. Stuff very lightly, keeping them flexible. Sew to the bottom of the body.
Tail (Pink Yarn)
R1: MR, 6 sc (6)
R2–20: sc around (6) – work 19 rounds even for a long thin tail
FO, leaving a tail for sewing. Do not stuff (let it stay floppy!). Sew to the back of the body.
👁️ Eye Assembly & Details
This is what really brings Pink Panther to life!
Attaching the Yellow Irises:
Take your crocheted yellow circles and position them around the safety eyes so the black eye center shows through the middle. Sew them securely in place, creating that signature two-toned eye look.
Sleepy Eyelids:
With black yarn, embroider curved lines (like half-circles or gentle arcs) above each eye. These should droop down slightly at the outer corners to give that signature sleepy Pink Panther expression. Each eyelid should be about 4–5 stitches long.
Eyebrows:
Use black yarn to create thick, slightly curved lines above the eyelids. Angle them downward at the outer edges for that classic concerned/sleepy look. Make them bold – about 3–4 stitches wide and positioned about 2–3 rows above the eyelids.
👃 Nose & Face Details
Triangle Nose:
Using dark pink yarn, embroider a small triangle at the top center of the snout. The triangle should point downward, about 3–4 stitches wide at the base and 3 stitches tall.
Whiskers:
With black yarn or embroidery thread, stitch 3 whiskers on each side of the snout. Make them about 1 inch long, radiating outward from the sides of the muzzle in a fan pattern.
Smile:
Embroider a small curved smile line below the nose using black yarn. Keep it subtle – just a gentle curve about 3–4 stitches long.
🔗 Keychain Attachment
Using pink yarn, chain 6–8 stitches. Attach one end securely to the top center of the head by weaving through several stitches and the stuffing inside. Loop through your metal keychain ring and secure the other end back through the head. For extra durability, stitch through multiple times to anchor it firmly!
🎯 Assembly Time
Now let’s put your Pink Panther together:
- Sew the yellow eye irises around the safety eyes first
- Add all face embroidery (eyelids, eyebrows, nose, whiskers, smile)
- Sew the snout to the lower center of the face
- Attach the ears to the sides of the head
- Sew the head to the body – position it securely and stitch all the way around
- Attach the arms to the upper sides of the body
- Sew on the belly patch centered on the front
- Attach the legs to the bottom of the body, spacing them evenly
- Sew on the tail at the back, positioning it low on the body
- Add the keychain loop at the top of the head
💡 Pro Tips for Success
🌟 Keep it lanky! Don’t over-stuff the limbs and body. Pink Panther should look slim and graceful, not chunky.
🌟 Floppy parts = character! The tail and limbs look best when they’re flexible and can move.
🌟 Bold embroidery matters! Don’t be shy with those eyebrows and eyelids – they’re what give Pink Panther his personality.
🌟 Yellow irises are KEY! Make sure they’re centered around the safety eyes with the black center visible.
🌟 Secure that keychain loop! Stitch it through multiple times so it can withstand daily use.
🎉 You Did It!
Congratulations! Your Pink Panther keychain is complete and ready to add some cartoon charm to your everyday carry. With his sleepy eyes, long limbs, and that adorable belly patch, he’s instantly recognizable and totally huggable.
This little guy makes an amazing handmade gift for Pink Panther fans, a fun stash-buster project, or just a delightful addition to your own bag or keys. The best part? Once you’ve made one, you’ll probably want to make a whole family of them!
Happy crocheting, and may your Pink Panther bring a smile to everyone who sees him! 🐾💗