Bring a touch of woodland whimsy to your crochet collection with the Amigurumi Pine Tree—a charming little evergreen that’s perfect for holiday decorating or year-round forest vibes! 🌲 With its textured stitches and cozy silhouette, this pine tree is a delightful way to celebrate nature’s quiet beauty. Whether you’re crafting a winter wonderland or building a miniature enchanted forest, this project adds a sprinkle of magic to any scene.
Quick to stitch and endlessly customizable, the Amigurumi Pine Tree is ideal for beginners looking to branch out or seasoned crocheters craving a relaxing make. Try different yarn weights for a variety of tree sizes, add tiny ornaments for festive flair, or pair it with woodland critters for a storybook display. However you style it, this little tree is sure to grow on you—one stitch at a time! 🧶✨

🎄 Amigurumi Pine Tree Crochet Pattern
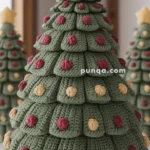
This chunky crochet Christmas tree features plump layered branches and a sturdy cone base. With its beautiful tiered effect and gradient shades of green, it makes the perfect handmade holiday decoration for your home.
✨ Skill Level
Intermediate – involves working in the round, using FLO/BLO, textured stitch layers, and shaping a cone base.
📏 Finished Size
Approx. 15–18 cm (6–7 in) tall using chunky yarn and a 5 mm hook.
🧶 Materials
- Chunky cotton or wool blend yarn:
- Dark green – bottom layers
- Medium green – middle layers
- Light green – top layers
- Red or brown – base
- 5 mm crochet hook
- Fiberfill stuffing
- Yarn needle, scissors, stitch marker
🔤 Abbreviations (US Terms)
MR – Magic Ring
sc – single crochet
inc – increase (2 sc in same st)
dec – invisible decrease
sl st – slip stitch
ch – chain
dc – double crochet
FLO – front loop only
BLO – back loop only
FO – fasten off
🪵 Tree Base (Red or Brown)
R1: MR 6 (6)
R2: inc ×6 (12)
R3: (sc, inc) ×6 (18)
R4: (2 sc, inc) ×6 (24)
R5: (3 sc, inc) ×6 (30)
R6–8: sc around (30)
FO and stuff firmly.
🌲 Tree Cone (Green Gradient)
This cone forms the structure of your tree.
Every two rounds, you’ll add a branch layer in the FLO and continue shaping in the BLO — keeping rows neatly stacked.
Color transitions
- Dark green → R1–6
- Medium green → R7–12
- Light green → R13–16
Cone Foundation
R1: MR 6 (6)
R2: inc ×6 (12)
R3: (sc, inc) ×6 (18)
⚡ Transition Clarification (How to Continue After Each Branch Row)
After completing the branch layer in FLO, go back to the unworked BLO loops from the same round to continue building the cone.
This creates the height between layers and ensures no overlap.
Example:
- Round 4: Work sc BLO around (18).
- Then in the same round’s FLO, crochet the branch layer (fans, puffs, or popcorns).
- Next, start Round 5 in BLO only.
This keeps layers evenly spaced and naturally tiered.
🍃 Cone + Branch Layers
R4: sc BLO around (18) → add branch layer in FLO (see below)
R5: (2 sc, inc) ×6 (24)
R6: sc BLO around (24) → branch layer in FLO
R7: (3 sc, inc) ×6 (30)
R8: sc BLO around (30) → branch layer in FLO
R9: (4 sc, inc) ×6 (36)
R10: sc BLO around (36) → branch layer in FLO
R11: (5 sc, inc) ×6 (42)
R12: sc BLO around (42) → branch layer in FLO
R13: (6 sc, inc) ×6 (48)
R14: sc BLO around (48) → branch layer in FLO
R15: (7 sc, inc) ×6 (54)
R16: sc BLO around (54) → final branch layer in FLO
FO when cone reaches desired height (≈ 16 rounds).
🌿 Branch Layer Options (FLO Work)
Default Fan Stitch (used in photo)
(gives a scalloped, leafy appearance)
In FLO: (ch 3, 3 dc, ch 3, sl st) in same st, skip 1 st → repeat around.
Each fan = one “leaf.”
Spacing tip:
Skip 1 st between fans for dense layering, or skip 2 for airier spacing.
Optional Stitch Variations (for thicker texture)
💠 Puff Stitch Layer (fuller, bubbly look):
(Yarn over, insert hook, pull up a loop) ×4, yarn over, pull through all loops, ch 1.
Work 1 puff stitch per FLO, skip 1 st, repeat around.
💠 Popcorn Stitch Layer (compact and rounded):
Work 5 dc into one FLO stitch, remove hook, insert in first dc, pull working loop through to close, ch 1, skip 1 st, repeat.
These produce a more 3D “pinecone” look than the fans.
Note: heavier stitches shorten the tree slightly; add 1–2 extra shaping rounds if needed.
🌲 Top Crown
At the very tip, make 4–5 fans (or puffs/popcorns) close together to hide the cone top and fill out the shape.
🧵 Assembly
- Attach cone securely to the stuffed red/brown base.
- Stuff firmly for a stable structure.
- Fluff and shape fans downward to form smooth layers.
- Tug gently on each loop/fan for a natural drape.
🌟 Finishing Touches
- Keep plain for a minimalist Scandi look, or add:
- Small red embroidery “baubles”
- Mini yellow star topper
- Dusting of white yarn for “snow” effect
💬 FAQ & Tips
Q1. My fans are overlapping or twisting — what am I doing wrong?
Make sure each branch layer is worked into front loops only, and the next shaping round is always in back loops only. This ensures spacing. If your yarn is thick, skip 2 stitches between fans instead of 1 to reduce crowding.
Q2. How do I go from one fan layer to the next without confusion?
After completing your FLO branch layer, insert your hook into the unworked BLO stitches of that same round and continue to the next numbered round. The next layer will naturally sit above without touching the one below.
Q3. Can I use puff or popcorn stitches instead of dc fans?
Absolutely! Puff and popcorn stitches give a chunkier, pinecone-like result. The fan version (3 dc) produces the wavy, leafy texture shown in most examples. Choose based on your desired texture — fans = airy, puffs/popcorns = dense.
Q4. Why does my tree look different from the photo?
The final texture depends heavily on yarn:
- Cotton creates crisp, defined layers.
- Acrylic or wool makes softer, rounder branches.
- Bulky yarn exaggerates loops, giving a plush look.
- For a smaller, firmer tree, use thinner yarn and a smaller hook.
Q5. How can I make my tree stand sturdier?
Stuff the base firmly or insert a small flat disc (like cardboard or felt) at the bottom before closing.
🎉 Final Result
A cozy, layered pine tree with perfectly stacked branch tiers — whether you use fans, puffs, or popcorns, each version brings its own holiday charm. 🌲✨


Just what I was looking for!