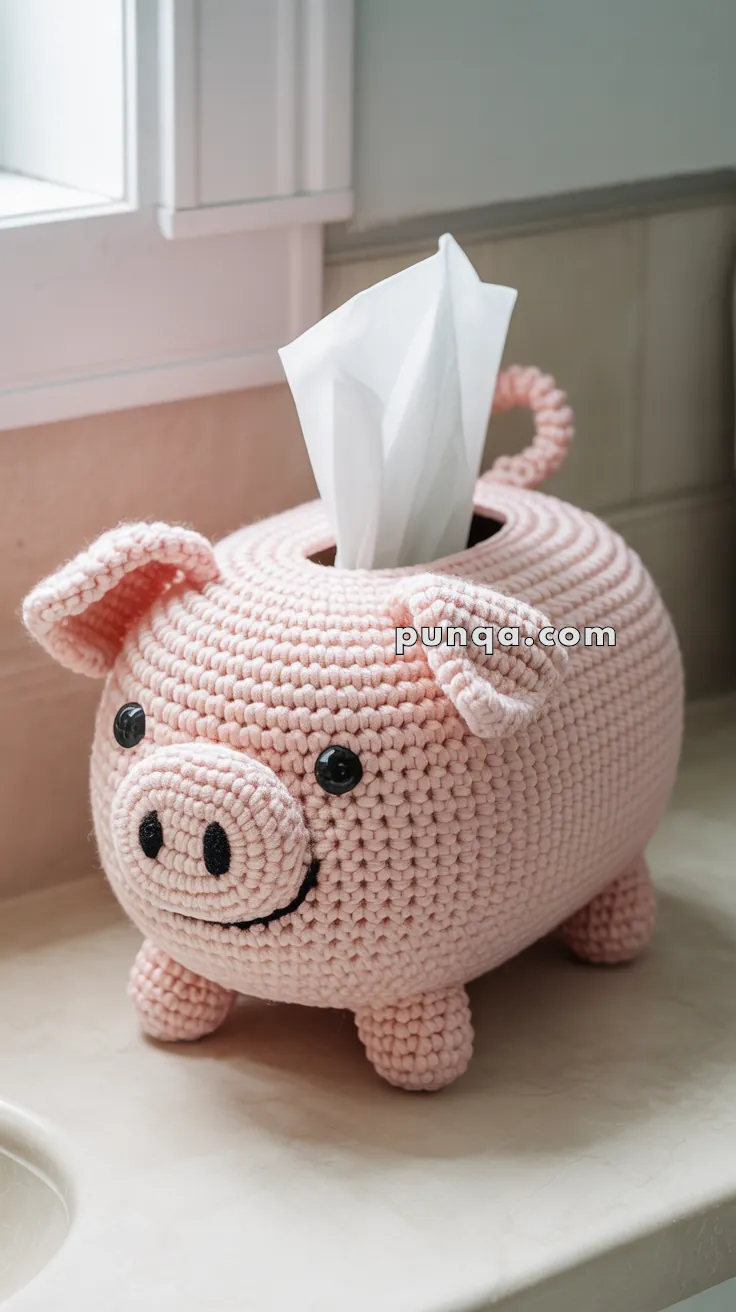
Add a touch of farmyard fun to your home with this Amigurumi Pig Tissue Box Cover crochet pattern! Designed to turn an ordinary tissue box into an adorable piggy friend, this charming creation features a cute snout, floppy ears, and a cheerful expression that makes reaching for a tissue extra delightful. Whether you’re crafting for animal lovers, adding a whimsical accent to your decor, or simply enjoy making playful amigurumi designs, this pattern lets you stitch up a pig bursting with personality! Perfect for brightening up any space, this crochet creation brings a touch of handmade joy to every sniffle. 🐷✨
Designed for customization, this pattern allows you to experiment with different shades of pink, embroidered details, or even tiny accessories like a miniature bow or flower for extra charm. Craft a classic pig with soft, rosy hues, create a pastel version for a dreamy aesthetic, or even stitch up a full set of farm-inspired amigurumi for a charming display! Whether gifted as a thoughtful keepsake, displayed as a cheerful accent, or made simply for the joy of crafting, this Amigurumi Pig Tissue Box Cover is a fun and creative project—perfect for bringing a touch of handmade farmyard magic to every stitch! 🧶💖✨

🐖 Amigurumi Pig Tissue Box Cover Crochet Pattern
Add charm and function to your home with this adorable pig tissue box cover! The body is shaped to fit a standard oval or rectangular tissue box, with a center slot on top for easy access. Cute details like the snout, ears, stubby legs, and curly tail bring this piggy to life.
✨ Skill Level
Intermediate – involves working in the round, shaping ovals, and simple embroidery.
📏 Finished Size
Fits a standard rectangular tissue box: 9 × 5 × 3 in (23 × 13 × 7 cm).
🧶 Materials
- Yarn (bulky weight /#5):
- Light pink – 200 g (main body)
- Darker pink or brown – 10 g (hooves)
- Black – small amount (face embroidery)
- Hook: 5 mm
- Safety eyes: 12 mm black
- Fiberfill stuffing: for snout, ears, legs, and tail
- Tapestry needle, stitch markers, scissors
- Tissue box for shaping
🧵 Abbreviations (US)
MR – Magic Ring
sc – Single Crochet
inc – Increase (2 sc in same st)
dec – Decrease (sc 2 tog)
ch – Chain
sl st – Slip Stitch
st – Stitch
( … ) × n – Repeat inside parentheses n times
FO – Fasten Off
🩷 Body (Main)
Foundation:
ch 21
Round 1: sc in 2nd ch from hook, sc in next 18, 3 sc in last ch, continue on other side, sc 18, 2 sc in last st (42)
Round 2: inc, sc 18, inc × 3, sc 18, inc × 2 (48)
Round 3: sc 1, inc, sc 18, (sc, inc) × 3, sc 18, (sc, inc) × 2 (54)
Round 4: sc 2, inc, sc 18, (2 sc, inc) × 3, sc 18, (2 sc, inc) × 2 (60)
Round 5: sc 3, inc, sc 18, (3 sc, inc) × 3, sc 18, (3 sc, inc) × 2 (66)
Rounds 6 – 14: sc around (no increases) (66)
Round 15 (BLO): sc around (creates a slight bottom ridge) (66)
Rounds 16 – 24: sc around (66)
Tissue Opening:
Round 25: sc 22, ch 20, skip 20 sts, sc 24 (66)
Round 26: sc 22, sc 20 across ch, sc 24 (66)
Rounds 27 – 36: sc around (66)
Round 37 (optional rounding): (9 sc, dec) × 6 (60)
Round 38: sc around (60)
FO and weave ends.
💡 Insert the tissue box now to check fit and slot alignment.
🐽 Snout
MR 6 (6)
R2: inc × 6 (12)
R3: (sc, inc) × 6 (18)
R4: (2 sc, inc) × 6 (24)
R5 – 8: sc around (24)
Stuff firmly and FO leaving tail to sew.
Attach centered on front of body, just above bottom curve.
Embroider two vertical black nostrils with thick stitches.
👂 Ears (× 2)
MR 6 (6)
R2: (sc, inc) × 3 (9)
R3: (2 sc, inc) × 3 (12)
R4: (3 sc, inc) × 3 (15)
R5: (4 sc, inc) × 3 (18)
R6 – 7: sc around (18)
Flatten and pinch base into folded shape.
Sew on angled upward and slightly forward at top corners of head.
🐾 Legs (× 4)
Start with darker pink (brown for hooves).
R1: MR 6 (6)
R2: inc × 6 (12)
R3: sc around (12)
R4: sc around (12)
R5: switch to light pink, sc around (12)
R6: sc around (12)
FO, stuff firmly, and sew four legs evenly under body so the pig sits flat.
🌀 Tail
ch 25
1.5 sc in each ch across → creates tight curl.
FO and attach high on back right.
👁 Eyes & Face
Insert 12 mm safety eyes 4 sts apart above snout (centered horizontally).
With black yarn, embroider:
- Two vertical nostrils on snout.
- A curved smile under snout (one side lifted slightly).
🎀 Assembly Summary
1️⃣ Attach snout low on front.
2️⃣ Place eyes above snout.
3️⃣ Sew ears angled upward and outward.
4️⃣ Sew legs securely for stability.
5️⃣ Attach curly tail high on rear.
6️⃣ Insert tissue box and adjust slot alignment.
🧼 Finishing & Care
- Spot clean with mild soap and water.
- Lay flat to dry.
- Remove tissue box before washing.
🕒 Estimated Time
Approx. 8 – 10 hours.
🎯 Shaping Tips
- Insert the tissue box while crocheting rows 23–36 to check slot placement and overall snug fit.
- Do not stuff the body; it should stretch around the box.
- Only snout, legs, ears, and tail are stuffed.
🔄 Adjusting for Different Sizes
For Cube Tissue Boxes (square 5 × 5 in):
- Start with ch 15 instead of ch 21.
- Work increases until base matches cube.
- Build up height evenly (≈ 20 rows).
- Slot: ch 12, skip 12 sts for opening.
For Travel Pack Covers:
- Start with ch 13, shorter oval base.
- Slot only ch 8.
- Shorten height to ≈ 10–12 rows.
🌟 Final Touch
This little piggy will brighten up your room and make reaching for tissues extra fun. Whether you make one for yourself or as a gift, it’s sure to be a squeal-worthy favorite! 🐷💖


