Oh, the joy of crafting an amigurumi peacock! 🦚 There’s something irresistibly charming about transforming a ball of yarn into a vibrant, colorful little bird. The beauty of amigurumi lies in its ability to bring whimsy and joy into our lives, and peacocks, with their dazzling feathers and striking colors, are perfect candidates for this craft. The excitement begins with selecting the perfect shades of yarn. Will you stick to the traditional iridescent blues and greens, or will you let your creativity run wild with a riot of colors? It’s all about expressing your unique artistic vision!
Once I have my yarn and crochet hook ready, the process becomes a delightful journey of creation. I start by forming the peacock’s body, using basic crochet techniques like the magic ring and single crochet stitches. There’s a meditative rhythm to the process, and before I know it, I’m shaping the neck and head. And then comes the pièce de résistance—crafting the elaborate tail feathers. This part always feels like a burst of creativity as I choose various colors and textures to mimic the beautiful plumage. Stitch by stitch, my peacock begins to come to life, and with each loop and knot, I feel more connected to this enchanting creature. The final product is not just a toy, but a piece of art that I proudly display or gift, spreading joy and color wherever it goes! 🌈
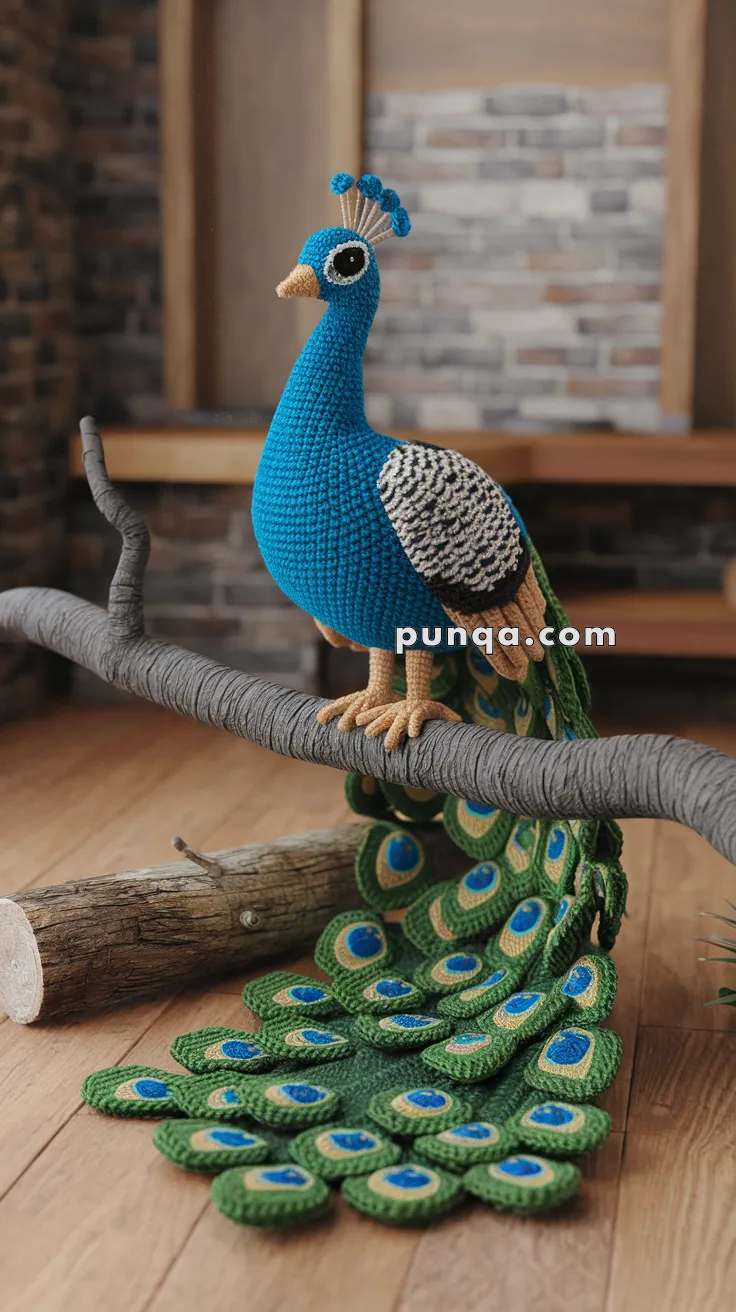
🦚 Amigurumi Peacock Crochet Pattern
This elegant amigurumi peacock features a tall royal-blue body, a slender curved neck, a delicate beak, expressive eyes, textured folded wings, and a dramatic cascading tail made from layered feather motifs with iconic peacock “eye” markings. Designed in a perched pose, this piece is perfect as a statement décor item or heirloom gift.
✨ Skill Level
Advanced – includes shaping, surface layering, colorwork, appliqués, and multi-part assembly.
📏 Finished Size
Approx. 30–35 cm (12–14 in) tall from feet to crest, with tail extending 40–45 cm (16–18 in).
🧶 Materials
Yarn (DK or light worsted recommended for stitch definition)
-
Royal Blue – body, head, neck
-
Dark Green – tail base feathers
-
Medium Green – tail feather edging
-
Teal / Blue-Green – tail eye centers
-
Golden Yellow / Mustard – beak, legs, feet, tail eye rings
-
Light Grey – crest stems
-
Blue (same as body) – crest balls
-
Cream & Charcoal – wing texture
Other Supplies
-
8–10 mm safety eyes (black, glossy)
-
Polyester fiberfill
-
Tapestry needle
-
Stitch marker
-
Floral wire or pipe cleaners (for neck & perch stability – optional but recommended)
🧵 Abbreviations (US Terms)
MR – magic ring
sc – single crochet
inc – increase
dec – decrease
sl st – slip stitch
ch – chain
hdc – half double crochet
dc – double crochet
FO – fasten off
🦚 Head & Neck (One Piece)
Worked from head down.
With royal blue:
-
R1: 6 sc in MR (6)
-
R2: inc ×6 (12)
-
R3: (sc, inc) ×6 (18)
-
R4: (2 sc, inc) ×6 (24)
-
R5: (3 sc, inc) ×6 (30)
-
R6–R9: sc around (30)
Insert safety eyes between R7–R8, 7 sts apart.
-
R10: (3 sc, dec) ×6 (24)
-
R11: (2 sc, dec) ×6 (18)
-
R12–R20: sc around (18)
Lightly stuff head, then continue stuffing neck firmly as you go.
Optional: insert wire for poseable curve.
🧡 Beak
With golden yellow:
-
R1: 6 sc in MR (6)
-
R2: (sc, inc) ×3 (9)
-
R3–R5: sc around (9)
FO, lightly stuff and sew centered beneath eyes, angled slightly downward.
🪶 Crest (Make 5 Stalks)
Stems (Light Grey)
-
Ch 10
-
Sl st back along chain
Balls (Blue – Make 5)
-
R1: 6 sc in MR
-
R2: sc around (6)
FO.
Attach one ball to each stem tip.
Sew all five stems to top of head in a gentle fan.
🪽 Wings (Make 2)
Wings are folded, textured, and layered.
Inner Wing (Cream)
-
R1: 6 sc in MR
-
R2: inc ×6 (12)
-
R3: (sc, inc) ×6 (18)
-
R4: sc around (18)
FO.
Outer Wing (Charcoal)
-
R1: 6 sc in MR
-
R2: inc ×6 (12)
-
R3: (sc, inc) ×6 (18)
-
R4–R5: sc around (18)
Place cream piece on top of charcoal, sew together, slightly cupped.
Attach wings flat against sides of body just below neck.
🦚 Body
Continue from neck.
-
R21: (2 sc, inc) ×6 (24)
-
R22: (3 sc, inc) ×6 (30)
-
R23: (4 sc, inc) ×6 (36)
-
R24–R30: sc around (36)
-
R31: (4 sc, dec) ×6 (30)
-
R32: (3 sc, dec) ×6 (24)
-
R33: (2 sc, dec) ×6 (18)
Stuff firmly for upright posture.
-
R34: (sc, dec) ×6 (12)
-
R35: dec ×6 (6)
FO and close.
🦵 Legs (Make 2)
With golden yellow:
-
R1: 6 sc in MR (6)
-
R2: inc ×6 (12)
-
R3–R8: sc around (12)
Lightly stuff.
🦶 Feet (Make 2)
Worked flat for perching.
-
Ch 8
-
Sc in 2nd ch and across (7)
-
R2–R4: ch 1, turn, sc across
FO.
Sew feet to legs, then attach legs under body so peacock stands balanced.
🌿 Tail Feathers (Make 18–22)
Each feather is a layered oval.
Base (Dark Green)
-
R1: 6 sc in MR
-
R2: inc ×6 (12)
-
R3: (sc, inc) ×6 (18)
-
R4: sc around (18)
Eye Ring (Golden Yellow)
Surface crochet oval ring near top.
Eye Center (Teal)
-
MR 6 sc
FO, sew inside yellow ring.
Edge (Medium Green)
Sl st evenly around base to define feather.
Tail Assembly
-
Arrange feathers in overlapping rows, widest at bottom
-
Sew together into a cascading fan
-
Attach entire tail securely to lower back of body
Tail should rest on surface, not float.
🧷 Assembly & Finishing
-
Sew beak and wings
-
Attach crest
-
Insert neck wire if desired
-
Sew legs and feet
-
Attach completed tail
-
Shape neck into gentle curve
🌟 Finished Peacock
Your peacock should have:
-
A tall, elegant blue body
-
Upright curved neck with delicate beak
-
Five rounded crest tips
-
Textured folded wings
-
A dramatic trailing tail with layered eye motifs
Graceful, vibrant, and unmistakably regal, this amigurumi peacock is a true showpiece 🦚🧶