Oh my goodness, there’s just something incredibly delightful about crafting amigurumi pandas with their adorable little red ties! 🐼🎀 The appeal lies in their tiny, huggable cuteness and the joy they bring to anyone who sees them. Imagine this sweet, round panda, small enough to fit in the palm of your hand, with that bright red tie adding a splash of color and personality. It’s like having a tiny friend who can bring a smile to your face anytime! Crafting these little buddies is not just a hobby; it’s a therapeutic journey into a world where your creativity takes the lead, and you end up with the most charming companions.
Starting the process is always exciting, especially when you gather your yarn in shades of white and black, and of course, the striking red for the tie. 🧶 The pattern guides you through each step, from creating the body with its intricate stitches to carefully crafting the tiny ears and paws. It’s a rewarding experience as you watch your panda take shape stitch by stitch. The best part? Adding the finishing touches, like sewing on the red tie, which gives your little creation its signature look. Each completed panda feels like a small triumph, a unique creation that carries its own personality. It’s pure, unfiltered joy!

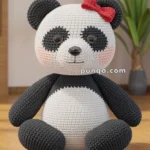
🐼 Miniature Amigurumi Panda with Red Tie – Free Crochet Pattern
Bring some charm to your amigurumi collection with this sweet panda wearing a bright red tie! Perfect for office desk decor or a quirky handmade gift, this panda is simple, stylish, and totally adorable.
🧶 Skill Level
Beginner to Intermediate – simple shapes, basic assembly.
📏 Finished Size
Approximately 18–22 cm (7–8.5 inches) tall using DK yarn and a 2.5 mm crochet hook.
🧵 Materials Needed
-
DK yarn in:
-
White 🧼 (main body, face)
-
Black ⚫ (ears, arms, legs, patches)
-
Red ❤️ (tie)
-
-
2.5 mm crochet hook
-
10–12 mm safety eyes
-
Safety nose or black yarn to embroider
-
Fiberfill stuffing
-
Stitch marker
-
Tapestry needle
-
Scissors ✂️
🔤 Abbreviations (US Terms)
-
MR = Magic Ring
-
SC = Single Crochet
-
INC = Increase (2 SC in one stitch)
-
DEC = Decrease (invisible preferred)
-
CH = Chain
-
SL ST = Slip Stitch
-
FO = Fasten Off
-
BLO = Back Loop Only
-
= Total stitch count at end of round
🐼 HEAD
With white yarn:
R1: MR, 6 SC [6]
R2: INC x6 [12]
R3: (SC, INC) x6 [18]
R4: (2 SC, INC) x6 [24]
R5: (3 SC, INC) x6 [30]
R6: (4 SC, INC) x6 [36]
R7–14: SC around [36]
R15: (4 SC, DEC) x6 [30]
R16: (3 SC, DEC) x6 [24]
R17: (2 SC, DEC) x6 [18]
R18: (SC, DEC) x6 [12]
R19: DEC x6 [6]
FO and close.
📌 Insert safety eyes between R10–11, approx. 8 stitches apart.
📌 Embroider or attach safety nose just above center.
👀 Eye Patches (Make 2)
With black yarn:
R1: MR, 6 SC [6]
R2: INC x6 [12]
R3: SC around [12]
FO and flatten. Stitch around the safety eyes on the face.
🐼 BODY
With white yarn:
R1: MR, 6 SC [6]
R2: INC x6 [12]
R3: (SC, INC) x6 [18]
R4: (2 SC, INC) x6 [24]
R5: (3 SC, INC) x6 [30]
R6–10: SC around [30]
Change to black yarn
R11–16: SC around [30]
R17: (3 SC, DEC) x6 [24]
R18: (2 SC, DEC) x6 [18]
R19: (SC, DEC) x6 [12]
Stuff well.
R20: DEC x6 [6]
FO and weave to close.
🐾 ARMS (Make 2 – black yarn)
R1: MR, 6 SC [6]
R2: (SC, INC) x3 [9]
R3–11: SC around [9]
Stuff lightly. FO and leave a tail to sew. Attach below neckline.
🐾 LEGS (Make 2 – black yarn)
R1: MR, 6 SC [6]
R2: INC x6 [12]
R3: (SC, INC) x6 [18]
R4–6: SC around [18]
R7: (SC, DEC) x6 [12]
R8–10: SC around [12]
Stuff firmly. FO and sew to base of body.
👂 EARS (Make 2 – black yarn)
R1: MR, 6 SC [6]
R2: INC x6 [12]
R3: SC around [12]
FO, flatten and sew on either side of the head.
👔 TIE
With red yarn:
📌 Wide Part
CH 7
R1: SC in 2nd CH from hook, SC across [6]
R2–4: SC across [6]
R5: DEC, 2 SC, DEC [4]
R6: SC across [4]
R7: DEC x2 [2]
R8: DEC [1]
FO.
📌 Knot Section
CH 9
SC across 1 row. FO and wrap it around the tie’s top as a knot. Stitch or glue into place.
🧵 Assembly
-
Sew head to body.
-
Attach arms just below the head.
-
Sew on legs and ears.
-
Add eye patches and safety features.
-
Stitch on the red tie for that office-chic panda look! 🧑💼
-
Embroider a smile for extra cuteness.
🎀 Optional Details
-
Add felt blush circles with fabric glue
-
Use thread to make tiny eyebrows or lashes
-
Give your panda a little briefcase or mug ☕