Creating an amigurumi panda with a red bow tie is a delightful way to combine creativity and craft into a cuddly masterpiece! 🐼✨ Imagine holding a little panda, perfectly sized to fit in your palm, with a charming red bow tie adding a touch of elegance. The process of making these adorable crochet creatures is not only rewarding but also incredibly fun. It starts with gathering soft, colorful yarn—black and white for the panda, and a bright, eye-catching red for the bow tie. I love how quickly the magic happens as each stitch comes together to form the panda’s round body, tiny arms, and stubby legs.
The excitement really builds as I work on the details, like the panda’s sweet round eyes and that quirky little bow tie. The beauty of amigurumi lies in its simplicity, where a few basic stitches transform into something extraordinary. 🧶✨ The best part is that these projects are so portable; I can take them anywhere and crochet whenever I have a spare moment. Each completed panda becomes its own cheerful character, ready to bring joy to my day or to someone else’s if I decide to give it as a gift. Crafting amigurumi is like creating little bundles of happiness, one stitch at a time!
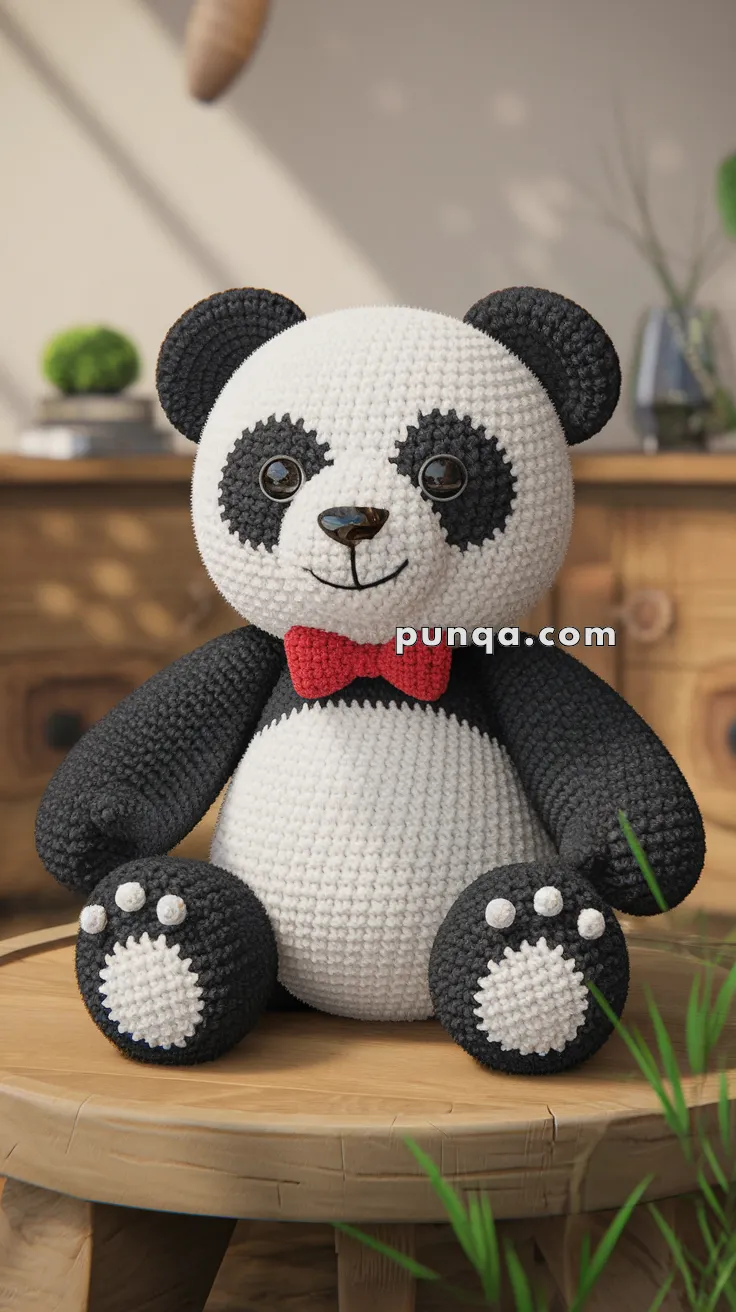
Amigurumi Panda With Red Bow Tie Pattern
Skill Level: Intermediate
Finished Size: Approximately 10 inches tall
Materials
– Worsted weight yarn in white and black
– Small amount of red yarn for bow tie
– Crochet hook size G/4.0mm
– 12mm safety eyes
– Black embroidery thread
– Polyester fiberfill stuffing
– Yarn needle
– Stitch marker
Abbreviations (US Terminology)
– ch: chain
– sc: single crochet
– inc: increase (2 sc in one stitch)
– dec: decrease (single crochet two stitches together)
– st: stitch
– sl st: slip stitch
– FO: fasten off
Pattern Instructions
Head
1. With white yarn, create a magic ring.
2. Round 1: 6 sc in magic ring (6)
3. Round 2: inc around (12)
4. Round 3: (sc, inc) around (18)
5. Round 4: (2 sc, inc) around (24)
6. Round 5: (3 sc, inc) around (30)
7. Round 6: (4 sc, inc) around (36)
8. Rounds 7-12: sc in each st around (36)
9. Round 13: (4 sc, dec) around (30)
10. Round 14: (3 sc, dec) around (24)
11. Round 15: (2 sc, dec) around (18)
12. Insert safety eyes between rounds 10 and 11, approximately 6 stitches apart.
13. Round 16: (sc, dec) around (12)
14. Stuff the head firmly.
15. Round 17: dec around (6)
16. FO and weave in end.
Body
1. With white yarn, create a magic ring.
2. Round 1: 6 sc in magic ring (6)
3. Round 2: inc around (12)
4. Round 3: (sc, inc) around (18)
5. Round 4: (2 sc, inc) around (24)
6. Round 5: (3 sc, inc) around (30)
7. Rounds 6-12: sc in each st around (30)
8. Change to black yarn.
9. Rounds 13-18: sc in each st around (30)
10. Round 19: (3 sc, dec) around (24)
11. Round 20: (2 sc, dec) around (18)
12. Round 21: (sc, dec) around (12)
13. Stuff the body firmly.
14. FO and weave in end.
Arms (make 2)
1. With black yarn, create a magic ring.
2. Round 1: 6 sc in magic ring (6)
3. Round 2: inc around (12)
4. Rounds 3-6: sc in each st around (12)
5. Round 7: (2 sc, dec) around (9)
6. Stuff lightly.
7. Round 8: sc in each st around (9)
8. FO and leave a long tail for sewing.
Legs (make 2)
1. With black yarn, create a magic ring.
2. Round 1: 6 sc in magic ring (6)
3. Round 2: inc around (12)
4. Round 3: (sc, inc) around (18)
5. Rounds 4-7: sc in each st around (18)
6. Round 8: (sc, dec) around (12)
7. Stuff firmly.
8. FO and leave a long tail for sewing.
Ears (make 2)
1. With black yarn, create a magic ring.
2. Round 1: 6 sc in magic ring (6)
3. Round 2: inc around (12)
4. Rounds 3-4: sc in each st around (12)
5. FO and leave a long tail for sewing.
Bow Tie
1. With red yarn, ch 11.
2. Row 1: sc in 2nd ch from hook and across (10)
3. Rows 2-4: ch 1, turn, sc in each st across (10)
4. FO and wrap yarn around the center to form the bow shape.
Assembly
1. Sew the head to the body.
2. Attach the arms to each side of the body, just below the head.
3. Sew the legs to the bottom of the body.
4. Attach the ears to the top sides of the head.
5. Sew the bow tie below the head on the front of the body.
Finishing Touches
– Embroider the nose and mouth with black thread.
– Ensure all pieces are securely attached.
– Add any additional stuffing if needed.
Tips:
– Use a stitch marker to keep track of your rounds! 🧶
– This panda makes a perfect cuddly friend or gift! 🎁
– Enjoy your adorable new panda pal! 🐼❤️
Happy Crocheting!
🎉 Your handmade crochet creation for Amigurumi Panda With Red Bow Tie Pattern is complete! Enjoy your one-of-a-kind amigurumi masterpiece and experiment with various yarn colors for a personal touch! 🧶✨