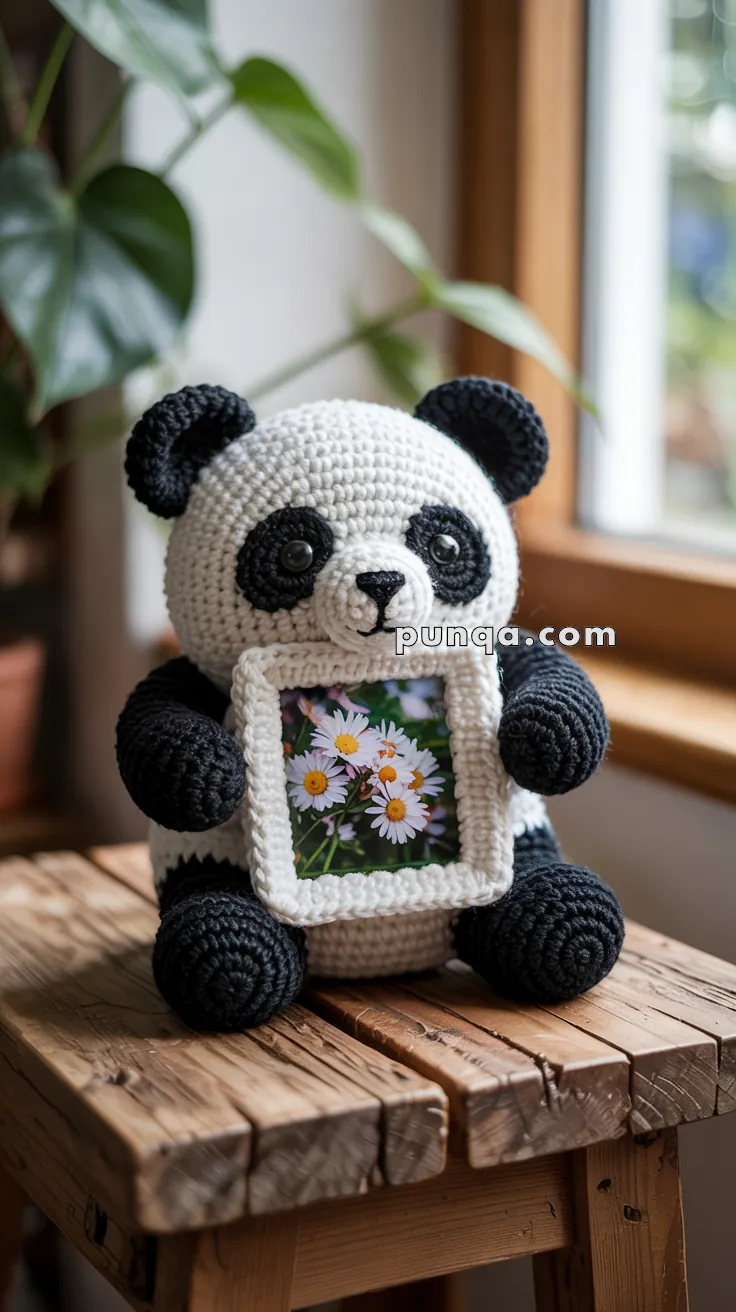
Capture your favorite memories in an irresistibly cute way with this Amigurumi Panda Picture Frame crochet pattern! Whether you’re a panda lover, crafting a unique gift, or simply adding a playful touch to your decor, this free pattern lets you stitch up an adorable frame featuring a charming panda design. With its signature black-and-white coloring, sweet round ears, and soft textured border, this amigurumi frame brings personality and warmth to any cherished photo. Perfect for desks, shelves, or nursery decor, it’s a delightful way to showcase special moments with handmade charm!
Designed for customization, this pattern allows you to play with different shades, add tiny embroidered details, or even incorporate bamboo-themed accents for a nature-inspired twist! Whether you craft it as a gift for a fellow panda enthusiast, create a set of matching frames for a cohesive display, or simply enjoy the process of making something special, this amigurumi panda picture frame is a fun and heartfelt addition to any crochet collection—one stitch at a time! 🐼🖼️✨
🐼 Amigurumi Panda Picture Frame – FREE Crochet Pattern
Turn your favorite memories into huggable art with this adorable amigurumi panda holding a mini picture frame. This charming companion is perfect as a unique gift or cozy desk decor!
✨ Skill Level
Intermediate – Basic shaping, color changes, and assembly involved.
📏 Finished Size
Approx. 8–10 in (20–25 cm) tall
Frame fits a 2.5 x 2.5 in (6 x 6 cm) photo
🧶 Materials
- Worsted weight yarn:
- Black (Color A)
- White (Color B)
- Optional: a small amount of pink or beige for cheeks
- 3.5 mm crochet hook
- Plastic safety eyes (12 mm)
- Black embroidery thread (for nose & smile)
- Tapestry needle
- Polyfill stuffing
- Stitch markers
- Small square of clear plastic or acetate (for photo cover)
- Photo trimmed to 2.5″ square
🧵 Abbreviations (US Terms)
MR – Magic Ring
sc – Single Crochet
inc – Increase
dec – Decrease
sl st – Slip Stitch
FO – Fasten Off
BLO – Back Loop Only
🐼 Head (Make 1 – with White)
- MR, 6 sc
- inc x6 (12)
- (sc, inc) x6 (18)
- (2 sc, inc) x6 (24)
- (3 sc, inc) x6 (30)
- (4 sc, inc) x6 (36)
7–13. sc around (36) - (4 sc, dec) x6 (30)
- (3 sc, dec) x6 (24)
- (2 sc, dec) x6 (18)
– Stuff firmly - (1 sc, dec) x6 (12)
- dec x6 (6)
FO, weave tail.
🐼 Ears (Make 2 – Black)
- MR, 6 sc
- inc x6 (12)
- sc around (12)
FO, leave tail. Flatten and sew to sides of head.
🐼 Muzzle (White)
- MR, 6 sc
- inc x6 (12)
- (1 sc, inc) x6 (18)
- sc around (18)
FO, stuff lightly. Sew between eyes. Embroider black nose and mouth.
🐼 Arms (Make 2 – Black)
- MR, 6 sc
- (sc, inc) x3 (9)
3–7. sc around (9)
FO, stuff lightly. Flatten open end. Sew one arm to each side of the frame later.
🐼 Legs (Make 2 – Black)
- MR, 6 sc
- inc x6 (12)
- (1 sc, inc) x6 (18)
4–6. sc around (18) - (1 sc, dec) x6 (12)
- sc around (12)
FO, stuff and sew to body.
🐼 Body (Start with White, switch to Black)
- MR, 6 sc
- inc x6 (12)
- (sc, inc) x6 (18)
- (2 sc, inc) x6 (24)
- (3 sc, inc) x6 (30)
6–8. sc around (30) - Change to Black, sc around (30)
- (3 sc, dec) x6 (24)
- sc around (24)
- (2 sc, dec) x6 (18)
- sc around (18)
– Stuff firmly - (1 sc, dec) x6 (12)
- dec x6 (6)
FO, close and weave in.
🖼️ Mini Picture Frame (White)
Front Frame (Make 1)
- Ch 16
- Row 1: sc in 2nd ch from hook and across (15)
3–15. sc across (15)
FO and weave ends.
🧷 Optional: Work a round of sc around the whole square, placing 3 sc in each corner for rounded edges.
Cut Window:
Use scissors to cut a 2.5″ square center opening. You can also crochet the window with chain gaps in Row 6–10 if preferred.
🧲 Assembly
- Insert photo and clear plastic square into the crocheted frame and secure with light stitching or glue from behind.
- Sew the frame securely to the panda’s body.
- Attach arms so they appear to “hold” the frame gently.
- Add optional blush (with pink yarn or soft fabric paint).
💡 Optional Touches
- Add a ribbon bow or name label
- Embroider date or special text on the frame
- Create a hanging loop or magnet version!
This cuddly panda frame is more than decoration — it’s a heartfelt memory holder 🐾📸. Perfect for nurseries, gifts, or your desk buddy!