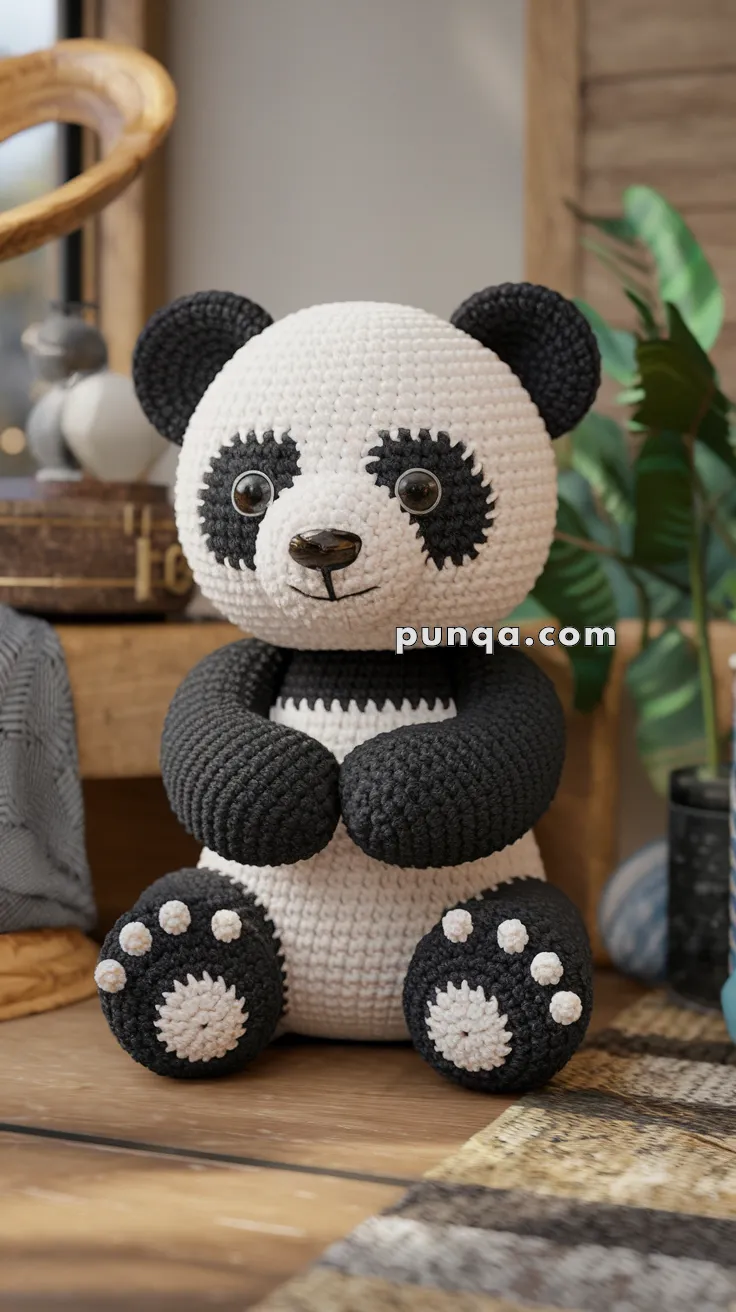
Cuddle up with cuteness using this Amigurumi Panda Baby crochet pattern! With its round belly, tiny paws, and sweet expression, this little panda is the perfect plushie for gifting, playtime, or adding a touch of charm to your handmade collection. Whether you’re crafting for a nursery, a panda-loving friend, or just want a quick and adorable project, this baby bear is sure to bring smiles with every stitch. 🧶🐼💖
Designed for softness and simplicity, this pattern invites you to explore classic black-and-white colorwork, gentle shaping, and fun extras like a diaper, bow, or even a tiny bamboo snack. Customize your panda with pastel tones or playful accessories to match your style. Whether perched on a shelf, tucked into a gift basket, or snuggled up for storytime, this Panda Baby Amigurumi is a joyful and satisfying project—perfect for stitching up a little handmade hug, one loop at a time! ✨🌿🎁
🐼 Amigurumi Panda Baby Crochet Pattern
Bring this cuddly panda to life! With its wide button eyes, jagged-edged eye patches, soft muzzle, and adorable paw pads, this amigurumi panda is the perfect gift for animal lovers, nursery décor, or your own cozy collection.
✨ Skill Level
Intermediate – includes color changes, embroidery, and shaping.
📏 Finished Size
Approx. 10–12 in (25–30 cm) tall using DK or worsted weight yarn and a 2.75–3.5 mm hook.
🧶 Materials
-
Yarn (DK or Worsted weight):
-
White (head, body, belly, paw details)
-
Black (ears, arms, legs, eye patches, chest band)
-
Ivory/Beige (paw pads, muzzle)
-
-
Crochet hook: 2.75–3.5 mm (adjust to yarn size)
-
10–12 mm safety eyes
-
Black safety nose or embroidery thread
-
Black embroidery thread for mouth/eyelids
-
Polyfill stuffing
-
Tapestry needle
-
Stitch markers
-
Scissors
🧵 Abbreviations (US Terms)
-
MR – Magic Ring
-
sc – Single Crochet
-
inc – Increase (2 sc in one stitch)
-
dec – Decrease (invisible preferred)
-
sl st – Slip Stitch
-
ch – Chain
-
BLO – Back Loop Only
-
FLO – Front Loop Only
-
FO – Fasten Off
🧠 Head (White)
-
MR, 6 sc (6)
-
inc x6 (12)
-
(1 sc, inc) x6 (18)
-
(2 sc, inc) x6 (24)
-
(3 sc, inc) x6 (30)
-
(4 sc, inc) x6 (36)
-
(5 sc, inc) x6 (42)
8–18. sc around (42) -
(5 sc, dec) x6 (36)
-
(4 sc, dec) x6 (30)
-
(3 sc, dec) x6 (24)
-
(2 sc, dec) x6 (18)
Stuff firmly. -
(1 sc, dec) x6 (12)
-
dec x6 (6) → FO, close
👉 Positioning: Insert safety eyes between Rnds 10–11, spaced about 10 stitches apart. Eye patches will go under them.
👀 Eye Patches (Black, Make 2)
-
MR, 6 sc (6)
-
(1 sc, inc) x3 (9)
-
sc around (9–10 sts) – shape into a slightly oval patch.
👉 To create jagged edges like in the photo:
-
Work alternating inc/dec in one round, or add a few tiny embroidered “spikes” around the edges after sewing.
FO, flatten slightly. Sew behind safety eyes before attaching them.
🐽 Muzzle (Ivory/Beige)
-
MR, 6 sc (6)
-
inc x6 (12)
-
(1 sc, inc) x6 (18)
4–5. sc around (18)
FO, stuff lightly.
👉 Placement: Sew the muzzle slightly lower than center, leaving a wide forehead area above the eyes (matches photo). Attach safety nose or embroider. Add vertical mouth line + small side smile curves with black thread.
👂 Ears (Black, Make 2)
-
MR, 6 sc (6)
-
inc x6 (12)
-
(1 sc, inc) x6 (18)
4–5. sc around (18) -
(1 sc, dec) x6 (12)
FO, flatten (do not stuff). Sew symmetrically on head between Rnds 5–7.
🧸 Body (White + Black Chest Band)
-
MR, 6 sc (6)
-
inc x6 (12)
-
(1 sc, inc) x6 (18)
-
(2 sc, inc) x6 (24)
-
(3 sc, inc) x6 (30)
-
(4 sc, inc) x6 (36)
7–10. sc around (36)
11–13. Switch to black, sc around (36) → chest band
14–18. Switch back to white, sc around (36) -
(4 sc, dec) x6 (30)
-
(3 sc, dec) x6 (24)
-
(2 sc, dec) x6 (18)
Stuff firmly. -
(1 sc, dec) x6 (12)
-
dec x6 (6) → FO, close
💪 Arms (Black, Make 2)
-
MR, 6 sc (6)
-
(1 sc, inc) x3 (9)
3–14. sc around (9)
Stuff lightly. FO, flatten.
👉 Placement: Sew at the black chest stripe, angled slightly forward so arms hug inward.
🦵 Legs (Black, Make 2)
-
MR, 6 sc (6)
-
inc x6 (12)
-
(1 sc, inc) x6 (18)
4–6. sc around (18) -
(1 sc, dec) x6 (12)
8–12. sc around (12)
Stuff firmly. FO, flatten top.
👉 Sew wide apart and angled forward for sitting pose.
🐾 Paw Pads
Foot Pads (Make 2, Ivory)
-
MR, 6 sc (6)
-
inc x6 (12)
-
(1 sc, inc) x6 (18)
-
(2 sc, inc) x6 (24) → FO
Toes (Make 6, Ivory)
-
MR, 4 sc (4)
-
sc around (4) → FO
👉 Attach 1 large pad to each foot bottom, and 3 small toes above (like photo).
🧷 Final Assembly
-
Sew head firmly to body.
-
Attach arms to hug inward.
-
Sew legs wide apart so panda sits upright.
-
Add ears, muzzle, and eye patches symmetrically.
-
Embroider eyelids and mouth details.
-
Optional: add light blush to cheeks.
🌟 Customization Ideas
-
Add a bamboo stick, scarf, or seasonal accessory.
-
Swap colors for a red panda version (rust + cream).
-
Use cotton yarn for a matte, realistic texture.
🎉 Your snuggly Amigurumi Panda Baby is ready! With jagged eye patches, paw pads, and hugging arms, this little friend will melt hearts wherever it sits. 🐼💕