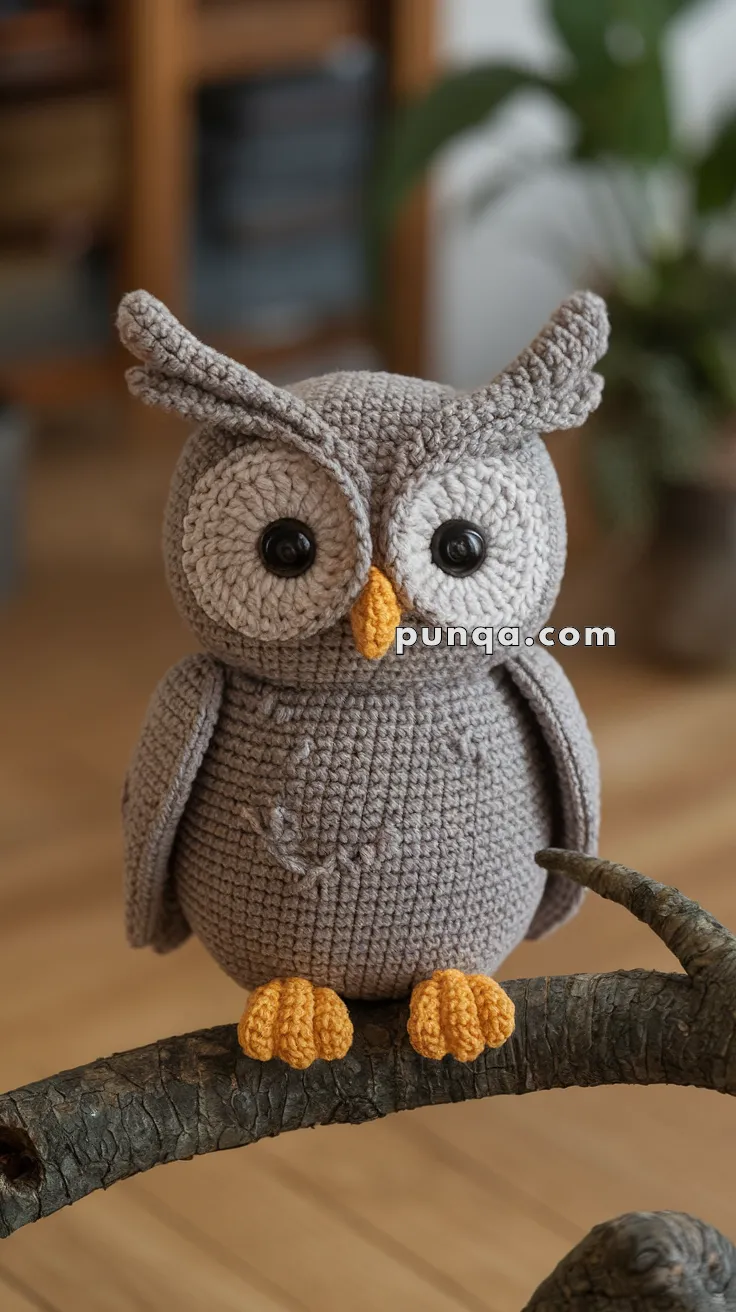
Perfect for crocheters who enjoy soothing colors and simple elegance, this pattern invites you to explore texture and personality in a soft, calming way. Add tiny accessories like a scarf or acorn, pair it with other forest animals, or stitch up a whole parliament of pastel owls. The Amigurumi Woodland Owl is a joyful way to stitch up serenity, sweetness, and a sprinkle of handmade woodland magic—one loop at a time! 🧵🌲✨
✨ Skill Level
Intermediate
Techniques used:
📏 Finished Size
Approx. 21–23 cm (8–9 inches) tall using worsted weight yarn and a 3 mm crochet hook.
🧶 Yarn Requirements
Worsted weight yarn.
Warm grey — 120 g / 240 m (body, wings, ear tufts)
Light cream — 40 g / 80 m (face discs)
Mustard yellow — 20 g / 40 m (beak and feet)
Polyester stuffing — approx 140 g
Safety eyes — 14 mm black (2)
🧰 Tools & Supplies
3 mm crochet hook
Tapestry needle
Stitch markers
Embroidery needle
Polyester fiberfill
🧵 Abbreviations (US Terms)
MR — Magic Ring
sc — Single Crochet
inc — Increase (2 sc in same stitch)
dec — Invisible decrease
sl st — Slip stitch
ch — Chain
st — Stitch
FO — Fasten off
Head and Body (Worked as One Piece)
The owl is intentionally wide and rounded, almost like a soft sphere with a slight belly.
Using grey yarn.
Round 1
MR, 6 sc (6)
Round 2
inc x6 (12)
Round 3
(1 sc, inc) x6 (18)
Round 4
(2 sc, inc) x6 (24)
Round 5
(3 sc, inc) x6 (30)
Round 6
(4 sc, inc) x6 (36)
Round 7
(5 sc, inc) x6 (42)
Round 8
(6 sc, inc) x6 (48)
Rounds 9–15
sc around (48)
This creates the full rounded head.
Round 16
(6 sc, dec) x6 (42)
Round 17
(5 sc, dec) x6 (36)
Round 18
(4 sc, dec) x6 (30)
Rounds 19–22
sc around (30)
Begin stuffing the body firmly and shape it into a rounded ball.
Round 23
(3 sc, dec) x6 (24)
Round 24
(2 sc, dec) x6 (18)
Round 25
(1 sc, dec) x6 (12)
Round 26
dec x6 (6)
FO and close.
Shape the body so it remains round rather than tapered.
Face Discs (Make 2)
Using cream yarn.
Round 1
MR, 6 sc
Round 2
inc x6 (12)
Round 3
(1 sc, inc) x6 (18)
Round 4
(2 sc, inc) x6 (24)
Round 5
(3 sc, inc) x6 (30)
Round 6
sc around (30)
FO leaving a long tail.
Insert the safety eyes through the center of each disc before attaching.
Sew the discs onto the head so they touch slightly in the middle.
Beak
Using mustard yarn.
Round 1
MR, 4 sc
Round 2
(1 sc, inc) x2 (6)
Round 3
sc around (6)
FO.
Flatten slightly into a triangle and sew between the facial discs.
Ear Tufts (Make 2)
These pieces create the owl’s expressive brow shape.
Using grey yarn.
Round 1
MR, 6 sc
Round 2
(1 sc, inc) x3 (9)
Rounds 3–12
sc around (9)
Do not stuff.
Flatten gently and curve slightly.
Sew along the top of the head so they angle upward and outward.
Wings (Make 2)
Using grey yarn.
Round 1
MR, 6 sc
Round 2
inc x6 (12)
Round 3
(1 sc, inc) x6 (18)
Round 4
(2 sc, inc) x6 (24)
Round 5
(3 sc, inc) x6 (30)
Rounds 6–7
sc around (30)
Flatten completely without stuffing.
FO leaving a long tail.
Attach vertically along the sides of the body so the wings sit close and slightly curved.
Feet (Make 2)
Each foot consists of three thick toes joined together.
Toes (Make 6)
Using mustard yarn.
Round 1
MR, 6 sc
Round 2
(1 sc, inc) x3 (9)
Rounds 3–5
sc around (9)
FO on five toes.
Leave yarn attached on the sixth.
Join Toes
Place three toes side by side.
Round 6
sc evenly around all three toes (18)
Rounds 7–8
sc around (18)
Lightly stuff.
FO leaving a sewing tail.
Assembly
Sew the face discs onto the upper front of the head.
Insert and secure safety eyes.
Attach the beak centered between the discs.
Sew ear tufts to the top edges of the head so they arch outward.
Attach the wings vertically along the sides of the body.
Sew the feet slightly forward at the base so the owl sits balanced.
Shape the body with your hands to keep the smooth rounded silhouette.
🦉 Finishing Touches
Adjust the ear tufts so they curve upward like raised brows.
Shape the wings so they hug the body.
Gently compress the belly to keep the owl compact and round.
🌲 Finished Owl
The completed owl sits upright with a plump rounded body, large expressive eyes, and soft curved ear tufts that give it a calm woodland personality. Its chunky feet and narrow wings create a natural perched pose while maintaining a clean, modern amigurumi look.
This cozy owl makes a lovely woodland decor piece, nursery companion, or thoughtful handmade gift.