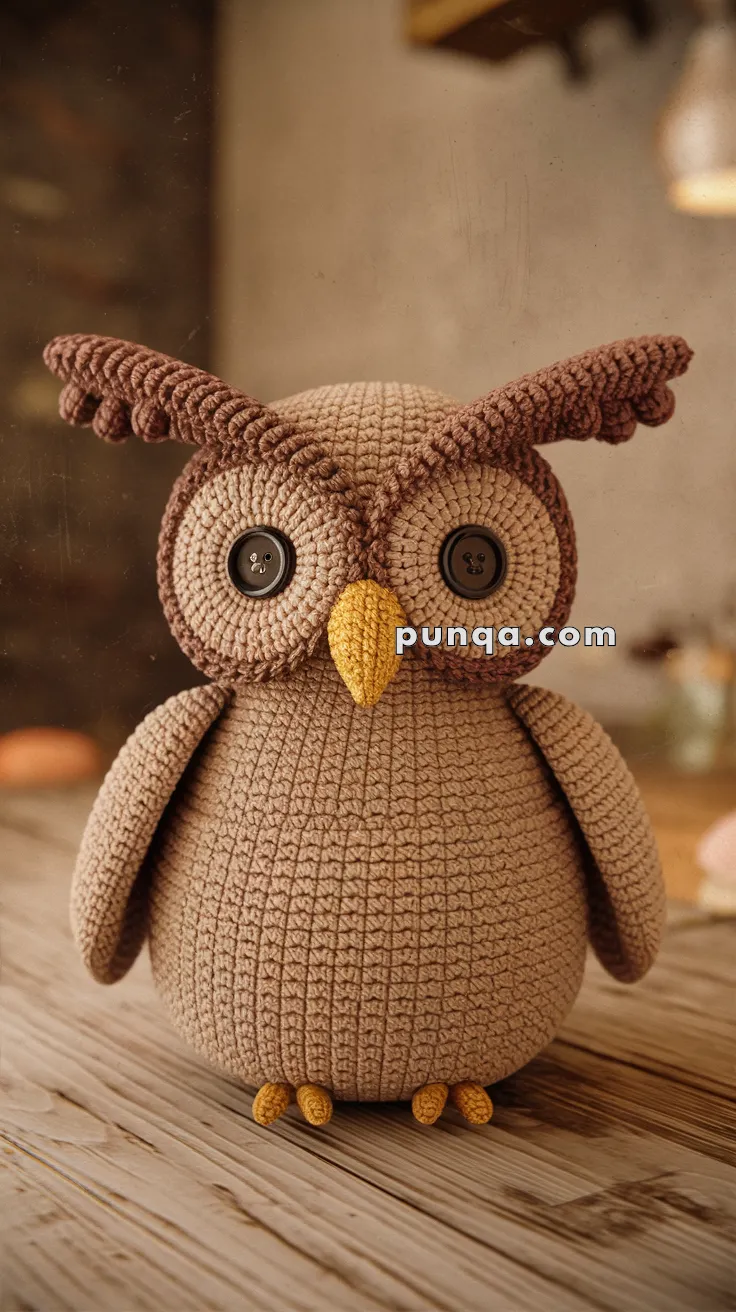
Dive into the magic of handmade crafting with the Amigurumi Owl with Button Eyes!🦉✨ This charming little owl, with its quirky button eyes and cozy design, is the perfect blend of whimsy and creativity. Whether you choose soft, earthy tones or bold, vibrant hues, each stitch brings your owl to life with personality and charm. The playful mix of textures and thoughtful details make this project a delightful journey into amigurumi artistry.
🎨🧵 As you crochet, you’ll enjoy the soothing rhythm of stitches coming together, transforming simple yarn into an endearing feathered friend. With its expressive button eyes and snug shape, this owl becomes more than just a project—it’s a handcrafted treasure full of warmth and character. Whether you’re making it as a gift, décor, or a beloved addition to your collection, this pattern lets you infuse your creativity into every loop and detail. Let’s get stitching and bring this adorable owl to life! 🦉💕
🦉 Amigurumi Owl with Button Eyes Crochet Pattern
Bring woodland charm to your handmade collection with this wise and cozy amigurumi owl! With its round body, bold eyebrows, button eyes, and golden beak, this owl is a show-stopper. Perfect for nursery decor, gifts, or just adding a forest friend to your amigurumi family.
✨ Skill Level
Beginner to Intermediate – basic shaping, color changes, and textured eyebrow tufts.
📏 Finished Size
Approx. 20–25 cm (8–10 in) tall with worsted yarn and a 3.5 mm hook.
🧶 Materials
-
Worsted weight yarn:
-
Light brown (main body, wings)
-
Dark brown (face rings, eyebrow tufts)
-
Mustard/yellow (beak, feet)
-
-
3.5 mm crochet hook
-
Polyester stuffing
-
2 black buttons (or safety eyes)
-
Black embroidery thread (optional for mouth detail)
-
Tapestry needle & scissors
🧵 Abbreviations (US Terms)
-
MR – Magic Ring
-
sc – single crochet
-
inc – increase (2 sc in same st)
-
dec – decrease (sc 2 together)
-
sl st – slip stitch
-
ch – chain
-
FO – fasten off
🪶 Pattern Instructions
🟤 Head & Body (worked in one piece) – Light Brown
-
MR, 6 sc (6)
-
inc ×6 (12)
-
(sc, inc) ×6 (18)
-
(2 sc, inc) ×6 (24)
-
(3 sc, inc) ×6 (30)
-
(4 sc, inc) ×6 (36)
-
(5 sc, inc) ×6 (42)
8–20. sc around (42)
➡️ Place buttons (or safety eyes) later, centered in face rings.
-
(5 sc, dec) ×6 (36)
-
(4 sc, dec) ×6 (30)
-
(3 sc, dec) ×6 (24)
-
(2 sc, dec) ×6 (18)
-
(sc, dec) ×6 (12)
➡️ Begin body expansion:
-
inc in each st (24)
-
(3 sc, inc) ×6 (30)
-
(4 sc, inc) ×6 (36)
29–39. sc around (36) -
(4 sc, dec) ×6 (30)
-
(3 sc, dec) ×6 (24)
-
(2 sc, dec) ×6 (18)
-
(sc, dec) ×6 (12)
-
dec ×6 (6)
FO, close. Stuff firmly.
🟤 Face Rings (Make 2 – Dark Brown)
These form the large eye circles.
-
MR, 6 sc (6)
-
inc ×6 (12)
-
(sc, inc) ×6 (18)
-
(2 sc, inc) ×6 (24)
-
(3 sc, inc) ×6 (30)
-
(4 sc, inc) ×6 (36)
-
To create an oval: ch 1, sc in next 30 sts, hdc in next 3, dc in next 3, sl st to join.
FO, leaving a long tail. Sew to head. Place black buttons at centers.
🟡 Beak (Mustard/Yellow)
-
MR, 4 sc (4)
-
(sc, inc) ×2 (6)
-
sc around (6)
-
dec ×3 (3)
FO, sew between eyes.
🪶 Wings (Make 2 – Light Brown)
-
MR, 6 sc (6)
-
inc ×6 (12)
-
(sc, inc) ×6 (18)
-
(2 sc, inc) ×6 (24)
5–10. sc around (24) -
(2 sc, dec) ×6 (18)
-
(sc, dec) ×6 (12)
-
dec ×6 (6)
FO, flatten, sew to sides of body.
🟤 Eyebrow Tufts (Make 2 – Dark Brown)
These create the owl’s dramatic “eyebrows.”
-
Ch 18.
-
Row 1: sc in 2nd ch from hook and across (17 sts).
-
Row 2: ch 1, turn. (sc in next st, skip 1, 5 dc in next st, skip 1) repeat across. End with sc in last st.
This creates a curved scallop edge. FO with long tail. Sew above each eye ring, arcing outward.
🟡 Feet (Make 6 Toes Total – Yellow)
-
MR, 5 sc (5)
2–3. sc around (5)
FO.
Sew 3 toes side by side at bottom front for each foot.
🪡 Assembly
-
Sew face rings centered on head, slightly overlapping at middle.
-
Attach button eyes in centers.
-
Sew beak between rings.
-
Sew eyebrow tufts above, angling outward.
-
Attach wings to body sides.
-
Sew feet to bottom.
-
Stuff firmly, shape by hand.
🌲 Finished Look
Your owl should have:
-
Chubby round body with smooth belly
-
Large button eyes framed by oval dark brown rings
-
Bold arched eyebrow tufts with scallops
-
Small golden beak and three-toed feet
This matches the wise woodland owl in the photo exactly! 🦉✨