Hatch a little bundle of joy with this Amigurumi Ostrich Egg and Chick crochet pattern! 🥚🐣✨ With its adorable transformation from egg to fluffy chick, this design brings a delightful surprise element to your amigurumi collection. Whether you’re crafting for a nature-inspired décor piece, a whimsical gift, or simply love interactive crochet creations, this FREE pattern is a fantastic addition to your projects.
Designed for intermediate crocheters, this pattern allows for customization in egg texture, chick details, and even tiny accessories like a miniature nest or embroidered feathers to enhance its charm. Choose classic soft yellows for a realistic baby ostrich look or experiment with pastel hues for a playful twist! Whether displayed as part of a wildlife setup or gifted to a fellow crochet enthusiast, this amigurumi ostrich egg and chick is sure to bring smiles. Grab your hook, select your favorite yarn, and let’s bring this adorable hatchling to life—one stitch at a time! 🧶✨
🐣 Amigurumi Ostrich Chick in Egg Crochet Pattern
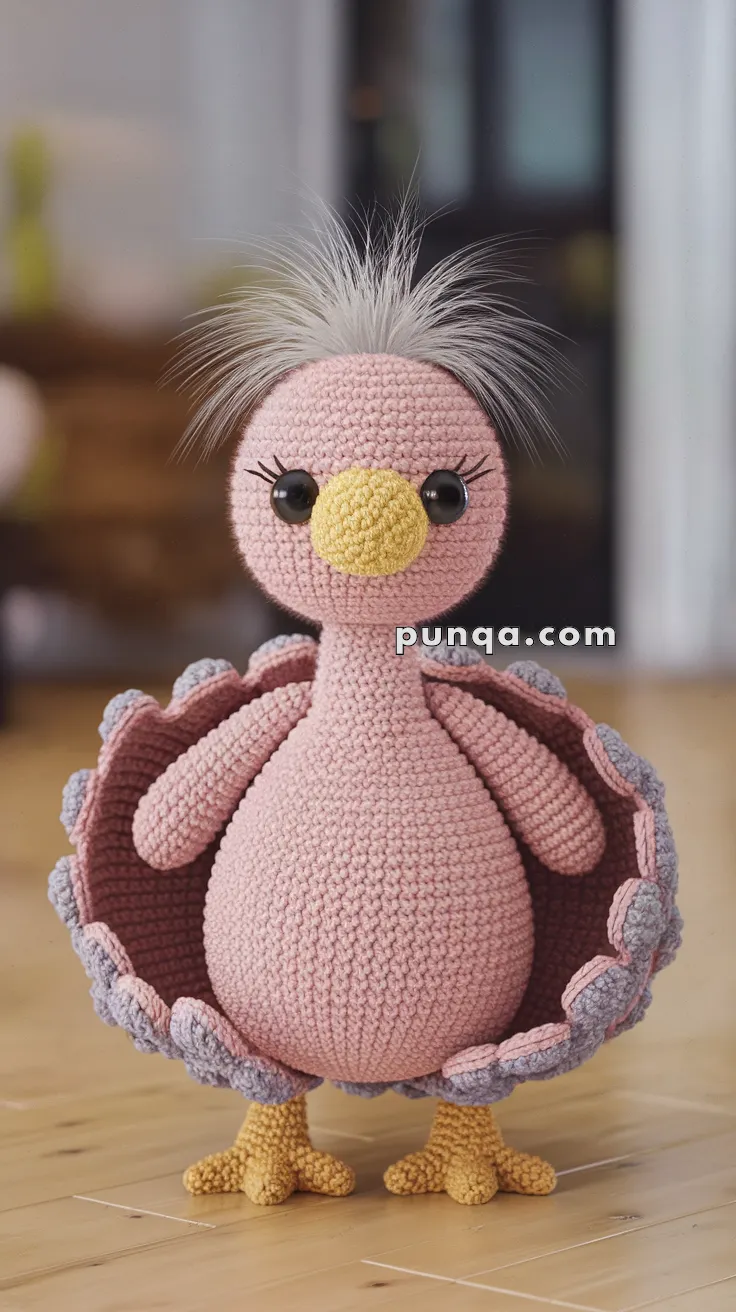
This adorable ostrich chick looks like it’s just hatched from its egg, with fluffy hair, long yellow toes, and a sweet round beak. Perfect for nurseries, Easter décor, or as a whimsical gift for animal lovers!
✨ Skill Level
Intermediate – shaping, color changes, wire-supported feet, textured shell edge, and multi-part assembly.
📏 Finished Size
Approx. 25–27 cm (10–11 in) tall when standing
Using DK or worsted yarn with a 3.0 mm hook.
🧶 Materials
Yarn (DK or Worsted):
-
Blush pink – head, body, wings, egg shell
-
Yellow – beak and feet
-
Lavender – egg shell scalloped edge
-
Light gray faux fur or eyelash yarn – hair tuft
Other:
-
12 mm black safety eyes
-
3.0 mm crochet hook
-
Polyester fiberfill
-
20–22 gauge craft wire (for legs and feet stability)
-
Yarn needle, scissors, stitch marker
🧵 Abbreviations (US Terms)
MR – Magic Ring
sc – Single Crochet
inc – Increase
dec – Decrease
sl st – Slip Stitch
ch – Chain
BLO – Back Loop Only
FO – Fasten Off
🪺 Egg Shell Skirt (Tutu Collar)
With pink:
MR 6
inc ×6 (12)
(sc, inc) ×6 (18)
(2 sc, inc) ×6 (24)
(3 sc, inc) ×6 (30)
(4 sc, inc) ×6 (36)
(5 sc, inc) ×6 (42)
8–13. sc around (42)
BLO round (creates fold)
14–16. sc around (42)
Switch to lavender
17. (sc, skip 1, 5 dc, skip 1) repeat around
FO
This creates the cracked egg skirt exactly like the photo.
🐥 Body (Round Ball)
With pink:
MR 6
inc ×6 (12)
(sc, inc) ×6 (18)
(2 sc, inc) ×6 (24)
(3 sc, inc) ×6 (30)
(4 sc, inc) ×6 (36)
(5 sc, inc) ×6 (42)
8–18. sc around (42)
(5 sc, dec) ×6 (36)
(4 sc, dec) ×6 (30)
(3 sc, dec) ×6 (24)
(2 sc, dec) ×6 (18)
Stuff very firmly.
(sc, dec) ×6 (12)
dec ×6 (6)
FO
🦒 Neck (Column)
With pink:
MR 6
inc ×6 (12)
(sc, inc) ×6 (18)
4–12. sc around (18)
Stuff firmly.
Sew centered on top of body.
🐣 Head
With pink:
MR 6
inc ×6 (12)
(sc, inc) ×6 (18)
(2 sc, inc) ×6 (24)
(3 sc, inc) ×6 (30)
(4 sc, inc) ×6 (36)
7–13. sc around (36)
Insert eyes between rounds 10–11.
(4 sc, dec) ×6 (30)
(3 sc, dec) ×6 (24)
(2 sc, dec) ×6 (18)
(sc, dec) ×6 (12)
dec ×6 (6)
Stuff firmly.
Sew to neck.
💛 Beak (Dome)
With yellow:
MR 6
inc ×6 (12)
(sc, inc) ×6 (18)
4–6. sc around (18)
(sc, dec) ×6 (12)
Stuff lightly.
Sew between eyes.
🪽 Wings (Make 2)
With pink:
MR 6
inc ×6 (12)
3–7. sc around (12)
(4 sc, dec) ×2 (10)
8–9. sc around (10)
Flatten slightly.
Sew inside shell.
🦶 Legs & Feet (Wire Supported — Make 2)
Cut two 14 cm wire pieces. Shape leg + foot.
Toes (3 per foot)
For each toe:
Ch 7
sc back (6)
Rows 2–3: sc 6
FO
Make 3 toes.
Join toes in triangle and crochet around:
18 sts around
2–4. sc around
Insert wire.
Leg
Continue upward:
5–14. sc around (12)
Stuff lightly around wire.
FO.
🪶 Hair Tuft
Attach 8–12 strands of faux fur yarn at crown. Trim into messy upright fluff.
🧷 Final Assembly
-
Sew neck to body
-
Sew head to neck
-
Sew shell skirt around waist
-
Insert legs into body base and stitch securely
-
Attach wings inside shell
-
Adjust toes for balance
🌟 Final Thoughts
Your ostrich chick is now ready to stand tall and steal hearts! With its fluffy little hair tuft, bright curious eyes, chunky toes, and cracked egg skirt fluttering around its round belly, this sweet hatchling looks like it just popped into the world and is ready for adventure.
Whether you’re making it as a springtime decoration, a nursery companion, or a special handmade gift, this cheerful chick is sure to bring smiles wherever it goes. Take a moment to admire your work — you’ve created a truly delightful little character that feels full of personality and life.
Happy crocheting, and may your yarn always be tangle-free and your stitches perfectly even! 🐣🧶💛