Welcome to the adorable and feathery world of amigurumi! 🐣✨ Today, I’m excited to share my crochet pattern for an Ostrich Chick—a tiny, fluffy companion full of charm, personality, and delightful details! 🌿 Whether you love crafting miniature wildlife-inspired designs, enjoy making expressive baby animals, or simply want to stitch up an irresistibly cute ostrich chick, this pattern will guide you through creating a beautifully textured plush friend with soft down and playful shaping! 🤎
This design embraces fluffy textures, gentle curves, and delicate features to bring a heartwarming baby bird to life! 🧶🏞️ I’ve carefully outlined each step to ensure your Amigurumi Ostrich Chick turns out just right—ready to waddle into your collection or become a treasured handmade gift! 🎁 So grab your hooks, pick out warm creams, soft grays, and gentle beige tones, and let’s stitch up a sweet and cuddly ostrich chick! ✨
🐣 Amigurumi Ostrich Chick Crochet Pattern
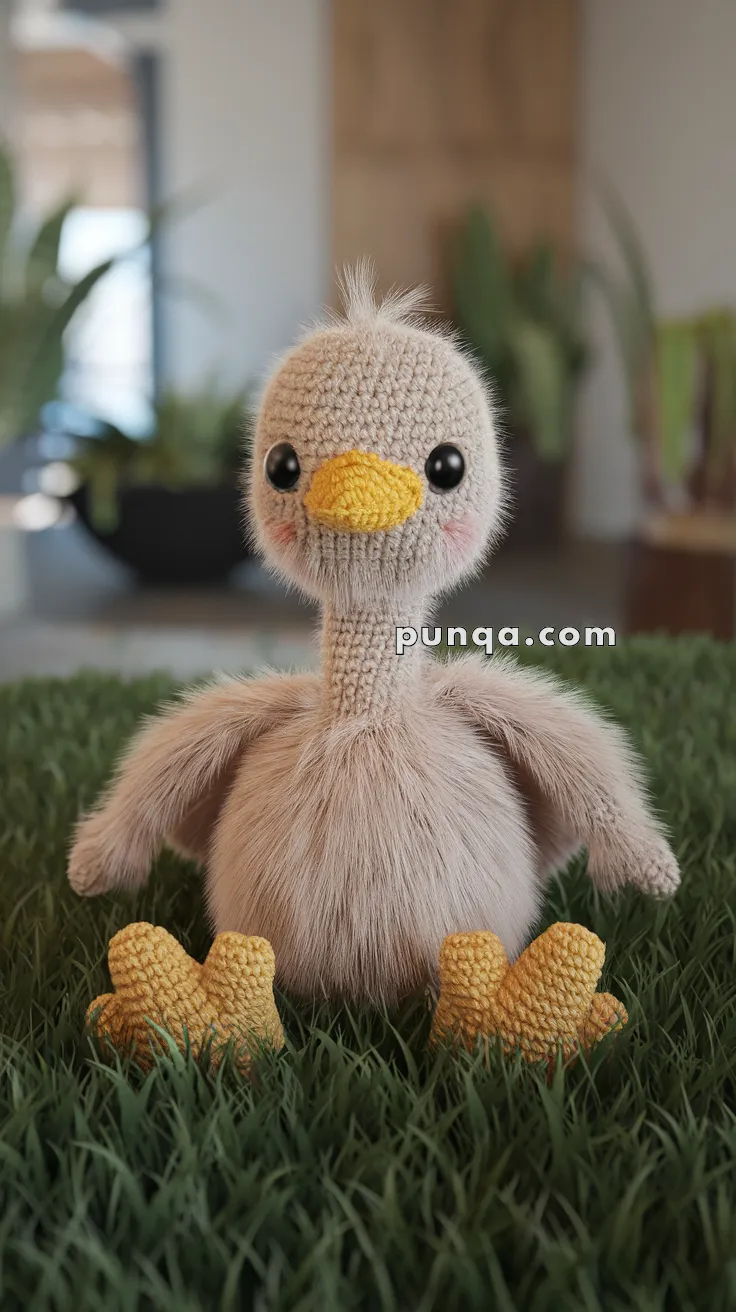
This fluffy ostrich chick is just the cutest little hatchling! With soft faux-fur yarn and bright yellow feet, it’s a huggable and whimsical addition to your amigurumi flock. Great for nursery decor or as a unique handmade gift!
✨ Skill Level
Intermediate – Combines basic crochet with faux fur yarn use and sewing multiple parts.
📏 Finished Size
Approximately 8–10 inches (20–25 cm) tall using worsted-weight yarn and faux-fur yarn with a 3.5–4 mm hook.
🧶 Materials
-
Worsted weight yarn (cotton or acrylic):
-
Color A: Beige or pale yellow (beak, feet)
-
Color B: Light tan (head and neck – non-fuzzy part)
-
-
Faux-fur yarn (e.g., Himalaya Dolphin Baby, Go For Faux):
-
Color C: Taupe or dusty brown (body, arms, fluff)
-
-
3.5 mm crochet hook
-
4.5 mm crochet hook (for faux fur)
-
Safety eyes (12 mm)
-
Tapestry needle
-
Stitch markers
-
Stuffing
-
Blush or pastel for cheeks (optional)
🧵 Abbreviations (US Terms)
MR – Magic Ring
sc – Single Crochet
inc – Increase
dec – Decrease
sl st – Slip Stitch
FO – Fasten Off
( ) – Repeat sequence
BLO – Back Loop Only
🧠 Head & Neck (Color B)
-
MR, 6 sc
-
inc x6 (12)
-
(1 sc, inc) x6 (18)
-
(2 sc, inc) x6 (24)
5–10. sc around (24)
Insert safety eyes between rounds 7–8, approx. 6–7 stitches apart -
(2 sc, dec) x6 (18)
-
(1 sc, dec) x6 (12)
Start stuffing
13–23. sc around (12) – This is the neck -
inc x6 (18)
-
(2 sc, inc) x6 (24) – FO, leave long tail for sewing
🪶 Body (Faux Fur Yarn – Color C, use 4.5 mm hook)
-
MR, 6 sc
-
inc x6 (12)
-
(1 sc, inc) x6 (18)
-
(2 sc, inc) x6 (24)
-
(3 sc, inc) x6 (30)
-
(4 sc, inc) x6 (36)
7–12. sc around (36) -
(4 sc, dec) x6 (30)
-
(3 sc, dec) x6 (24)
-
(2 sc, dec) x6 (18)
-
(1 sc, dec) x6 (12)
Stuff firmly -
dec x6 (6), FO
🐣 Beak (Color A)
-
MR, 6 sc
-
(1 sc, inc) x3 (9)
3–4. sc around (9) -
(2 sc, dec) x2, 1 sc (7)
Flatten slightly, FO and sew under eyes
✋ Wings (Make 2 – Faux Fur Yarn, Color C)
-
MR, 6 sc
-
(1 sc, inc) x3 (9)
3–6. sc around (9)
Flatten and lightly stuff -
Fold flat and sc across to close, FO and sew to sides
🐥 Feet (Make 2 – Color A)
Toes (Make 3 per foot):
-
MR, 6 sc
2–4. sc around (6)
FO 2 of them, do not cut yarn on 3rd
Join toes together:
-
Continue working:
-
sc in next 6 sts of toe 3
-
sc in next 6 sts of toe 2
-
sc in next 6 sts of toe 1 (18 sts total)
-
1 round sc around (18)
-
(1 sc, dec) x6 (12)
-
1 round sc (12)
Stuff lightly, flatten, FO. Sew to bottom of body.
-
✂️ Finishing Touches
-
Sew neck to body using yarn tail
-
Attach beak and wings
-
Embroider nostrils and lashes if desired
-
Apply blush to cheeks
-
Trim faux fur gently for shape if needed
This fluffy chick is bound to waddle right into your heart! Great for farm-themed nurseries or as a cuddly friend in your amigurumi collection. 🐤💛