Roll out the yarn and get ready to crochet a legend—introducing the Amigurumi Optimus Prime, a heroic twist on your handmade collection! 🤖🧶 With bold colors, iconic details, and a surprisingly cuddly form, this pattern transforms the mighty leader of the Autobots into a soft, stitchable companion. Whether you’re a die-hard Transformers fan or just love bringing characters to life through crochet, this project is packed with personality and power.
From his signature helmet to his blocky boots, every piece of Optimus Prime is a celebration of craftsmanship and geeky charm. Customize his armor, add tiny embellishments, or even pose him for display—this amigurumi is as fun to make as it is to show off. Perfect for gifting, collecting, or simply unleashing your inner crocheting superhero, this pattern proves that even the strongest warriors can be handmade with heart. 💥🧵
🤖 Amigurumi Optimus Prime–Inspired Robot Crochet Pattern
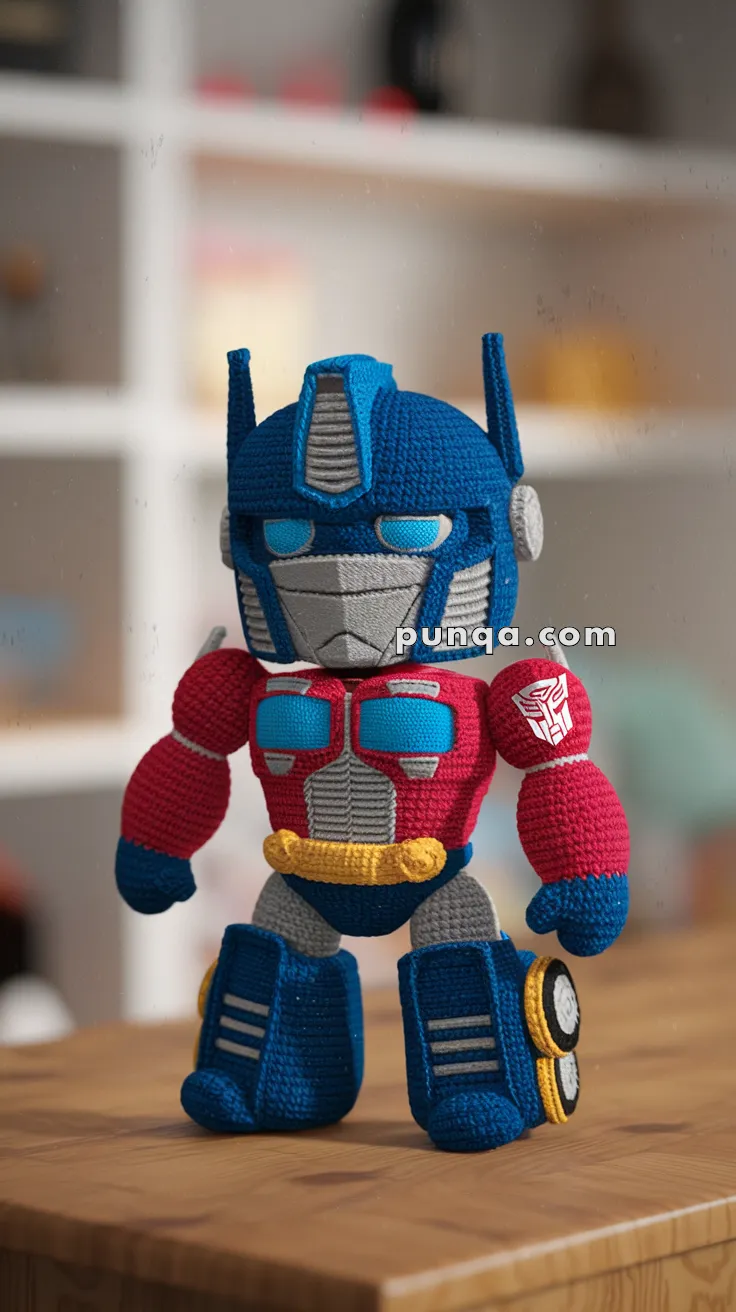
This bold, chibi-style robot is inspired by the legendary Optimus Prime! With his iconic blue helmet, glowing cyan eyes, red chest with twin windows, ribbed grille, yellow belt, and chunky boots with side wheels, this amigurumi is a true show-stopper.
Whether you’re a fan of Transformers or just love geeky crochet projects, this pattern will guide you step-by-step to create a display-ready figure.
✨ Skill Level
Intermediate – requires shaping, color changes, appliqué, and a bit of structural work with wire or felt.
📏 Finished Size
Approx. 22–24 cm (9–9.5 in) tall using DK cotton yarn and a 2.75–3.0 mm hook.
🧶 Materials
- Yarn (DK cotton): Blue, Red, Light Gray, Dark Gray, Yellow, Black, White, Cyan
- Crochet hook: 2.75–3.0 mm
- Polyester fiberfill
- Aluminum wire (1.5–2 mm) for arms, legs, and neck support
- Plastic canvas or cardboard (boot soles)
- Felt or craft foam (cyan for eyes, gray for knee/boot details, white circle for badge, black/yellow/white for wheels)
- Fabric glue or hot glue
- Yarn needle, scissors, stitch markers
- Optional: fabric paint for shoulder insignia
🔤 Abbreviations (US terms)
MR – magic ring
sc – single crochet
inc – increase (2 sc in same st)
dec – invisible decrease (sc 2 tog)
sl st – slip stitch
ch – chain
FO – fasten off
🧩 Pattern
1. Head (Helmet Base – Blue)
R1: MR 6 (6)
R2: inc x6 (12)
R3: (sc, inc) x6 (18)
R4: (2sc, inc) x6 (24)
R5: (3sc, inc) x6 (30)
R6: (4sc, inc) x6 (36)
R7: (5sc, inc) x6 (42)
R8: (6sc, inc) x6 (48)
R9–15: sc around (48)
R16: (6sc, dec) x6 (42)
R17: (5sc, dec) x6 (36)
R18: (4sc, dec) x6 (30)
R19: (3sc, dec) x6 (24)
FO, close.
👉 Tip: Work more flat rounds (R9–15) to give a dome rather than a tall sphere.
Helmet Crest (Blue):
Ch 7, turn, sc 6.
Row2: dec, sc 2, dec (4).
Row3: sc across.
Row4: dec, dec (2).
FO. Sew at forehead center.
Crest Vent (Gray):
Ch 5, sc across 5 rows. Add 4–5 horizontal dark gray surface stitches. Attach to crest base.
Antennae (2, Blue):
R1: MR 5 (5)
R2–10: sc around (5)
FO. Sew upright on each side of helmet.
Ear Pods (2, Gray):
R1: MR 6 (6)
R2: inc x6 (12)
R3: sc around (12)
Flatten and sew at sides of head.
2. Face Mask (Light Gray)
Ch 16.
Row1: sc across (15)
Row2: dec, sc 11, dec (13)
Row3: dec, sc 9, dec (11)
Row4: dec, sc 7, dec (9)
Row5: sc across (9)
Row6: dec, sc 5, dec (7)
Row7: sc across (7)
Row8: dec, sc 3, dec (5)
Row9: sc across (5). FO.
Edge with dark gray sl st for sharper outline.
Eyes (non-yarn): Cut two cyan felt rectangles, angled at the inner corners. Glue under top mask edge.
Cheek Panels (Gray, 2):
Ch 6, sc across 2 rows. Row3: sl st, sc 4. FO. Attach diagonally at mask sides.
3. Torso (Red)
R1: MR 6 (6)
R2: inc x6 (12)
R3: (sc, inc) x6 (18)
R4: (2sc, inc) x6 (24)
R5: (3sc, inc) x6 (30)
R6: (4sc, inc) x6 (36)
R7–12: sc around (36)
R13: (4sc, dec) x6 (30)
R14: sc around (30)
R15: (3sc, dec) x6 (24)
FO, stuff firmly.
Chest Windows (2, Blue with Gray Frames):
Ch 10.
Row1–7: sc across (9). FO.
Edge with gray sl st.
Sew side-by-side on chest with 1–2 st gap.
Grille (Light Gray):
Ch 9. Work 16 rows of sc (9 sts each). Surface stitch vertical ribs in dark gray. Place under windows.
Belt (Yellow):
Ch 8, sc 7 for 2 rows. FO. Attach across torso bottom front.
Knobs (2): MR 6 → inc → (12). FO. Sew one on each side of belt.
4. Arms (Make 2)
Upper Arm (Red):
R1: MR 6 (6)
R2: inc x6 (12)
R3–9: sc around (12)
Lower Arm & Hand (Blue):
R10: change to blue, sc around (12)
R11–14: sc around (12)
R15: (2sc, dec) x3 (9)
R16: (sc, dec) x3 (6)
FO, close. Stuff lightly.
Shoulder Cap (Red):
R1: MR 6 (6)
R2: inc x6 (12)
R3: (sc, inc) x6 (18). FO.
Sew flat to shoulder.
Badge (non-yarn): White felt circle with red insignia painted or stitched. Attach to right shoulder.
5. Pelvis (Blue)
R1: MR 6 (6)
R2: inc x6 (12)
R3: (sc, inc) x6 (18)
R4–5: sc around (18)
FO. Sew under torso.
6. Legs & Boots (Make 2)
Thigh Connector (Gray):
R1: MR 6 (6)
R2: (sc, inc) x3 (9)
R3–6: sc around (9). FO.
Boot Sole (Blue):
Ch 10, work oval base (20 sts).
R2: sc around with increases (24).
R3: (sc 10, inc 2, sc 10, inc 2) (28).
R4: blo sc around (28). Insert plastic canvas sole.
Boot Shaft (Blue):
R5–8: sc around (28)
R9: (5sc, dec) x4 (24)
R10–14: sc around (24).
FO. Stuff firmly.
Knee Plate (Gray, 2):
Ch 8, sc 7 for 6 rows. FO. Sew at top of boot fronts.
Front Ladders (Non-yarn): Three gray felt strips glued vertically, covering ⅔ boot height.
Side Wheels (Per Boot, 2):
- Black tire: MR 6 → (sc, inc) x6 (12).
- Yellow hub: MR 6 → (sc, inc) x6 (12).
- White cap: MR 6 (6), inc (12).
Stack and sew. Attach to boot sides low near ankle.
🧩 Assembly & Shaping
- Join head to torso, slightly forward tilt.
- Sew chest windows wide and square; grille centered under them.
- Add yellow belt strip, then knobs.
- Attach arms at sides; badge on right shoulder.
- Sew thighs into pelvis, then boots. Keep boots flat and boxy — steam block if needed.
- Add knee plates and ladder strips on boots.
- Attach wheels to outer sides.
🌟 Finishing Touches
- Steam block the helmet, boots, and grille for sharp lines.
- Lightly stuff arms so they stay flexible.
- Outline eyes with thin black thread for intensity.
- Add pellets inside boots for stability if standing display is desired.
🎉 You’re done!
Your chibi “Optimus Prime–inspired” robot should now match the photo: bold blue helmet with silver crest vent, cyan lenses, red torso with twin blue windows, ribbed gray grille, yellow belt with knobs, chunky blue boots with silver ladders and side wheels, and the shoulder badge.