Bring the peaceful charm of an Olive Tree with Mini Doves to life with this Amigurumi Olive Tree crochet pattern! 🌿🕊️✨ With its delicate branches, textured leaves, and tiny doves perched gracefully, this design captures the essence of serenity and harmony in yarn form. Whether you’re crafting for a nature-inspired décor piece, a meaningful gift, or simply love symbolic amigurumi, this FREE pattern is a beautiful addition to your collection.
Designed for intermediate crocheters, this pattern allows for customization in leaf textures, dove details, and even tiny accessories like a miniature olive or a rustic pot to enhance its charm. Choose classic greens and browns for a natural look or experiment with soft pastels for a whimsical twist! Whether displayed as part of a peaceful setup or gifted to a fellow crochet enthusiast, this amigurumi olive tree is sure to inspire. Grab your hook, select your favorite yarn, and let’s bring this tranquil creation to life—one stitch at a time! 🧶✨
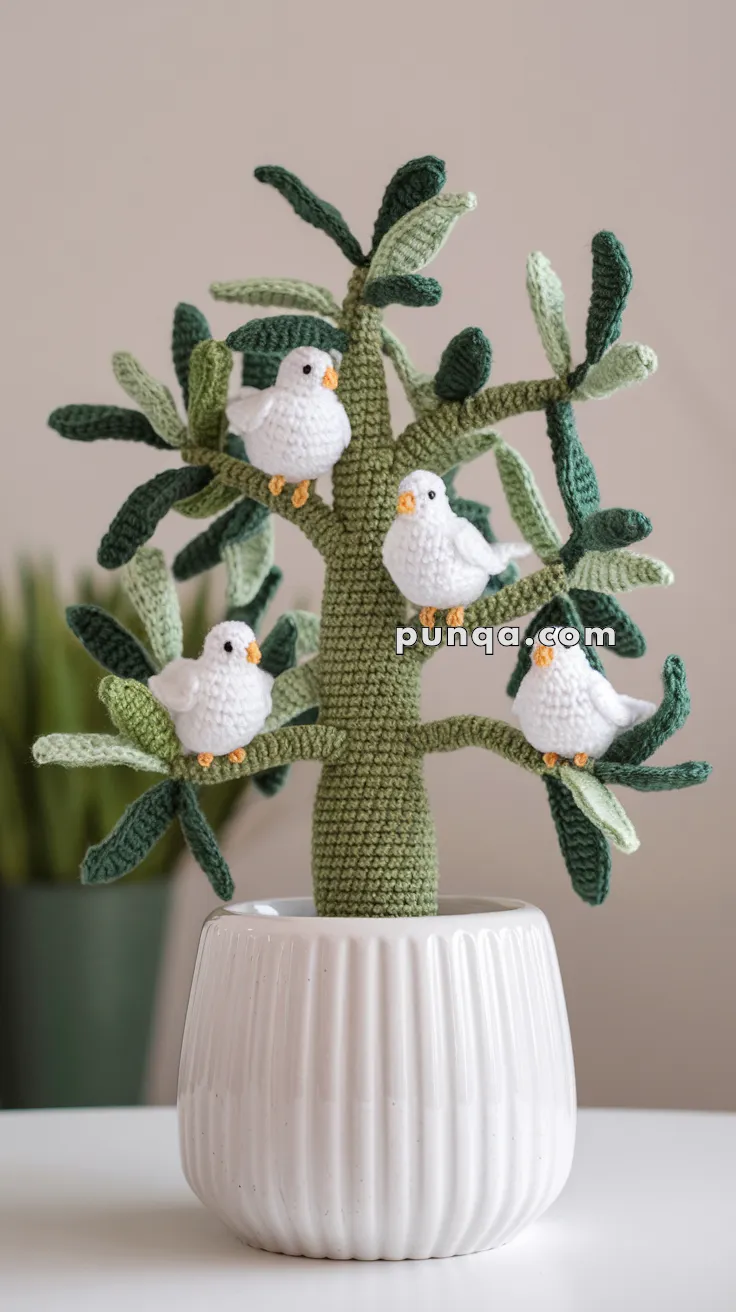
🕊️ Amigurumi Olive Tree with Mini Doves Crochet Pattern
Bring peace, charm, and a touch of nature into your home with this delightful Amigurumi Olive Tree — complete with tiny white doves perched among its leafy branches. This handmade piece beautifully combines structure, texture, and symbolism, representing tranquility and hope. Whether you’re decorating a cozy corner, gifting a loved one, or creating a centerpiece for your table, this crochet tree radiates warmth all year round. 🌿🕊️
✨ Skill Level
Intermediate – involves shaping with wire, crocheting in the round, and assembling multiple parts for a realistic finish.
📏 Finished Size
Approximately 25–30 cm tall, including the pot, depending on yarn weight and tension.
🧶 Materials
-
Cotton or acrylic yarn in:
-
Olive green (trunk and branches)
-
Dark green, medium green, and light green (leaves)
-
White (birds)
-
Orange (beaks and feet)
-
Black (for eyes and embroidery)
-
-
Crochet hook (2.5–3 mm depending on your yarn)
-
Floral or medium-strength wire (for trunk and branches)
-
Fiberfill stuffing
-
Yarn needle and scissors
-
Black embroidery thread or tiny seed beads (for eyes)
-
Ceramic pot or sturdy container
-
Stones, plaster, or glued cardboard base (to stabilize the tree)
🧵 Abbreviations (US Terms)
MR = Magic Ring
SC = Single Crochet
INC = Increase (2 SC in same stitch)
DEC = Decrease (SC 2 stitches together)
CH = Chain
SL ST = Slip Stitch
BLO = Back Loop Only
Bobble = 4 double crochet cluster in same stitch
🌳 Tree Trunk
With olive green yarn:
MR, 6 SC (6)
INC in each stitch around (12)
(SC, INC) × 6 (18)
(2 SC, INC) × 6 (24)
Rounds 5–7: SC around (24)
(3 SC, INC) × 6 (30)
Rounds 9–25: SC around (30) — adjust to desired height
DEC evenly 4 times (26)
SC around (26)
Insert 3–4 wires twisted together inside the trunk. Leave extra length at the bottom to anchor into the pot. Slightly taper the top by decreasing 2–3 stitches near the end so branches attach more naturally. Stuff the trunk firmly, keeping wire centered.
🌿 Branches (Make 6–7)
With olive green yarn:
MR, 6 SC (6)
(SC, INC) × 3 (9)
Rounds 3–18: SC around (9)
For photo accuracy, you can stop at 8 stitches instead of 9 for a slimmer look.
Stuff lightly, insert a piece of wire, and bend each branch slightly.
Attach the wire ends of each branch to the main trunk wire by twisting them together tightly. Then, wrap the joint with olive yarn, sewing over the wrapped section to blend it seamlessly into the trunk. This makes the join invisible and gives a clean finish.
🍃 Leaves (In 3 Green Shades)
Use dark, medium, and light greens for natural variety.
Small Leaf:
CH 6.
SC in 2nd CH from hook, HDC, DC, HDC, SC. Turn to work along other side of chain: SC, HDC, DC, HDC, SC.
Fasten off, leaving a tail for sewing.
Large Leaf:
CH 10.
SC in 2nd CH, HDC, 2 DC, HDC, SC in next 3 stitches, SL ST last.
Work along the other side of chain similarly.
Fasten off and weave in ends.
Attach leaves in clusters of two or three at branch tips. Mix colors and angles — some tilted upward, others sideways — for a realistic, layered canopy.
🕊️ Mini Doves (Make 4)
Body (White Yarn):
MR, 6 SC (6)
INC × 6 (12)
(SC, INC) × 6 (18)
(SC, Bobble) repeat around (for a textured feather effect)
Rounds 5–6: SC around (18)
(SC, DEC) × 6 (12)
DEC × 6 (6)
Fasten off, stuff, and close.
Beak (Orange):
CH 3, SC across to form a small cone. Sew to face.
Wings (Make 2 per bird):
CH 6, SC, HDC, DC, HDC, SC. Fasten off and sew to sides.
Feet (Orange):
Embroider two small claws with thread or yarn under each bird.
Eyes (Black):
Add French knots or sew on tiny seed beads.
Position birds on the branches — two at the upper level and two near the middle — facing different directions to mimic the natural perches seen in the photo.
🪵 Invisible Branch Attachment (When Trunk Is Already Finished Off)
If your trunk is closed and stuffed, you can still attach branches invisibly without reopening it.
-
Mark each branch placement with pins — typically 3 on each side and one at the top.
-
Use a tapestry needle or awl to pierce through the trunk’s stitches at each mark.
-
Slide the wire end of a finished branch through the hole and into the trunk until it meets the central wire.
-
Twist the branch wire tightly around the main trunk wire inside.
-
Thread olive yarn and wrap it neatly around the joint area, spiraling upward 2–3 times to cover any small gaps.
-
Sew or glue the yarn tail in place.
The result is an invisible join — it looks like the branches grow naturally from the trunk, exactly as shown in the image.
🌱 Optional Soil Topper (Base Cover)
To give your tree a polished, complete look and hide the wires inside the pot, crochet a simple “soil” circle in olive or dark green yarn.
Round 1: MR, 6 SC (6)
Round 2: INC × 6 (12)
Round 3: (1 SC, INC) × 6 (18)
Round 4: (2 SC, INC) × 6 (24)
Round 5: (3 SC, INC) × 6 (30)
Continue increasing by 6 stitches per round until the circle fits snugly inside your pot.
To create a trunk hole, CH 4 and skip 4 stitches when you’re about 3–4 rounds short of the final size. On the next round, SC into each stitch and 4 SC into the chain space to reinforce the opening.
Slip the circle around the trunk before inserting the tree into the pot. Once the trunk is anchored with stones or plaster, flatten the “soil” cover over the base. Secure with a few hidden stitches or glue for a perfect finish.
For an extra touch, work one final round of reverse SC (crab stitch) in dark brown or dark green to frame the pot neatly.
✨ Finishing Touches
Insert the trunk wire into your chosen pot and stabilize it with stones, plaster, or a glued cardboard base. Arrange branches evenly around the trunk, bending them slightly upward for natural posture. Attach leaf clusters and mini doves securely. Adjust leaf angles to overlap gently for realism.
When complete, your handmade olive tree will stand elegantly in its ceramic pot — lush, balanced, and full of charm.
💭 Final Thoughts
This amigurumi olive tree with peaceful white doves is a project that captures serenity and craftsmanship in one creation. The wire-supported trunk and branches allow elegant shaping, while the textured birds bring personality to the scene. The finished piece adds natural warmth to any room — a perfect handmade symbol of peace, friendship, and hope. 🌿🕊️💚