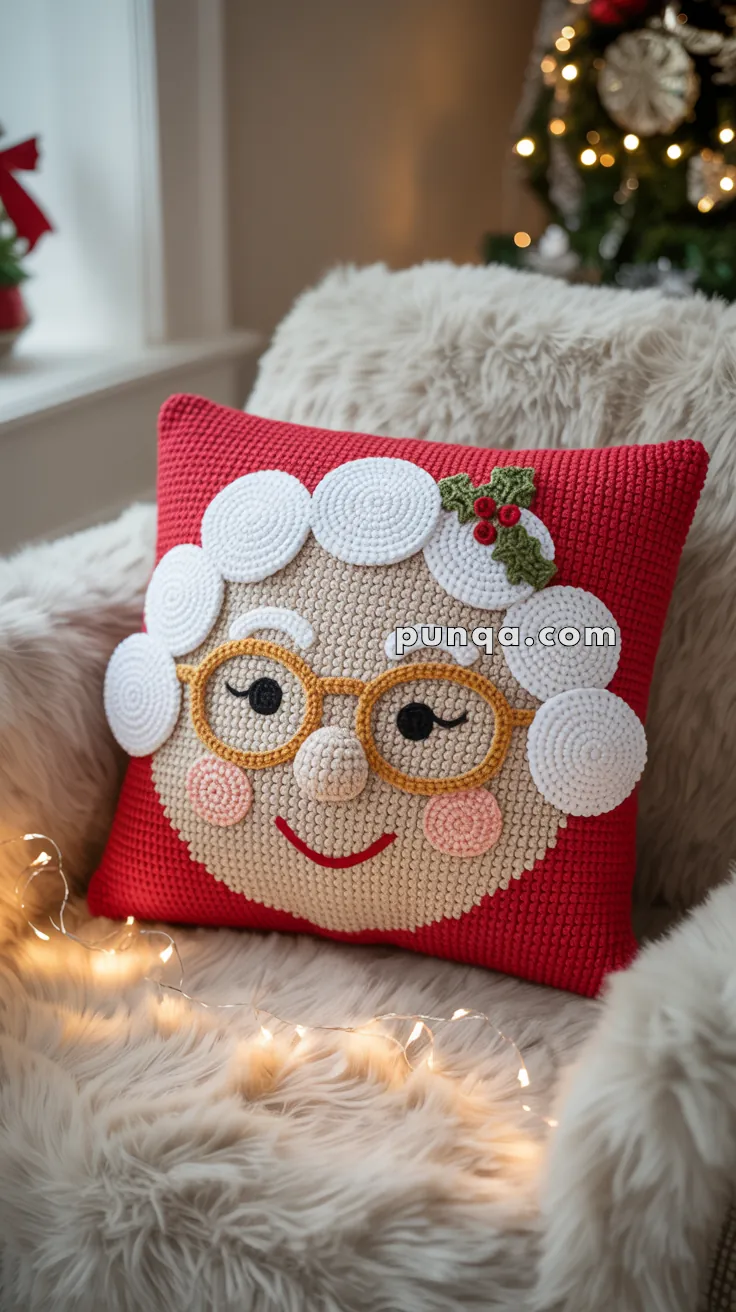
Add a sprinkle of sweetness to your holiday décor with the Amigurumi Mrs. Claus Pillow, a cuddly and cheerful companion to Santa himself! 🎅❤️ With her rosy cheeks, warm smile, and signature red-and-white outfit, Mrs. Claus brings a cozy charm that’s perfect for festive couches, guest beds, or gift baskets. Her soft, huggable shape and gentle expression make her a heartwarming addition to any handmade holiday scene.
This pattern is a joy for crocheters who love crafting character-rich designs with playful details. You can personalize her look with tiny glasses, embroidered accessories, or even a matching apron for extra flair. Whether she’s paired with a Santa pillow or standing proudly on her own, the Mrs. Claus Pillow is a delightful way to celebrate the season with warmth, whimsy, and a whole lot of handmade love. 🧶🎄
🎄 Amigurumi Mrs. Claus Pillow Crochet Pattern
Add some handmade magic to your holiday décor with this charming Mrs. Claus Crochet Pillow! Her warm smile, curly white hair, golden glasses, rosy cheeks, and festive holly make her the perfect cozy companion for Christmas.
✨ Skill Level
Intermediate – worked in the round, appliqué assembly.
📏 Finished Size
Approx. 40 × 40 cm (16 × 16 in) pillow cover.
🧶 Materials
- Red worsted-weight yarn (background panels)
- Beige worsted-weight yarn (face + nose)
- White yarn (hair curls, eyebrows)
- Yellow/golden yarn (glasses)
- Pink yarn (cheeks)
- Black yarn (eyes, eyelashes)
- Green yarn (holly leaves)
- Red yarn (berries + mouth)
- Crochet hook: 4.0 mm (G)
- Yarn needle, scissors
- 40 × 40 cm pillow insert
- Optional: zipper or buttons for closure
📖 Abbreviations (US Terms)
MR = Magic Ring
sc = single crochet
inc = increase (2 sc in same st)
sl st = slip stitch
🪡 Pattern
1. Pillow Panels
Front Panel (red):
- Ch 41.
- Row 1: sc in 2nd ch from hook, sc across (40). Ch 1, turn.
- Rows 2–40: sc across (40).
- Fasten off.
Back Panel (red):
- Repeat same as front (40 × 40 cm).
2. Oval Face (beige) – With Exact Stitch Counts
Work in continuous rounds, use stitch marker.
- R1: MR, 6 sc (6)
- R2: inc in each st (12)
- R3: (sc, inc) × 6 (18)
- R4: (2 sc, inc) × 6 (24)
- R5: (3 sc, inc) × 6 (30)
- R6: (4 sc, inc) × 6 (36)
- R7: (5 sc, inc) × 6 (42)
- R8: (6 sc, inc) × 6 (48)
- R9: (7 sc, inc) × 6 (54)
- R10: (8 sc, inc) × 6 (60)
- R11: (9 sc, inc) × 6 (66)
- R12: (10 sc, inc) × 6 (72)
- R13: (11 sc, inc) × 6 (78)
- R14: (12 sc, inc) × 6 (84)
- R15: (13 sc, inc) × 6 (90)
- R16: (14 sc, inc) × 6 (96)
- R17: (15 sc, inc) × 6 (102)
- R18: (16 sc, inc) × 6 (108)
- R19: (17 sc, inc) × 6 (114)
- R20: (18 sc, inc) × 6 (120)
- R21: (19 sc, inc) × 6 (126)
- R22: (20 sc, inc) × 6 (132)
- R23: (21 sc, inc) × 6 (138)
- R24: (22 sc, inc) × 6 (144)
- R25: (23 sc, inc) × 6 (150)
👉 At this point, you’ll have a large flat circle ~24–25 cm wide.
Oval Adjustment (to elongate face vertically like the photo):
- R26–28: sc around (150 each round).
👉 But instead of full rounds, work these only on the bottom half (75 sts). This stretches the face downward. - Fasten off, leave long tail, sew face to center of red panel.
3. Hair Curls (white, make 10–12)
- R1: MR, 6 sc (6)
- R2: inc in each st (12)
- R3: (sc, inc) × 6 (18)
- R4: (2 sc, inc) × 6 (24)
👉 Sew around top & sides of oval face.
4. Eyes (black, make 2)
- R1: MR, 6 sc (6)
- R2: inc in each st (12)
👉 Sew onto face, add white highlight.
5. Eyebrows (white, make 2)
- Ch 7, sc across (6).
👉 Sew above eyes.
6. Nose (beige)
- R1: MR, 6 sc (6)
- R2: inc in each st (12)
- R3: (sc, inc) × 6 (18)
👉 Stuff lightly, sew to center of face.
7. Cheeks (pink, make 2)
- R1: MR, 6 sc (6)
- R2: inc in each st (12)
- R3: (sc, inc) × 6 (18)
👉 Sew under eyes.
8. Glasses (yellow/golden)
Lenses (make 2):
- R1: MR, 6 sc (6)
- R2: inc in each st (12)
- R3: (sc, inc) × 6 (18)
- R4: (2 sc, inc) × 6 (24)
👉 Do not fasten off after 2nd lens.
Bridge: ch 5, sl st to opposite lens.
Arms: ch 10 each side.
9. Mouth (red)
- Embroider curved smile below nose.
10. Holly & Berries
Leaves (green, make 2):
- Ch 6, sc in 2nd ch, hdc, dc, hdc, sc.
- Rotate, repeat other side.
Berries (red, make 3):
- MR, 6 sc, pull tight.
👉 Sew with leaves at top right.
11. Assembly
- Sew oval face appliqué to red front panel.
- Attach hair curls, eyes, eyebrows, nose, cheeks, glasses, mouth, holly.
- Place front & back panels together.
- Sc around 3 sides.
- Insert pillow form.
- Close final side.
👉 For removable closure: add zipper or button flap.
🎀 Finishing Touches
- Adjust oval face so it sits round but slightly longer top-to-bottom.
- Position curls and glasses symmetrically.
- Add soft pink blush if desired.
🧵 How to Make the Mrs. Claus Crochet Pillow Removable
When finishing your pillow, you have two main options: zipper closure or button closure. Both let you remove the insert for easy washing and storage.
🔹 Option 1: Zipper Closure (Neat & Hidden)
(already explained above, but summarizing for clarity)
- Crochet both panels (front with Mrs. Claus, back in red).
- Pin zipper along bottom edges of both panels.
- Sew zipper tape to panels with needle & thread (or whipstitch with yarn).
- Crochet around remaining 3 sides to join.
👉 Clean, professional finish — zipper is nearly invisible.
🔹 Option 2: Button Closure (Easier, No Sewing Machine)
- Crochet Extra Rows for Flap
- On the back panel only, after reaching full square size, add 6–8 more rows of sc at the bottom edge.
- This creates an overlapping flap for buttons.
- Add Buttonholes
- On flap rows: [sc 3, ch 2, skip 2 sts, sc 3] → repeat to make 3–4 evenly spaced buttonholes.
- Next row: sc across, working into chains to reinforce buttonholes.
- Sew Buttons
- Sew large decorative buttons (2–3 cm) onto the inside bottom edge of the front panel so they align with buttonholes.
- Assembly
- Line up panels, crochet around 3 sides as usual.
- Bottom edge stays open, flap folds over, and buttons close it securely.
🎀 Which Option Should You Choose?
- Zipper: Sleek, hidden, and looks store-bought. Great if you want a professional finish.
- Buttons: Easier, requires no zipper sewing. Decorative holiday buttons (snowflakes, holly, Santa hats) can add extra festive charm.
✨ Both closures make the Mrs. Claus Crochet Pillow washable, reusable, and long-lasting.
🎅 Final Result
Your Mrs. Claus Crochet Pillow is ready! With her built-in crocheted face, curly white hair, golden glasses, and festive holly, she’s the perfect companion to Santa Claus in your holiday decorations.