Bring a touch of quirky charm to your crochet collection with this Amigurumi Mr. Bean pattern! Whether you’re crafting for fans of the beloved character, adding a playful figure to your handmade creations, or simply love unique amigurumi designs, this free pattern lets you stitch up the iconic Mr. Bean with his signature suit, expressive face, and, of course, his trusty teddy bear. With whimsical details and a nostalgic feel, this crochet creation is perfect for gifting, displaying as a fun conversation piece, or celebrating the humor and charm of this classic character!
Designed for customization, this pattern allows you to personalize Mr. Bean with different outfit variations, embroidered facial expressions, or even tiny accessories like his suitcase or a miniature car. Craft his signature mischievous look, add playful details to bring out his personality, or even create a matching Teddy companion for the full set! Whether displayed as a tribute to the beloved comedy icon, gifted to a fellow fan, or stitched up simply for the joy of crochet, this Amigurumi Mr. Bean is a delightful and humorous project—one stitch at a time! 🧶🎭✨
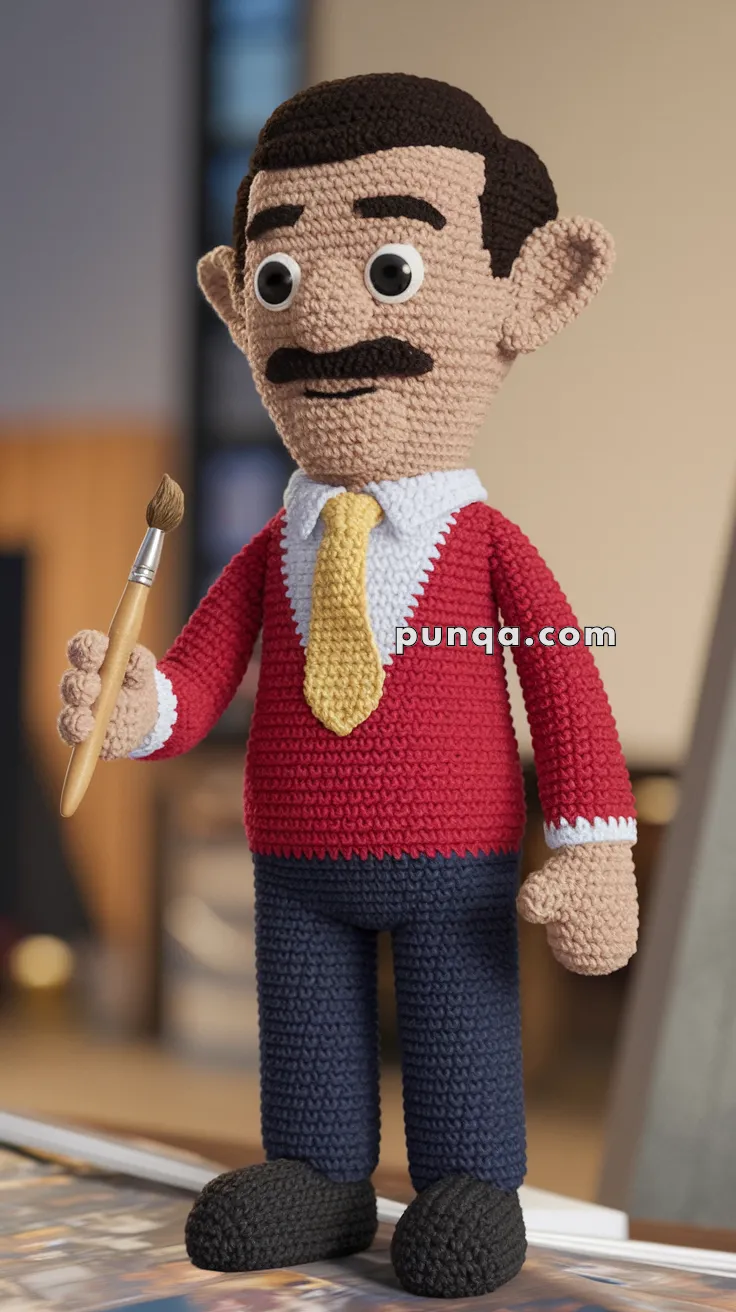
🎨 Amigurumi Mr. Bean-Inspired Doll Crochet Pattern
Bring a touch of quirky charm to your amigurumi collection with this Mr. Bean-inspired crochet doll! Featuring his expressive face, large ears, red sweater, tie, and navy trousers, this handmade figure is a fun and eye-catching project. For extra character, he’s holding a paintbrush as a prop.
✨ Skill Level
Intermediate – basic doll shaping with color changes, clothing details, and facial embroidery.
📏 Finished Size
Approx. 13 inches (33 cm) tall when made with DK or worsted weight yarn and a 2.5–3.5 mm hook.
🧶 Materials
-
Yarn (DK or worsted weight):
-
Beige (skin)
-
Black (hair, shoes, eyebrows, mustache)
-
Red (sweater)
-
Navy (pants)
-
White (shirt & cuffs)
-
Yellow (tie)
-
-
Crochet hook: 2.5–3.5 mm
-
Safety eyes: 10–12 mm
-
Tapestry needle
-
Stitch marker
-
Polyfill stuffing
-
Small paintbrush (optional for prop)
-
Craft glue or hot glue (for attaching accessories)
🔤 Abbreviations (US Terms)
-
MR – Magic Ring
-
sc – single crochet
-
inc – increase (2 sc in same st)
-
dec – decrease (sc 2 sts together)
-
sl st – slip stitch
-
ch – chain
-
FO – fasten off
🧵 Pattern Instructions
Head (Beige)
-
MR, 6 sc
-
inc x6 (12)
-
(sc, inc) x6 (18)
-
(2 sc, inc) x6 (24)
-
(3 sc, inc) x6 (30)
-
(4 sc, inc) x6 (36)
-
(5 sc, inc) x6 (42)
8–20. sc around (42) -
(5 sc, dec) x6 (36)
-
(4 sc, dec) x6 (30)
-
(3 sc, dec) x6 (24)
-
(2 sc, dec) x6 (18)
-
(sc, dec) x6 (12)
-
dec x6 (6), FO and close.
Details:
-
Insert safety eyes between R10–R11, about 10 sts apart.
-
Embroider thick black eyebrows, mustache, and a simple stitched mouth.
Hair Cap (Black)
Follow head pattern until R18. FO.
Sew onto head like a wig, leaving front hairline exposed.
Ears (Make 2, Beige – larger cupped shape)
-
MR, 6 sc (6)
-
(sc, inc) x3 (9)
-
(2 sc, inc) x3 (12)
-
sc around (12)
-
(2 sc, dec) x3 (9)
FO, leave tail. Flatten slightly and sew to sides of head, aligned with eyes.
Body (Start with White for Shirt Base)
-
MR, 6 sc
-
inc x6 (12)
-
(sc, inc) x6 (18)
-
(2 sc, inc) x6 (24)
-
(3 sc, inc) x6 (30)
-
(4 sc, inc) x6 (36)
7–9. sc around (36) -
Switch to Red (sweater), sc around (36)
11–24. sc around (36) – longer torso for slim look -
(4 sc, dec) x6 (30)
-
(3 sc, dec) x6 (24)
-
(2 sc, dec) x6 (18), stuff firmly
-
(sc, dec) x6 (12)
-
dec x6 (6), FO.
Legs (Make 2 – Navy with Black Shoes)
Shoes (Black):
-
MR, 6 sc
-
inc x6 (12)
-
(sc, inc) x6 (18)
4–5. sc around (18)
Change to Navy (pants):
6–22. sc around (18) – make legs longer/slimmer
FO, stuff.
Sew legs together at tops and attach to body.
Arms (Make 2 – Beige Hands, White Cuffs, Red Sleeves)
Hands (Beige):
-
MR, 6 sc
-
inc x6 (12)
3–4. sc around (12) -
(sc, dec) x4 (8) – mitten style (no fingers)
Change to White (cuff): -
sc around (8)
Change to Red (sleeves):
7–18. sc around (8), FO, stuff lightly.
Sew to sides of body.
Shirt Collar (White – pointed triangles)
Make 2 triangles:
-
ch 5
-
sc in 2nd ch, hdc, dc, tr (4 sts), FO.
Make 2, sew to neckline pointing downward.
Tie (Yellow)
-
ch 12, sc back across (11), FO.
-
Wrap center with yarn to form knot.
-
Sew beneath shirt collar.
Shoes (Extra Detail)
Surface stitch around top edge of shoes with black yarn for definition.
Paintbrush (Optional Accessory)
Use a real miniature craft brush. Place in hand before final sewing, or glue after assembly.
(Optional Crochet Version)
-
Handle: ch 12, sc back across, roll tightly, stitch closed.
-
Bristles: MR, 6 sc in brown, FO, sew to top of handle.
🪡 Assembly
-
Attach head to body securely.
-
Sew legs to bottom of torso.
-
Sew arms to shoulders.
-
Add collar, tie, and secure paintbrush in hand.
-
Adjust hair and embroidery for expression.
✨ Finishing Touches
-
Add light blush with embroidery floss or fabric paint if desired.
-
For posable limbs, insert craft wire before stuffing arms/legs.
-
Accessorize with a mini easel or teddy bear for more character!
🎉 Your Mr. Bean-inspired Amigurumi Doll is complete! Standing tall in his red sweater, tie, and trousers, he’s ready to bring handmade humor and charm to your collection.