Say cheese for the Amigurumi Mouse With Big Ears, a tiny crochet cutie that’s bursting with charm and character! 🐭🧶 With oversized ears, a sweet stitched smile, and a playful little tail, this mouse is ready to scurry into your heart. Whether you’re crafting a whimsical toy, a desk buddy, or a storybook-inspired gift, this pint-sized pal brings joy and personality to every stitch.
Perfect for crocheters who love expressive features and quick, lovable projects, this pattern invites you to customize your mouse with fun colors, accessories like a bow or scarf, or even a tiny wedge of cheese. Make one or stitch up a whole family—each with its own flair! The Mouse With Big Ears is a delightful way to stitch up smiles, one adorable loop at a time. 🧵💕
🐭 Crochet Mouse with Big Ears Amigurumi Pattern
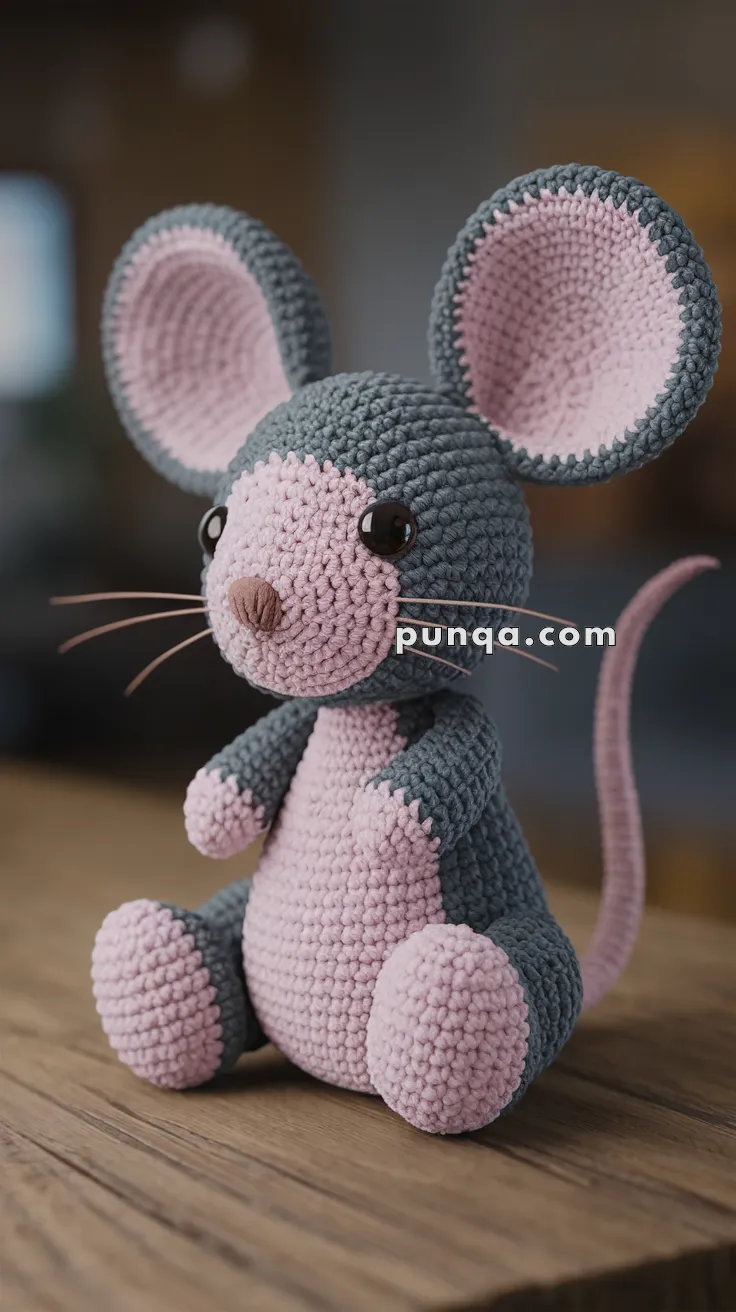
This sweet, chubby-cheeked mouse with oversized ears and a round pink belly is the perfect handmade companion. With its shiny eyes, long pink tail, and cuddly body, this mouse makes a wonderful gift, nursery decoration, or collectible piece for your amigurumi collection.
This version has been carefully checked and corrected to match the photo, so you’ll get the exact same look when finished.
📏 Finished Size
Approx. 20 cm (8 in) tall when made with DK yarn and a 2.5 mm hook.
🎯 Skill Level
Beginner to Intermediate – requires basic crochet stitches, simple increases/decreases, and sewing of parts.
🧶 Materials
- DK weight cotton yarn:
- Slate gray (head, body, outer ears, limbs)
- Light pink (muzzle, belly patch, inner ears, paws, tail)
- Brown (nose)
- Crochet hook: 2.5 mm
- Safety eyes: 8–10 mm
- Fiberfill stuffing
- Black embroidery thread or fishing line (for whiskers)
- Stitch marker
- Yarn needle
- Scissors
🔤 Abbreviations (US Terms)
- MR – Magic Ring
- sc – single crochet
- inc – increase (2 sc in same st)
- dec – decrease (sc 2 together)
- ch – chain
- sl st – slip stitch
- FO – fasten off
🧵 Pattern Instructions
🐭 Head (Gray)
- MR, 6 sc [6]
- inc ×6 [12]
- (sc, inc) ×6 [18]
- (2 sc, inc) ×6 [24]
- (3 sc, inc) ×6 [30]
- (4 sc, inc) ×6 [36]
7–13. sc around [36] - (4 sc, dec) ×6 [30]
- (3 sc, dec) ×6 [24] – insert safety eyes between Rounds 11–12, about 6 sts apart (closer together, like in photo).
- (2 sc, dec) ×6 [18]
- (sc, dec) ×6 [12], stuff firmly
- dec ×6 [6], FO and close.
🐽 Muzzle (Pink)
- MR, 6 sc [6]
- inc ×6 [12]
- (sc, inc) ×6 [18]
- (2 sc, inc) ×6 [24]
- sc around [24]
FO with long tail. Stuff lightly and sew centered below eyes.
Nose (Brown): MR, 6 sc, FO. Sew in middle of muzzle.
Mouth: Embroider a short black line below nose.
Whiskers: Use embroidery thread or thin plastic filament, secure on both sides of muzzle.
🐭 Body (Gray)
- MR, 6 sc [6]
- inc ×6 [12]
- (sc, inc) ×6 [18]
- (2 sc, inc) ×6 [24]
- (3 sc, inc) ×6 [30]
6–12. sc around [30] - (3 sc, dec) ×6 [24]
- (2 sc, dec) ×6 [18]
Stuff firmly. - (sc, dec) ×6 [12]
- dec ×6 [6], FO and close.
🐾 Belly Patch (Pink – Oval)
- MR, 6 sc [6]
- inc ×6 [12]
- (sc, inc) ×6 [18]
- (2 sc, inc) ×6 [24]
- To make oval: work 3 sc, inc ×3, sc across, 3 sc inc on opposite side, sc across. [~30–32 sts]
FO with tail. Flatten and sew to body front.
👂 Ears (Make 2)
Inner Ear (Pink):
- MR, 6 sc [6]
- inc ×6 [12]
- (sc, inc) ×6 [18]
- (2 sc, inc) ×6 [24]
- (3 sc, inc) ×6 [30]
- (4 sc, inc) ×6 [36] – big enough for oversized look.
FO.
Outer Ear (Gray):
Repeat inner ear steps with gray yarn.
Assembly: Place pink inner ear on gray circle, sc around to join. Pinch base slightly when sewing to head so ears stand up and cup forward.
🐾 Arms (Make 2)
Start with pink:
- MR, 6 sc [6]
- inc ×6 [12]
3–4. sc around [12]
Switch to gray:
5–10. sc around [12] - dec ×6 [6], stuff lightly
FO and sew to body sides.
🐾 Legs (Make 2)
Start with pink:
- MR, 6 sc [6]
- inc ×6 [12]
- (sc, inc) ×6 [18]
4–5. sc around [18]
Switch to gray:
6–10. sc around [18] - (sc, dec) ×6 [12]
- dec ×6 [6], stuff firmly
FO and sew to bottom sides of body.
🐁 Tail (Pink)
- ch 40
- sl st in each chain back to start.
FO and sew to back of body.
🪡 Final Assembly
- Sew head securely onto body.
- Attach muzzle, nose, and embroider mouth. Add whiskers.
- Sew belly patch to front.
- Attach arms, legs, and tail.
- Sew ears, pinching bases and angling slightly forward.
✨ Finishing Touches
- Add blush to cheeks with pink thread or fabric paint for a cute rosy look.
- Position whiskers outward for extra expression.
- Angle ears forward slightly to enhance the big-eared mouse charm.
🎉 Your Big-Eared Crochet Mouse is finished! With its oversized ears, chubby muzzle, and sweet details, this mouse is sure to be a favorite cuddly companion. Whether as a nursery friend, handmade gift, or holiday decoration, it will bring smiles everywhere.


I love your patterns!