Bring a splash of greenery to your space—no watering required—with this Amigurumi Mini Monstera Deliciosa crochet pattern! This adorable little plant captures the iconic split-leaf charm of the Monstera in a soft, squishy form that’s perfect for desks, shelves, or gifting to your favorite plant lover. Whether you’re a seasoned crocheter or just starting out, this mini monstera is a fun and beginner-friendly project that brings tropical vibes and handmade joy to any corner of your home. 🪴💚🧶
Designed for charm and creativity, this pattern invites you to play with rich greens, textured stitches, and expressive details like curled stems or a smiling face on the pot. Add a tiny tag, a splash of blush on the leaves, or even a bee buzzing nearby for extra personality. Whether it’s part of your amigurumi garden or a cheerful desk buddy, this Mini Monstera Deliciosa is a delightful and satisfying project—perfect for stitching up a little slice of the jungle, one leaf at a time! 🌿✨💖
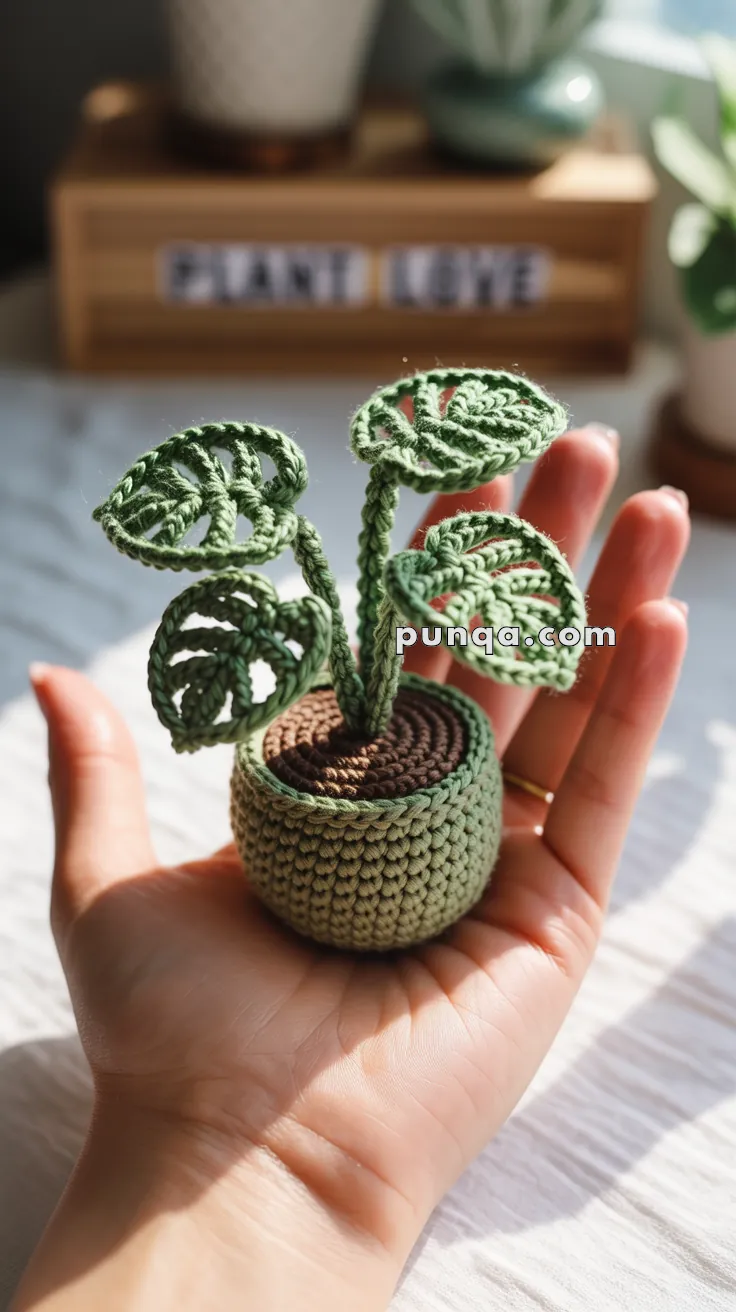
🌿 Amigurumi Mini Monstera Deliciosa Crochet Pattern
Bring some low-maintenance jungle vibes to your desk or windowsill with this palm-sized Monstera deliciosa! The airy Swiss-cheese leaves, twisted stems, and tidy little pot make a perfect stash-busting project or gift for any plant lover—no watering required.
✨ Skill Level
Confident Beginner – you’ll work in the round, crochet simple flat leaves with chain spaces, and sew pieces together.
📏 Finished Size
≈ 3 ½–4 in / 9–10 cm tall when made with sport/DK cotton and a 2.5 mm hook.
🧶 Materials
| Item | Amount/Color | Notes |
|---|---|---|
| Cotton yarn (sport or DK) | • Leaf green (10 g) • Stem green (small scrap slightly darker) • Light sage (pot) (10 g) • Brown (soil) (5 g) | Any smooth yarn works |
| Crochet hook | 2.25–2.75 mm | Match your yarn |
| Pipe cleaner / floral wire | 3 pieces 8 cm each | For poseable stems |
| Stitch marker, tapestry needle | – | |
| Fiberfill stuffing | small handful | |
| Hot glue (optional) | For anchoring stems |
🧵 Abbreviations (US)
MR magic ring sc single crochet inc 2 sc in same st dec invisible decrease ch chain sl st slip stitch FO fasten off () repeat
🪴 Pot & Soil (work in one piece)
- Pot Base – Sage: MR 6 sc
- inc ×6 (12)
- (sc, inc)×6 (18)
- (2 sc, inc)×6 (24)
- (3 sc, inc)×6 (30)
- Pot Walls: sc in BLO all around (30)
7–11. sc (30) - Switch to Brown (soil) – sc in FLO (30)
13–15. sc (30) - (3 sc, dec)×6 (24) – begin stuffing firmly
- (2 sc, dec)×6 (18)
- (sc, dec)×6 (12)
- dec ×6 (6) – FO, close.
Optional: surface-sl st around Round 6 in sage for a rim accent.
🌱 Twisted Stems (make 3)
- With darker green, ch 20 (for ≈ 4 cm stem).
- Starting in 3rd ch from hook, work 3 sc in every chain back to start— the cord will twist naturally.
- FO, leaving 12 cm tail to sew.
- Insert pipe cleaner through the stem; bend ends in so they aren’t sharp.
🍃 Monstera Leaves (make 5)
Each leaf is crocheted flat in rows then edged.
- Leaf centre – Leaf green: ch 11.
- Row 1: sc in 2nd ch, sc 9 (10) – ch 1, turn.
- Row 2: inc, sc 8, inc (12) – ch 1, turn.
- Row 3: sc 12 – ch 1, turn.
- Row 4: dec, sc 8, dec (10) – ch 1, turn.
- Row 5: sc 10. Do not turn.
Perforated edge and shaping
- Edge Round: Rotate to work around entire leaf: sc 2, ch 3, skip 2 sts (creates a hole); sc evenly to next side, repeating chain-loop holes twice more on curved edge. On stem end, ch 3 and sl st to first sc.
- FO, leave 15 cm tail.
Lightly steam-block to flatten and open holes.
🔧 Assembly
- Prepare leaves: sew each leaf to the tip of a pipe-cleaner stem using the long tails, wrapping tightly for 1 cm.
- Plant stems: poke a hole in soil top with tapestry needle, insert bare end of wire, add a drop of hot glue; stitch opening closed around stem.
- Position stems at differing angles for realistic spread.
- Bend stems gently to desired curve.
💡 Customization Ideas
- Vary leaf sizes: start with ch 13 for a larger frond.
- Make a rainbow of mini plants for a kawaii “shelf garden.”
- Add French-knot “pebbles” on soil with grey yarn.
Your micro-Monstera is ready to brighten any nook—sunlight optional! Share your jungle cutie with #MiniMonsteraMake. Happy crocheting! 🌿✨