Get ready for a squeak-tacular adventure with the Amigurumi Mice with Cheese—a delightful crochet duo that’s bursting with charm and mischief! 🧀🐭 These tiny mice, with their twitchy noses, oversized ears, and playful personalities, are the perfect companions for a whimsical handmade scene. Paired with a wedge of holey cheese that doubles as a cozy playground, this pattern brings storytelling and snuggles together in the most adorable way.
Whether you’re crafting a mouse family, adding embroidered whiskers, or customizing your cheese with buttery yellows and fun textures, this project is full of creative possibilities. It’s a joyful make for all skill levels—quick to stitch, fun to personalize, and guaranteed to spark smiles. Whether perched on a shelf, tucked into a gift box, or starring in your next amigurumi photo shoot, the Mice with Cheese are ready to scamper into your heart—one stitch at a time! 🧶💛
🧀 Amigurumi Mice with Cheese Crochet Pattern
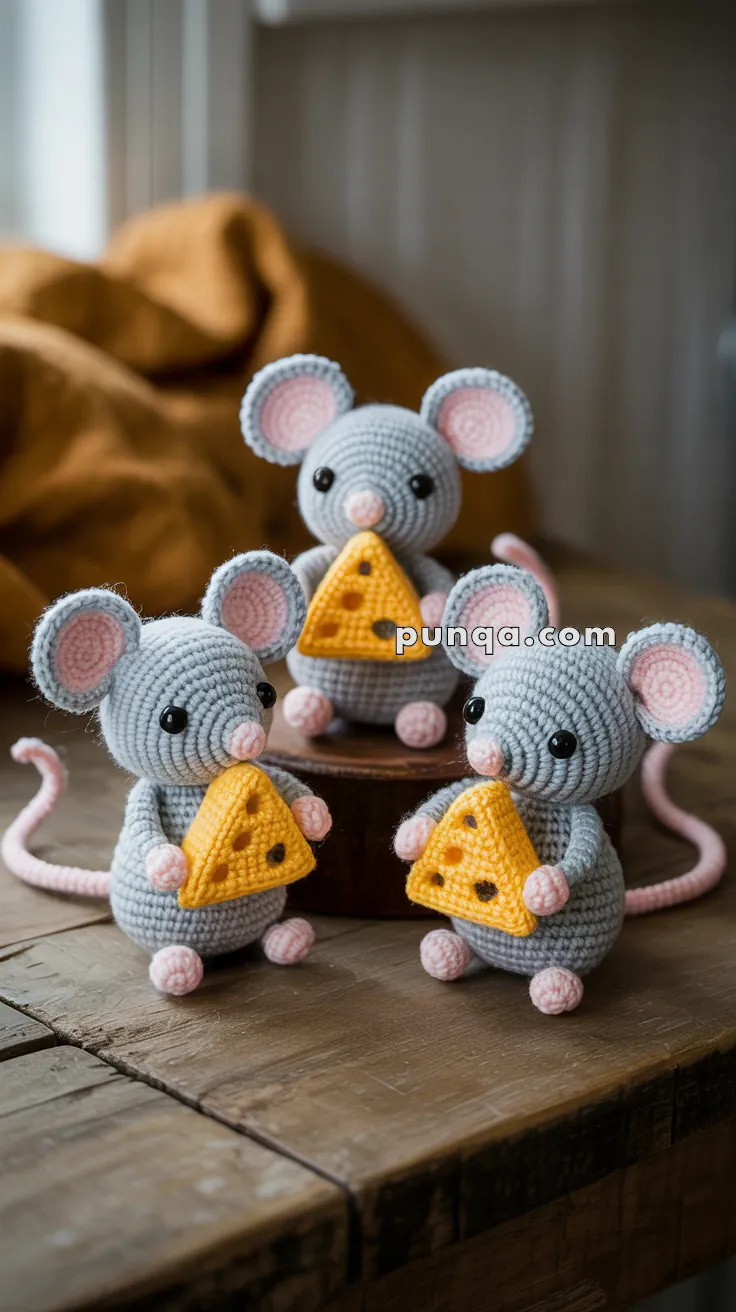
Bring a touch of cuteness (and a love for cheese!) into your home with these adorable crochet mice. With their oversized ears, long curly tails, and little stuffed cheese wedges, they make a delightful gift or decoration.
✨ Skill Level
Intermediate – Requires basic amigurumi knowledge (MR, sc, inc, dec), color changes, sewing parts, and simple shaping for 3D cheese.
📏 Finished Size
Each mouse measures about 15 cm (6 inches) tall, not including the tail.
🧶 Materials
- Light gray yarn (body & head)
- Pink yarn (ears, nose, tail, paws)
- Yellow yarn (cheese wedges)
- Black yarn (embroidery for cheese holes)
- 10 mm safety eyes
- Fiberfill stuffing
- Yarn needle
- Stitch marker
- Crochet hook size 2.5–3.0 mm
🪡 Abbreviations (US Terms)
- MR = Magic Ring
- sc = single crochet
- inc = increase (2 sc in same stitch)
- dec = decrease (sc2tog)
- ch = chain
- sl st = slip stitch
- FO = fasten off
🧵 PATTERN
HEAD (Gray)
- MR, 6 sc (6)
- inc x6 (12)
- (sc, inc) x6 (18)
- (2 sc, inc) x6 (24)
- (3 sc, inc) x6 (30)
- (4 sc, inc) x6 (36)
- sc around (36)
- sc around (36)
- sc around (36)
- sc around (36)
- sc around (36)
- sc around (36)
- sc around (36)
- sc around (36)
- (4 sc, dec) x6 (30)
- (3 sc, dec) x6 (24)
- (2 sc, dec) x6 (18)
👉 Insert safety eyes between rounds 10–11, spaced 8 stitches apart.
👉 Stuff firmly.
- (sc, dec) x6 (12)
- dec x6 (6)
FO, close opening, weave in end.
BODY (Gray)
- MR, 6 sc (6)
- inc x6 (12)
- (sc, inc) x6 (18)
- (2 sc, inc) x6 (24)
- sc around (24)
- sc around (24)
- sc around (24)
- sc around (24)
- sc around (24)
- sc around (24)
- sc around (24)
- (2 sc, dec) x6 (18)
- (sc, dec) x6 (12)
👉 Stuff firmly.
- dec x6 (6)
FO, close opening.
EARS (Make 2 Complete Ears)
Outer Ear (Gray)
- MR, 6 sc (6)
- inc x6 (12)
- (sc, inc) x6 (18)
- (2 sc, inc) x6 (24)
- (3 sc, inc) x6 (30)
- sc around (30)
FO, leave long tail for sewing.
Inner Ear (Pink)
- MR, 6 sc (6)
- inc x6 (12)
- (sc, inc) x6 (18)
- sc around (18)
FO, leave long tail.
Assembly:
- Place pink inner ear centered on gray outer ear
- Sew pink to gray using whip stitch
- Pinch the bottom of the completed ear to create a slight fold/cup shape
- Attach ears to head between rounds 2–4 (positioned high on head)
- Angle ears slightly outward for that signature mouse look
NOSE (Pink)
- MR, 6 sc (6)
- sc around (6)
- sc around (6)
FO, leave long tail.
👉 Sew centered between eyes, slightly below eye level.
ARMS (Make 2, Gray with Pink Paw)
Start with pink:
- MR, 6 sc (6)
- sc around (6)
- sc around (6)
Switch to gray:
- sc around (6)
- sc around (6)
- sc around (6)
- sc around (6)
- sc around (6)
- sc around (6)
- sc around (6)
FO, leave long tail.
👉 Lightly stuff only the paw tip (pink section).
👉 Sew to sides of body, positioned to angle forward to hold cheese.
LEGS (Make 2, Gray with Pink Paw)
Start with pink:
- MR, 6 sc (6)
- inc x6 (12)
- sc around (12)
- sc around (12)
Switch to gray:
- sc around (12)
- sc around (12)
- (sc, dec) x4 (8)
- sc around (8)
FO, leave long tail.
👉 Stuff firmly.
👉 Sew flat to bottom of body so mouse sits upright.
TAIL (Pink – Tubular Cord)
Method 1: Crocheted Cord
- Ch 4
- Sc in 2nd ch from hook, sc 2 (3)
- Do not turn. Rotate work and sc along the opposite side of the foundation chain (3)
- Continue working in a spiral: sc 3 around the tube
- Repeat step 4 for approximately 60-70 rounds (creates a 10-12 cm tail)
FO, leave tail for sewing.
Method 2: Simple Chain (Alternative)
- Ch 50
- Sl st back along chain (49)
FO, leave tail for sewing.
👉 Optional: Insert a thin floral wire inside for a poseable tail.
👉 Sew to back of body at the base.
CHEESE WEDGE (Yellow, 3D Triangular Prism)
This creates a proper three-dimensional cheese wedge.
Triangle Faces (Make 2 in Yellow)
- Ch 13
- Row 1: sc in 2nd ch from hook, sc across (12)
- Row 2: ch 1, turn, skip first st, sc 10, skip last st (10)
- Row 3: ch 1, turn, skip first st, sc 8, skip last st (8)
- Row 4: ch 1, turn, skip first st, sc 6, skip last st (6)
- Row 5: ch 1, turn, skip first st, sc 4, skip last st (4)
- Row 6: ch 1, turn, skip first st, sc 2, skip last st (2)
- Row 7: ch 1, turn, dec (1)
FO first triangle.
Leave long tail on second triangle for assembly.
Rectangular Bottom Panel (Yellow)
- Ch 13
- Rows 1-8: sc in 2nd ch from hook, sc across (12), ch 1, turn
- Repeat for 8 rows total
FO, leave long tail.
Rectangular Side Panel (Yellow)
- Ch 9
- Rows 1-8: sc in 2nd ch from hook, sc across (8), ch 1, turn
- Repeat for 8 rows total
FO, leave long tail.
Assembly:
- Lay one triangle flat
- Sew the rectangular bottom panel along the base (longest edge) of the triangle
- Sew the second triangle to the opposite long edge of the bottom panel
- Sew the side panel connecting the two triangles (this forms the “back” of the cheese)
- Before closing completely, stuff firmly with fiberfill
- Close the remaining open edge (the top angled edge)
Cheese Holes (Black Embroidery):
- Create 4-6 small circles on each visible face using black yarn
- Method: Make small satin stitches in a circle, OR crochet tiny circles (MR, 4 sc, FO) and sew them on
- Vary the sizes slightly for a natural look
- Position holes randomly but balanced across the cheese surface
🎨 ASSEMBLY
Step 1: Attach Head to Body
Sew head securely to body using gray yarn. Position so the face is centered and slightly tilted forward.
Step 2: Attach Arms
Sew arms to sides of body at approximately round 3-4 of the body. Angle them forward so they can hold the cheese wedge.
Step 3: Attach Legs
Sew legs to the bottom of the body, positioning them so the mouse sits upright and stable.
Step 4: Attach Tail
Sew tail to the back/bottom of the body. If using wire, you can pose it in a gentle curve.
Step 5: Position Cheese
Place cheese wedge between the arms. Stitch lightly to the paws/arms to secure it in place so it looks like the mouse is holding it.
🎀 FINISHING TOUCHES
Whiskers:
Using black yarn, embroider 2-3 thin straight stitches on each side of the nose for whiskers. Keep them subtle and fine.
Cheek Blush (Optional):
Add a light pink blush to the cheeks using:
- Pink yarn (make tiny French knots)
- Fabric blush or chalk pastels
- Pink embroidery floss
Final Positioning:
Arrange your mice in a group display. Position arms naturally holding cheese, and curve tails for extra character.
📸 Display Ideas
- Create a family of 3+ mice like in the photo
- Place them on a wooden surface or small platform
- Add a small crocheted or felt “cheese board” underneath
- Position with a rustic fabric backdrop for photos
🎉 FINAL NOTES
And there you have it — your adorable Amigurumi Cheese-Loving Mice! With their oversized ears, long tails, and chunky cheese wedges, they’re sure to bring smiles wherever they’re displayed.
These mice make wonderful:
- Gifts for cheese lovers
- Nursery decorations
- Photography props
- Collectible amigurumi displays
Make one or a whole family — because one mouse with cheese is never enough! 🐭🧀
💡 Tips for Success
- Tension: Keep your stitches tight and consistent for a professional finish
- Stuffing: Stuff firmly for the head and body, but leave arms flexible
- Ear Shaping: Really pinch the bottom of the ears when attaching for that cupped look
- Cheese Assembly: Take your time sewing the cheese panels — precise assembly makes all the difference
- Eye Placement: Position eyes carefully before securing — they determine the mouse’s expression
Happy Crocheting! 🧶✨