📏 Finished Size
Approx. 25 cm long × 17 cm high
(using worsted yarn & 3.5 mm hook)
🧶 Materials
Worsted weight yarn:
3.5 mm crochet hook
10 mm safety eyes
Polyfill stuffing
Yarn needle, stitch marker
🧵 Abbreviations (US Terms)
MR – magic ring
sc – single crochet
inc – increase
dec – decrease
sl st – slip stitch
FO – fasten off
Work in continuous rounds unless noted.
🚙 Truck Body (Main Cab)
Start with blue.
Base Oval
Ch 14
R1: sc in 2nd ch, 11 sc, 3 sc in last ch, other side: 11 sc, inc (28)
R2: inc, 11 sc, inc×3, 11 sc, inc×2 (34)
R3: (sc, inc), 11 sc, (sc, inc)×3, 11 sc, (sc, inc)×2 (40)
Build Height
R4–10: sc around (40)
Stuff gradually.
Shape Front Hood
R11: 14 sc, dec×6, 14 sc (34)
R12–13: sc around (34)
Windshield Section
Switch the front 14 stitches to white.
R14–17: sc around (34)
Insert safety eyes evenly in white panel.
Close Back
R18: (3 sc, dec) around (27)
R19: (2 sc, dec) around (20)
R20: (sc, dec) around (13)
Stuff firmly.
R21: dec around (7)
FO and close.
🤍 Grey Bumper
With grey:
Ch 12
Row 1–3: sc across (11)
Lightly stuff and sew to front lower edge in a gentle curve.
🔘 Headlights (Make 2)
With white:
R1: MR 6 sc
R2: inc×6 (12)
R3: sc around (12)
FO, stuff lightly, sew to hood front.
🛞 Wheels (Make 4)
Tire (Black)
R1: MR 6 sc
R2: inc×6 (12)
R3: (sc, inc)×6 (18)
R4: (2 sc, inc)×6 (24)
R5–9: sc around (24)
Stuff very firmly.
R10: BLO sc around (24)
R11–12: sc around (24)
FO.
Hub (Yellow)
R1: MR 6 sc
R2: inc×6 (12)
R3: (sc, inc)×6 (18)
FO and sew centered to tire.
Attach wheels to sides of body so they sit slightly below the base, creating the lifted monster-truck stance.
💙 Wheel Fenders (Make 4)
With blue:
Ch 8
Row 1–5: sc across (7)
Curve slightly and sew above each wheel to form rounded arches.
💛 Rear Roll Bar
With yellow:
R1: MR 6 sc
R2–10: sc around (6)
Stuff lightly. Bend into a gentle arch and sew behind the cab.
💡 Roof Lights (Make 3)
With grey:
R1: MR 6 sc
R2: inc×6 (12)
R3: sc around (12)
FO, stuff lightly, sew in a row on roof.
😊 Face Details
Embroider a small curved smile between the eyes with black yarn.
🪄 Final Shaping
-
Align wheels evenly for balance
-
Slightly flatten underside for stability
-
Shape hood and roof with gentle hand sculpting
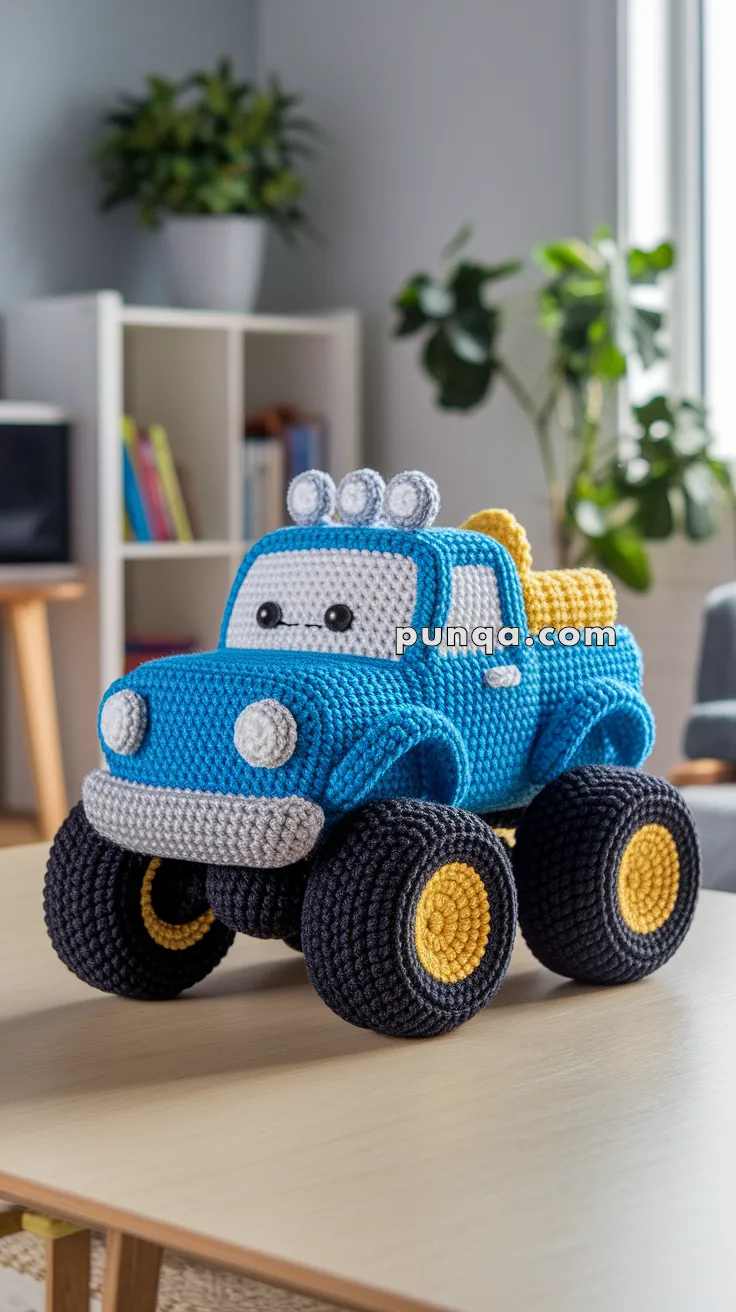
🚗 Finished Look
Your monster truck should have a rounded cab, bold raised fenders, thick textured tires with bright hubs, and a friendly windshield expression. It feels sturdy, playful, and ready for adventure — a perfect handmade toy for little drivers. 💙🛻