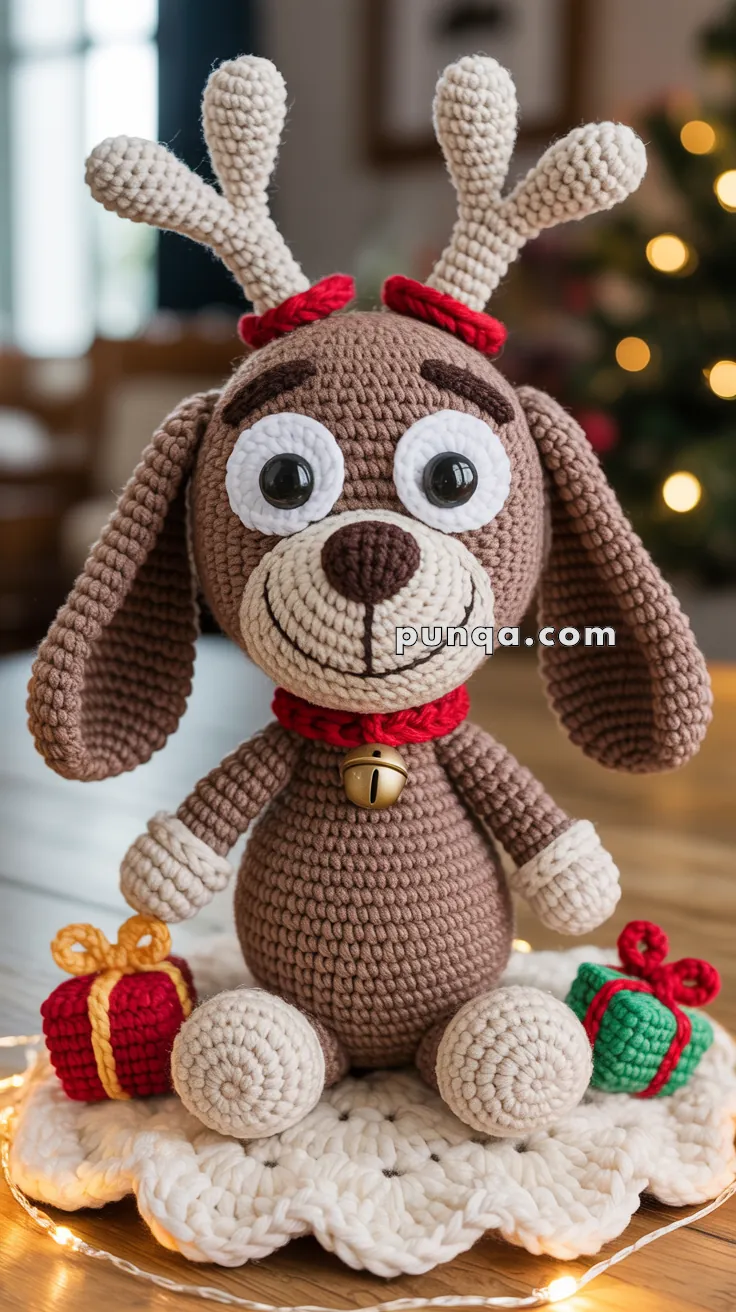
Get ready to stitch up some holiday cheer with this Amigurumi Max the Dog crochet pattern! Inspired by the lovable pup from How the Grinch Stole Christmas, Max comes complete with floppy ears, a sweet expression, and festive charm that’s perfect for the season. Whether you’re crafting for a fan of the classic tale, adding to your Christmas décor, or simply love bringing storybook characters to life in yarn, this cheerful companion is sure to warm hearts with every stitch. 🧶🐶🎄
Designed for personality and playfulness, this pattern invites you to explore soft textures, expressive features, and fun extras like a tiny antler, cozy scarf, or even a sleigh bell collar. Customize Max’s colors to match your favorite version or add embroidered details for a personal touch. Whether perched on a shelf, nestled in a gift basket, or starring in a handmade Whoville scene, this Max the Dog Amigurumi is a joyful and satisfying project—perfect for stitching up a little handmade holiday magic, one loop at a time! 💖✨🎁
🎄 Amigurumi “Max the Dog” Crochet Pattern
Bring festive cheer to your hooks with Max — a wide‑eyed, floppy‑eared puppy dressed for Christmas with reindeer antlers, a jingling collar, and two tiny gift boxes, all sitting on a cozy snow mat. This pattern is written in US terms and worked mostly in continuous spirals. Don’t miss any part — everything you see in the photo is here!
✨ Skill Level
Intermediate – Simple shaping but lots of separate parts and careful assembly.
📏 Finished Size
Approx. 26–30 cm (10–12 in) tall when seated using worsted (aran) weight yarn and a 3.0–3.5 mm hook.
🧶 Materials
- Worsted (aran) weight yarn:
- Main Brown (Body, Head, Ears, Arms)
- Cream/Beige (Muzzle, Paw cuffs, Feet pads, Antlers, Snow Mat)
- Dark Brown (Nose, Eyebrows, Mouth embroidery)
- Red (Collar, Antler cuffs, Red gift + bow for green gift)
- Green (Green gift)
- Mustard/Gold (Ribbon for red gift)
- Hook: 3.0–3.5 mm (or to match your yarn and tension)
- Safety eyes: 14–16 mm black domed
- Small jingle bell (about 15–18 mm)
- Tapestry needle, stitch markers, scissors
- Polyfill stuffing
- Optional: Craft wire for antlers (pattern is written without it), fabric glue or felt for securing eyebrows
🧵 Abbreviations (US Terms)
MR – Magic ring
sc – single crochet
inc – increase (2 sc in same st)
dec – invisible decrease
sl st – slip stitch
ch – chain
BLO – back loop only
FLO – front loop only
hdc – half double crochet
dc – double crochet
tr – treble crochet (optional for mat edging)
FO – fasten off
📝 General Notes
- Work in a continuous spiral unless otherwise stated. Use a stitch marker.
- Stuff firmly but evenly.
- Numbers in parentheses at the end of rounds indicate stitch counts.
- Read the Assembly section before you start sewing parts together.
🐶 Head (Brown)
- MR, 6 sc (6)
- inc x6 (12)
- (1 sc, inc) x6 (18)
- (2 sc, inc) x6 (24)
- (3 sc, inc) x6 (30)
- (4 sc, inc) x6 (36)
- (5 sc, inc) x6 (42)
- (6 sc, inc) x6 (48)
- (7 sc, inc) x6 (54)
- (8 sc, inc) x6 (60)
11–18. sc around (60) – 8 rounds
— Place safety eyes between Rnds 14–15, about 12 sts apart. - (8 sc, dec) x6 (54)
- (7 sc, dec) x6 (48)
- (6 sc, dec) x6 (42)
- (5 sc, dec) x6 (36)
- (4 sc, dec) x6 (30)
- (3 sc, dec) x6 (24)
- (2 sc, dec) x6 (18)
Stuff firmly. FO, leaving a long tail for sewing to the neck.
🐽 Muzzle (Cream)
- MR, 6 sc (6)
- inc x6 (12)
- (1 sc, inc) x6 (18)
- (2 sc, inc) x6 (24)
5–8. sc around (24)
Lightly stuff. FO, leaving a long tail to sew.
Nose (Dark Brown)
- MR, 6 sc (6)
- inc x6 (12)
3–4. sc around (12)
FO, leave a tail to sew onto the muzzle.
Mouth + Smile
After sewing the muzzle on the head, embroider a vertical line from the center bottom of the nose to the lower part of the muzzle and then a curved smile in dark brown.
👀 Whites of the Eyes (Make 2, White/Cream)
(These are crochet eye whites behind the safety eyes for the “cartoony” look.)
- MR, 6 sc (6)
- inc x6 (12)
- (1 sc, inc) x6 (18)
FO with a tail. Slide them under the safety eyes before locking the washers. Secure with a few stitches if needed.
☁️ Eyebrows (2 pcs, Dark Brown)
Option A (Crochet):
- MR, 6 sc, sl st to first st, FO, shape into a small crescent with your fingers and stitch across the top of each eye.
Option B (Felt):
Cut two small curved felt pieces and sew/glue carefully.
👂 Floppy Ears (Make 2, Brown)
- MR, 6 sc (6)
- inc x6 (12)
- (1 sc, inc) x6 (18)
- (2 sc, inc) x6 (24)
5–10. sc around (24) – 6 rounds - (2 sc, dec) x6 (18)
12–22. sc around (18) – 11 rounds (adjust length to taste) - (1 sc, dec) x6 (12)
24–25. sc around (12) – 2 rounds
Flatten, FO, leaving tails for sewing. Lightly stuff only the top third if you want subtle structure; otherwise leave unstuffed so they drape.
🦌 Antlers (Make 2, Cream)
Main Stem
- MR, 6 sc (6)
- inc x6 (12)
3–10. sc around (12) – 8 rounds
First Branch (make 1 per antler)
A1. MR, 5 sc (5)
A2. (1 sc, inc) x2, 1 sc (7)
A3–5. sc around (7) – 3 rounds, FO leaving a short tail.
Second Branch (slightly shorter; make 1 per antler)
B1. MR, 4 sc (4)
B2–4. sc around (4) – 3 rounds, FO leaving a short tail.
Sew Branch A around Rnds 5–6 of the stem and Branch B just above it (Rnds 7–8). Weave in ends securely.
Red Antler Cuffs (2 pcs, Red)
- ch 18, join to form a ring, being careful not to twist.
2–3. sc around (18)
FO. Slide one cuff to the base of each antler after attaching them to the head.
🔔 Collar (Red)
ch long enough to snugly wrap around the neck (approx. 34–38 ch, depends on your tension).
Row 1: sc in 2nd ch from hook and across.
Row 2: ch 1, turn, sc across.
FO. Sew ends together around the neck. Sew or tie on the bell at the center front.
🐾 Arms (Make 2)
Cuff (Cream)
- MR, 6 sc (6)
- inc x6 (12)
- BLO sc around (12)
Switch to Brown
4–14. sc around (12) – 11 rounds
15. (4 sc, dec) x2 (10)
Stuff lightly. Flatten opening and close with 5 sc through both layers. FO with tail to sew.
🦶 Legs & Feet (Make 2; Foot Pad Cream, Leg Brown)
Foot (Cream)
- MR, 6 sc (6)
- inc x6 (12)
- (1 sc, inc) x6 (18)
- (2 sc, inc) x6 (24)
5–6. sc around (24) – 2 rounds
Shape to a “sole”:
7. (2 sc, dec) x6 (18)
Switch to Brown
8. BLO sc around (18)
9. (4 sc, dec) x3 (15)
10–13. sc around (15) – 4 rounds
Stuff firmly. FO, leaving a long tail to sew.
🐕 Body (Brown)
- MR, 6 sc (6)
- inc x6 (12)
- (1 sc, inc) x6 (18)
- (2 sc, inc) x6 (24)
- (3 sc, inc) x6 (30)
- (4 sc, inc) x6 (36)
- (5 sc, inc) x6 (42)
- (6 sc, inc) x6 (48)
9–15. sc around (48) – 7 rounds - (6 sc, dec) x6 (42)
- (5 sc, dec) x6 (36)
- (4 sc, dec) x6 (30)
- (3 sc, dec) x6 (24)
- (2 sc, dec) x6 (18) – Neck
21–22. sc around (18) – 2 rounds
Stuff firmly. FO, leaving a long tail to sew the head on.
🐾 Tiny Tail (Optional, Brown)
- MR, 6 sc (6)
2–4. sc around (6)
FO, leave a tail to sew at the back base of the body.
🎁 Mini Gift Boxes (Make 2)
Red Box with Gold Ribbon
Box (Red)
- MR, 6 sc (6)
- inc x6 (12)
- (1 sc, inc) x6 (18)
- (2 sc, inc) x6 (24)
5–8. sc around (24) – 4 rounds - (2 sc, dec) x6 (18)
- (1 sc, dec) x6 (12) – Stuff
- dec x6 (6)
FO, close hole.
Ribbon (Gold/Mustard)
Chain a length that can wrap around the box vertically and horizontally. Make two strips and stitch them crossing on top. Make a small bow (ch 18, tie in a bow) and sew on top.
Green Box with Red Ribbon
Work the same as above, swapping the colors: green box, red ribbon and bow.
❄️ Snow Mat (White)
Use a slightly thicker/lofty yarn if you want extra squish.
Work in joined rounds; ch 1 does not count as a stitch.
- MR, 6 sc, join (6)
- inc x6, join (12)
- (1 sc, inc) x6, join (18)
- (2 sc, inc) x6, join (24)
- (3 sc, inc) x6, join (30)
- (4 sc, inc) x6, join (36)
- (5 sc, inc) x6, join (42)
- (6 sc, inc) x6, join (48)
- (7 sc, inc) x6, join (54)
- (8 sc, inc) x6, join (60)
Scalloped Edge:
11. sl st in next st, skip 1, 5 dc in next st, skip 1 repeat around. Adjust last few stitches so the scallops meet nicely. FO and weave in ends.
(Optional) Add subtle “snow dots” using black yarn with surface embroidery as in the photo.
🧩 Assembly
- Head to Body: Sew the head onto the neck opening of the body, ensuring it’s centered.
- Legs/Feet: Position both legs at the bottom front of the body so Max sits stably. Sew securely.
- Arms: Attach arms on either side of the body at shoulder height. Angle them down slightly in a relaxed pose.
- Muzzle & Nose: Sew the muzzle centered between the eyes, slightly lower than mid-face. Sew the nose at the top center of the muzzle. Embroider the mouth line and smile.
- Eyes & Eyebrows: Lock the safety eyes (with white crocheted backers) in place. Sew eyebrows above the eyes to give expression.
- Ears: Sew ears symmetrically on each side of the head. Let them flop naturally.
- Antlers & Cuffs: Sew antlers on the top of the head, slightly angled outward. Slide the red cuffs to the base of each antler and secure with a few stitches.
- Collar & Bell: Wrap the collar around the neck, sew ends together, and attach the bell at center front.
- Tail (optional): Sew the tiny tail to the back bottom of the body.
- Snow Mat & Gifts: Place Max on the snow mat. Stitch him down at a few hidden points if you want him fixed. Sew the red and green gifts on either side of his feet.
🌟 Finishing Touches
- Shape gently with your hands.
- Weave in every end securely.
- Add a tiny blush with fabric paint or pastel (optional).
- If gifting to a child, make sure all parts (especially the bell and eyes) are extremely secure, or replace with embroidered features.
Enjoy your festive friend! If you make Max, I’d love to see your version — try different collar colors, extra presents, or even a tiny Santa hat for a different holiday vibe. Happy crocheting! 🎅🐶🦌