Creating amigurumi macaws is an absolute delight! 🦜 There’s something truly magical about watching a ball of yarn transform into a vibrant, feathered friend. The appeal of amigurumi lies in its charming simplicity and the endless possibilities that come with each creation. When I pick up my crochet hook and begin to work on a macaw pattern, I can feel the excitement bubbling up. The bright colors of the yarn mimic the lively plumage of these stunning birds, and as the stitches come together, it feels like I’m breathing life into a tiny companion that brings joy to my home.
The process itself is a joyful journey of creativity and patience. I start with choosing the perfect yarn, often in bold blues, reds, and yellows to capture the essence of a macaw. As I work through the pattern, each stitch adds character and personality. There’s a certain satisfaction in seeing the macaw take shape from beak to tail, knowing that each curve and detail is crafted by hand. It’s a gentle reminder of the beauty of handmade art — taking the time to create something with love and care. Plus, it’s always fun to add a personal touch with unique patterns or playful expressions! 🎨💕
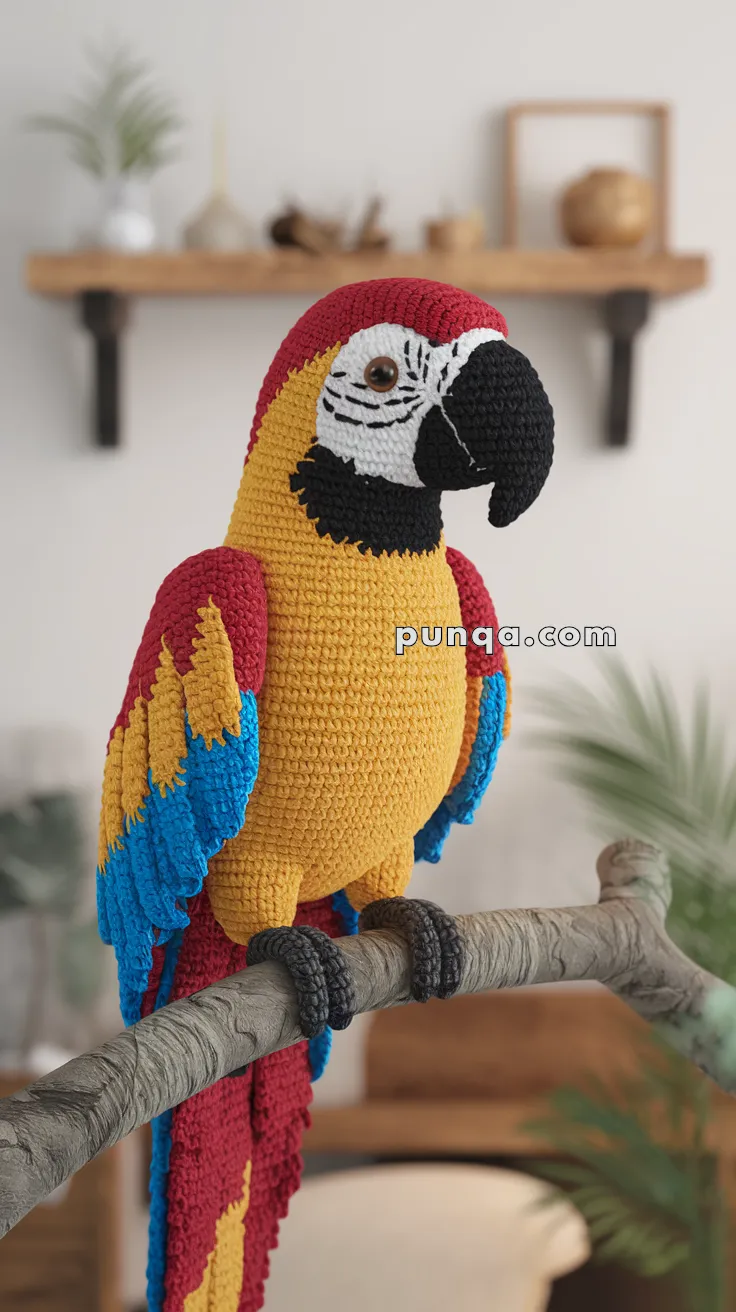
🦜 Amigurumi Macaw Crochet Pattern
Bring a burst of tropical color into your home with this stunning amigurumi macaw! With vibrant red, yellow, and blue feathers, this parrot captures the beauty of the rainforest in cuddly crochet form. Whether perched on a branch or displayed on a shelf, this macaw is sure to turn heads!
✨ Skill Level
Advanced – Detailed shaping, layered feather construction, structured legs, and facial embroidery.
📏 Finished Size
Height (body upright): approx. 34–36 cm (13–14 inches)
Full length including tail: approx. 42 cm (16–17 inches)
Using DK yarn and 2.75–3.25 mm hook.
🧶 Yarn Requirements (DK Weight)
Red – 130 g (head, upper back, upper wings, upper tail)
Golden Yellow – 90 g (chest, belly, mid-wings)
Royal Blue – 95 g (lower wings and lower tail feathers)
Black – 60 g (beak, throat patch, legs, claws)
White – 45 g (face patches)
Polyester stuffing – approx. 300 g
Optional: 1–1.5 mm craft wire for toes and tail stability
🧵 Abbreviations (US Terms)
MR – magic ring
sc – single crochet
inc – increase
dec – invisible decrease
ch – chain
sl st – slip stitch
BLO – back loop only
FO – fasten off
Work in continuous rounds unless stated.
🪶 Head & Upper Body (Worked as One Piece)
Start with red yarn.
R1: MR 6
R2: inc ×6 (12)
R3: (1 sc, inc) ×6 (18)
R4: (2 sc, inc) ×6 (24)
R5: (3 sc, inc) ×6 (30)
R6: (4 sc, inc) ×6 (36)
R7–12: sc around (36)
R13: (5 sc, inc) ×6 (42)
R14–20: sc around (42)
Begin stuffing head firmly.
Switch to golden yellow at R21.
R21–30: sc around (42)
Continue stuffing gradually to maintain a rounded chest.
R31: (5 sc, dec) ×6 (36)
R32: (4 sc, dec) ×6 (30)
R33: (3 sc, dec) ×6 (24)
R34: (2 sc, dec) ×6 (18)
R35: (1 sc, dec) ×6 (12)
R36: dec ×6 (6)
FO and close securely.
The chest should be rounded and prominent, not flat.
🤍 Facial Patch (Make 2)
With white:
R1: MR 6
R2: inc ×6 (12)
R3: (1 sc, inc) ×6 (18)
R4: (2 sc, inc) ×6 (24)
R5: (3 sc, inc) ×6 (30)
FO leaving long tail.
Lightly flatten into oval shape and sew high on each side of head.
Insert 12 mm brown or dark safety eyes centered within patch.
Embroider fine curved black feather lines radiating outward in 4–5 rows beneath the eye to mimic natural macaw markings.
🖤 Sculpted Beak
Upper Beak
With black:
R1: MR 6
R2: (1 sc, inc) ×3 (9)
R3: (2 sc, inc) ×3 (12)
R4: (3 sc, inc) ×3 (15)
R5–9: sc around (15)
R10: (3 sc, dec) ×3 (12)
R11: (2 sc, dec) ×3 (9)
Stuff only the top half to maintain curved shape.
FO leaving long tail.
Gently curve downward before sewing firmly to face.
Lower Beak
R1: MR 6
R2–5: sc around (6)
Flatten slightly and sew under upper beak.
🖤 Black Throat Patch
With black:
R1: MR 6
R2: inc ×6 (12)
R3: (1 sc, inc) ×6 (18)
FO.
Flatten into semicircle and sew directly beneath beak extending slightly onto chest.
🪽 Wings (Layered Feather Construction – Make 2)
Base Wing (Red Upper Layer)
R1: MR 6
R2: inc ×6 (12)
R3: (1 sc, inc) ×6 (18)
R4: (2 sc, inc) ×6 (24)
R5: (3 sc, inc) ×6 (30)
R6–10: sc around (30)
Flatten slightly and stuff lightly.
Yellow Middle Feather Layer
Attach yellow yarn to lower third of wing.
Row 1: sc 20
Row 2: (3 sc, dec) repeat across
Row 3–5: sc across, tapering gradually
Blue Lower Feather Layer
Attach blue yarn below yellow layer.
Row 1: sc 22
Row 2: (4 sc, dec) repeat
Row 3–7: sc across forming elongated feather edge
The blue layer should extend longest at bottom.
Sew wings firmly at upper body sides, angled downward.
🪶 Long Tail (Full & Flowing)
Create 6 feathers:
Red Upper Tail Feathers (2)
R1: MR 6
R2: (1 sc, inc) ×3 (9)
R3–22: sc around (9)
R23: (1 sc, dec) ×3 (6)
R24: dec ×3
Yellow Middle Feathers (2)
Same pattern but 3 rounds shorter.
Blue Lower Feathers (2)
Same pattern but 4 rounds longer.
Insert wire optionally for support.
Sew layered vertically at back so blue extends longest.
🦵 Structured Legs & Curved Claws (Essential Detail)
Upper Leg (Make 2)
With black:
R1: MR 6
R2–6: sc around (6)
Do not stuff.
Toes – Zygodactyl Arrangement (2 Front, 2 Back)
Each toe:
Ch 7
Starting 2nd ch from hook, sl st back along chain.
Make 4 toes per foot.
Sew two toes forward and two backward evenly spaced around leg base.
Insert thin wire through leg and into each toe to allow wrapping around branch.
Leg Attachment
Position legs slightly forward on body underside.
Secure deeply with strong stitches.
Shape toes to wrap around perch for natural grip.
🧵 Final Assembly
Attach face patches first.
Insert eyes and embroider facial feather lines.
Attach sculpted beak and black throat patch.
Sew wings securely.
Layer and attach tail.
Install legs and shape claws around branch.
✨ Finishing Touches
Curve the beak slightly downward.
Fan wing layers naturally.
Align tail straight behind body.
Ensure claws wrap convincingly around perch.
Shape chest to appear rounded and proud.
This detailed macaw captures bold tropical color transitions, realistic facial structure, layered feather depth, and strong gripping legs for a lifelike perched stance. A striking crochet centerpiece for any handmade collection. 🦜❤️💛💙