Step into the wild with this Amigurumi Lynx Cub crochet pattern! Whether you’re crafting for animal lovers, woodland-themed decor, or simply enjoy making adorable amigurumi creatures, this free pattern lets you stitch up a charming lynx cub full of personality. With its tufted ears, soft fur-like texture, and expressive eyes, this crochet lynx captures the essence of these majestic wild cats in every stitch. Perfect for gifting to nature enthusiasts, decorating a cozy space, or simply celebrating the joy of crochet, this amigurumi lynx cub is sure to bring a touch of the wilderness to your handmade collection! 🐾✨
Designed for customization, this pattern allows you to experiment with different fur shades, embroidered details, or even tiny accessories like a miniature scarf or forest backdrop for extra charm. Craft a classic tawny lynx, create a snowy version for a winter aesthetic, or even stitch up a full family of lynx cubs for a playful display! Whether displayed as a lovable accent, gifted to a fellow crochet lover, or made simply for the joy of crafting, this Amigurumi Lynx Cub is a fun and heartwarming project—perfect for bringing the beauty of the wild to every stitch! 🧶🌲
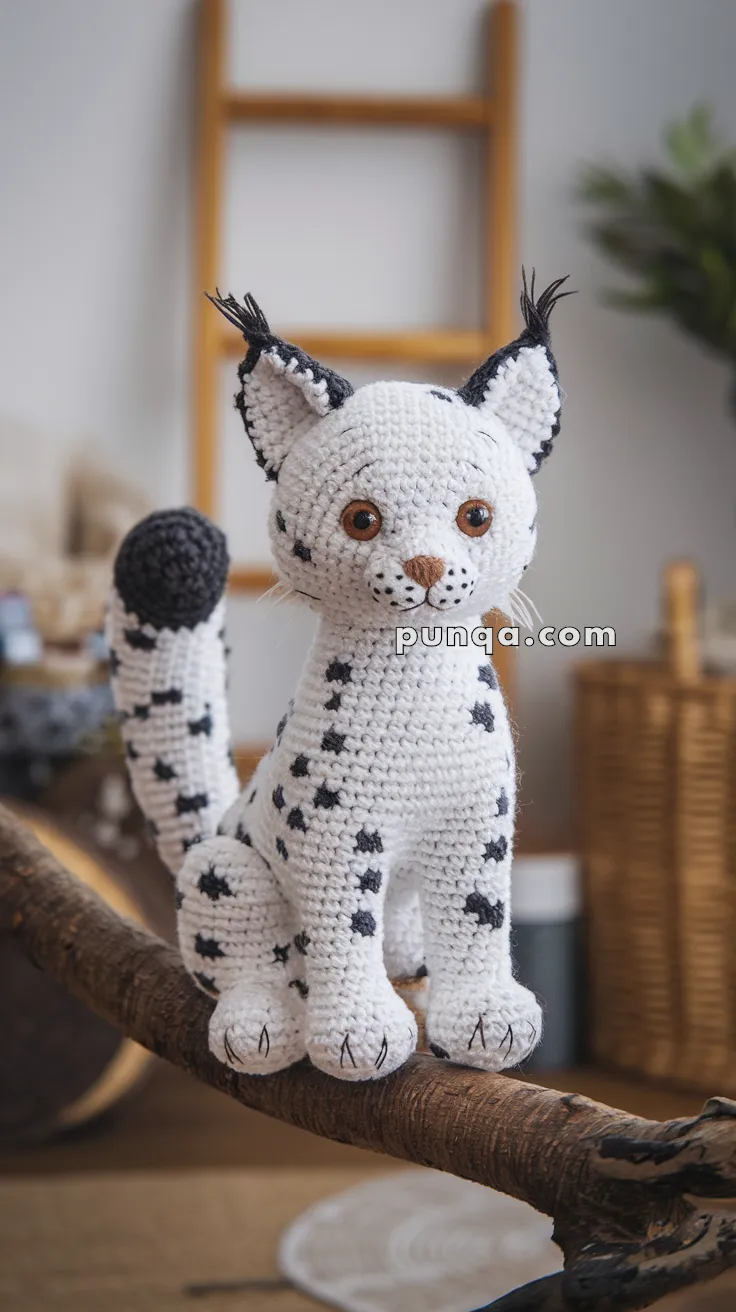
🐾 Amigurumi Lynx Cub Crochet Pattern
Bring the wild charm of the forest into your crochet collection with this sweet spotted lynx cub. Featuring tufted ears, embroidered claws, and bold spots, this little snow lynx is both majestic and cuddly.
✨ Skill Level
Intermediate – shaping, color changes, facial embroidery, and simple appliqué.
📏 Finished Size
Approx. 9–10 inches (23–25 cm) tall when seated, using worsted weight yarn and a 3.0–3.5 mm hook.
🧶 Materials
-
Worsted weight yarn:
-
White or Pale Gray (main body)
-
Black or Dark Gray (spots, ear trim, claws, tail tip)
-
Brown (nose)
-
Pink or Tan (optional inner ears)
-
-
Crochet hook: 3.0–3.5 mm
-
Safety eyes: 10–12 mm
-
Polyfill stuffing
-
Tapestry needle & scissors
-
Stitch markers
-
Small comb/brush (for ear tufts)
-
Black embroidery thread (for claws & whisker details)
🧵 Abbreviations (US Terms)
-
MR – Magic Ring
-
sc – Single Crochet
-
inc – Increase (2 sc in same st)
-
dec – Decrease (sc 2 sts together)
-
sl st – Slip Stitch
-
ch – Chain
-
FO – Fasten Off
🐱 Head (Main Color)
-
MR, 6 sc (6)
-
inc x6 (12)
-
(1 sc, inc) x6 (18)
-
(2 sc, inc) x6 (24)
-
(3 sc, inc) x6 (30)
-
(4 sc, inc) x6 (36)
-
(5 sc, inc) x6 (42)
8–14. sc around (42) -
(5 sc, dec) x6 (36)
-
(4 sc, dec) x6 (30)
-
(3 sc, dec) x6 (24)
👉 Insert safety eyes between Rnds 11–12, about 7–8 sts apart. -
(2 sc, dec) x6 (18)
Stuff firmly. -
(1 sc, dec) x6 (12)
-
dec x6 (6)
FO and close.
🐾 Body (Main Color)
-
MR, 6 sc (6)
-
inc x6 (12)
-
(1 sc, inc) x6 (18)
-
(2 sc, inc) x6 (24)
-
(3 sc, inc) x6 (30)
6–12. sc around (30) -
(3 sc, dec) x6 (24)
14–17. sc around (24) -
(2 sc, dec) x6 (18)
19–20. sc around (18)
Stuff firmly, FO leaving long tail for sewing.
🐾 Front Legs (x2)
-
MR, 6 sc (6)
-
inc x6 (12)
3–5. sc around (12) -
(2 sc, dec) x3 (9)
7–14. sc around (9)
Lightly stuff. Flatten and sc across to close. FO, sew to front body.
🐾 Back Legs (x2)
-
MR, 6 sc (6)
-
inc x6 (12)
3–6. sc around (12) -
(2 sc, dec) x3 (9)
8–13. sc around (9)
Lightly stuff. Flatten and sc across to close. FO, sew to lower back body.
🐾 Tail
-
With Black: MR, 6 sc (6)
-
Round 2: inc x6 (12)
-
Rounds 3–4: sc around (12)
-
Switch to White: Rounds 5–10: sc around (12)
-
Round 11: dec x6 (6), stuff lightly, FO.
Sew tail to back of body.
👂 Ears (x2) – with Tufts
-
MR, 4 sc (4)
-
(1 sc, inc) x2 (6)
-
(2 sc, inc) x2 (8)
-
sc around (8)
-
Change to black: (3 sc, inc) x2 (10)
FO, sew to top sides of head.
Ear Tufts
Cut several 2″ strands of black yarn. Loop and knot at ear tips. Trim to ~1–1.5″. Brush gently for fluff.
👀 Face Details
-
Nose: Embroider small brown oval between eyes.
-
Whisker spots: Add 2–3 small black stitches under nose.
-
Smile: Simple black curve with embroidery thread.
⚫ Spots
Option 1 – Surface Crochet
Use black yarn, sl st directly onto body for natural X- or dot-shaped spots.
Option 2 – Appliqués
MR, 6 sc (6), FO. Make ~10–12 small black circles, sew on body, tail, and limbs.
👉 Mix both methods for realism.
🐾 Claws (NEW Update)
After attaching all paws:
-
Use black embroidery thread.
-
Stitch 3 short diagonal claws per paw (front and back).
-
Keep evenly spaced, slightly curved forward.
🧺 Final Assembly
-
Sew head onto body securely.
-
Attach front legs under chest, angled forward.
-
Attach back legs at seated angle.
-
Sew tail at back center.
-
Add ears + tufts.
-
Embroider claws and whisker details.
-
Place spots across body for realistic patterning.
💡 Customization Ideas
-
Use pale gray for a snowy lynx look.
-
Add pink felt inside ears for softness.
-
Make claws longer for a “wild” version.
-
Add blush to cheeks with soft pastel.
✨ Your lynx cub is ready – complete with tufted ears, embroidered claws, and spotted fur! A perfect mix of wild and adorable. 🐆❄️