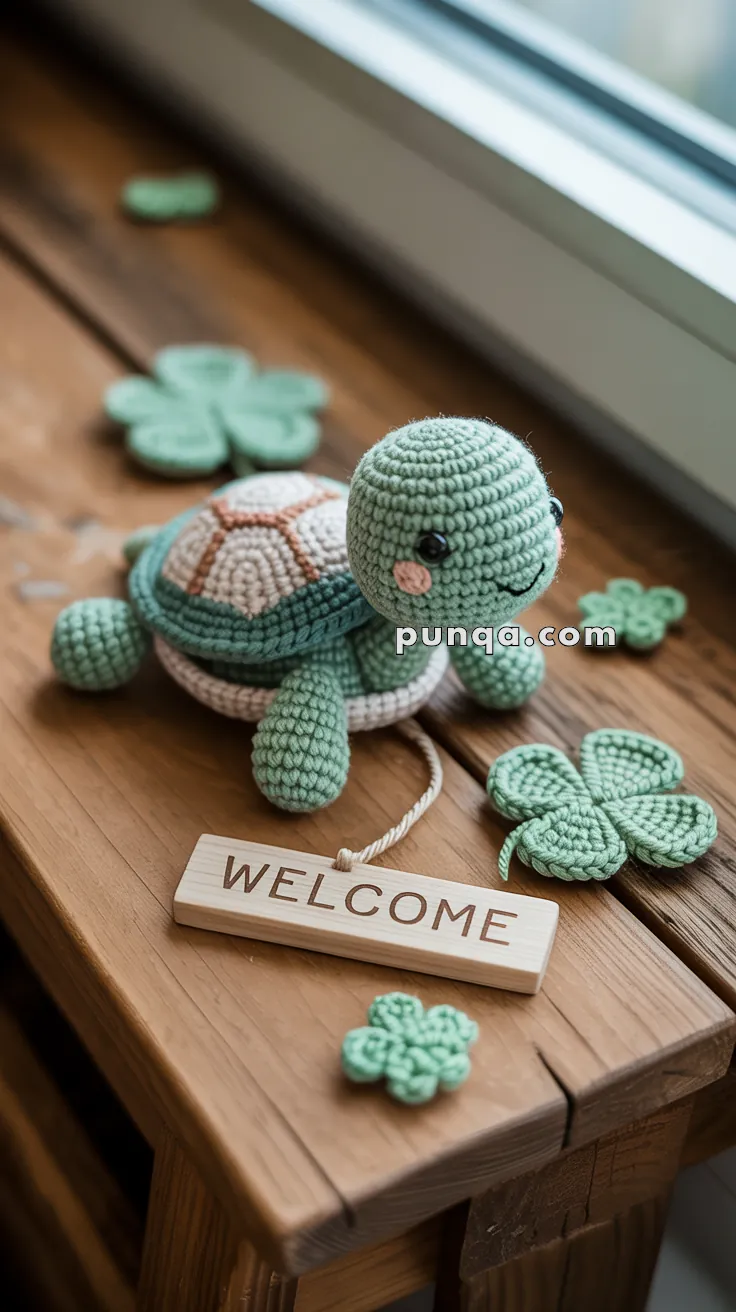
Welcome home to a world of charm with this Amigurumi Lucky Turtle crochet pattern! This sweet little turtle, complete with a delightful two-tone shell and rosy cheeks, is the perfect symbol of warmth and good fortune. Whether you’re crafting for a cozy home accent, adding a whimsical touch to your collection, or simply enjoy making nature-inspired amigurumi designs, this pattern lets you stitch up a turtle bursting with personality! Scatter lucky clovers around it to create a heartwarming vignette that radiates positivity and joy. 🍀✨
Designed for customization, this pattern allows you to experiment with different shades of green, embroidered details, or even tiny accessories like a miniature flower or golden coin for extra charm. Craft a classic lucky turtle with vibrant hues, create a pastel version for a softer aesthetic, or even stitch up a full set of clover-inspired amigurumi for a charming display! Whether gifted as a thoughtful keepsake, displayed as a cheerful accent, or made simply for the joy of crafting, this Amigurumi Lucky Turtle is a fun and creative project—perfect for bringing a touch of handmade luck to every stitch! 🧶💖✨
🐢 Amigurumi Lucky Turtle & Clover Set Crochet Pattern
This sweet little turtle features a soft sage-green body, a rounded head with tiny glossy eyes, subtle blush cheeks, and a gentle embroidered smile. Its layered shell design includes a cream underside, a visible sage collar band, and a softly domed top shell finished with a darker green rim and delicate stitched panel lines. The legs are short and rounded, slightly angled outward, giving the turtle its relaxed, grounded pose.
The flat four-leaf clovers complete the lucky theme, making this set perfect for seasonal décor, gifting, or a charming handmade display.
✨ Skill Level
Beginner to Intermediate
Includes shaping, layered shell construction, surface embroidery, and neat assembly.
📏 Finished Size
Approximately 12–14 cm (5–5.5 inches) long
Using DK or light worsted yarn with a 2.5–3 mm hook.
🧶 Materials & Yarn Amount
DK or Light Worsted Weight Yarn
• Sage Green – 75 g (approx. 140 m)
(Head, neck, legs, tail, collar band)
• Cream / Light Beige – 45 g (approx. 80 m)
(Top and bottom shell panels)
• Deep Forest Green – 25 g (approx. 45 m)
(Shell rim)
• Light Brown – small amount (under 5 g)
(Shell segment lines)
• Soft Blush Pink – small amount (under 5 g)
(Cheeks)
• Leaf Green – 15 g (approx. 25 m)
(Clovers)
Notions
• 6 mm black safety eyes
• 2.5–3 mm crochet hook
• Polyester fiberfill
• Tapestry needle
• Stitch marker
• Scissors
🧵 Abbreviations (US Terms)
MR – magic ring
sc – single crochet
inc – increase
dec – invisible decrease
sl st – slip stitch
ch – chain
dc – double crochet
FO – fasten off
🐢 Head (Sage Green)
The head is smooth, evenly rounded, and slightly tilted forward when attached.
R1: MR 6 (6)
R2: inc x6 (12)
R3: (1 sc, inc) x6 (18)
R4: (2 sc, inc) x6 (24)
R5: (3 sc, inc) x6 (30)
R6–11: sc around (30)
Insert 6 mm safety eyes between R7–8, spaced 6 stitches apart.
Embroider a small curved smile just below eye level.
Add tiny blush circles slightly under the outer edges of the eyes.
R12: (3 sc, dec) x6 (24)
R13: (2 sc, dec) x6 (18)
R14: (1 sc, dec) x6 (12)
R15: dec x6 (6)
Stuff firmly but shape the underside slightly flatter so it sits naturally on the neck.
FO and close.
🐢 Neck (Short & Slightly Tapered)
The neck is short and gently tapered at the top.
R1: MR 6 (6)
R2: inc x6 (12)
R3: (1 sc, inc) x6 (18)
R4–5: sc around (18)
R6: (1 sc, dec) x6 (12)
Lightly stuff to keep it stable but flexible.
FO leaving a long tail for sewing.
The neck should be shorter than the head height and positioned slightly forward during assembly.
🟢 Collar Band (Visible Sage Ring)
This band sits between the top and bottom shell and remains visible all around.
R1: MR 6 (6)
R2: inc x6 (12)
R3: (1 sc, inc) x6 (18)
R4–6: sc around (18)
Lightly stuff so it holds a rounded shape.
FO leaving long tail.
🐚 Bottom Shell (Cream)
The underside is wide and gently curved.
R1: MR 6 (6)
R2: inc x6 (12)
R3: (1 sc, inc) x6 (18)
R4: (2 sc, inc) x6 (24)
R5: (3 sc, inc) x6 (30)
R6: (4 sc, inc) x6 (36)
R7: (5 sc, inc) x6 (42)
R8–9: sc around (42)
FO.
🐚 Top Shell (Cream with Deep Green Rim)
R1: MR 6 (6)
R2: inc x6 (12)
R3: (1 sc, inc) x6 (18)
R4: (2 sc, inc) x6 (24)
R5: (3 sc, inc) x6 (30)
R6: (4 sc, inc) x6 (36)
R7: (5 sc, inc) x6 (42)
R8–9: sc around (42)
Switch to Deep Forest Green
R10–11: sc around (42)
FO leaving long tail.
The rim should appear clearly defined and slightly thicker than the cream section.
🟤 Shell Panel Lines
Using light brown yarn, surface slip stitch 6 evenly spaced curved lines from the center of the cream top shell outward toward the rim.
Keep lines slightly rounded, forming soft wedge segments.
Do not stitch over the dark green rim.
🦵 Legs (Make 4 – Sage Green)
Short and softly rounded.
R1: MR 6 (6)
R2: (1 sc, inc) x3 (9)
R3–6: sc around (9)
Lightly stuff.
FO.
Front legs attach slightly forward.
Back legs attach slightly wider and angled outward for stability.
🐢 Tail
R1: MR 4 (4)
R2–3: sc around (4)
Lightly stuff or leave soft.
FO.
🧩 Shell & Body Assembly
- Sew neck to head.
- Attach neck to the front of the collar band.
- Position legs and tail on the bottom shell.
- Place the collar band centered on bottom shell.
- Add light stuffing inside shell cavity.
- Place top shell over everything.
- Sew carefully around the dark green rim to close.
The sage collar band should remain visible between the cream bottom shell and the cream top shell.
🍀 Clover Leaves
Each clover is flat with slightly textured petals.
Into MR:
(Ch 2, 3 dc, ch 2, sl st) x4
Pull ring tight.
For stem:
Ch 6–8
Sl st back along chain.
Make 3–4 clovers for display.
🪵 Optional Crochet Welcome Sign
Ch 18
Row 1–3: sc across
FO.
Embroider “WELCOME” in brown yarn.
Attach a short chain loop if desired.
💚 Final Thoughts
This Lucky Turtle & Clover Set combines soft shaping with layered shell construction for a beautifully structured result. The visible sage collar, defined shell segments, rounded limbs, and expressive face create a balanced and polished finish.
Display it on a shelf, windowsill, or entryway for a cozy handmade accent filled with gentle charm and a touch of luck. 🐢🍀✨