Oh, the joy of crafting small, cuddly creatures from yarn! There’s something truly magical about creating amigurumi, especially when it’s a lizard with its quirky features and vibrant colors. 🦎 Amigurumi, the Japanese art of crocheting small stuffed toys, has an irresistible charm. It’s a delightful blend of creativity and whimsy, where each stitch brings your little critter to life. Whether you’re a seasoned crocheter or just starting out, the process is as satisfying as the finished product. Imagine giving your lizard a personality with shades of green, yellow, or even a dash of purple. The choice is yours, and each decision adds a personal touch that makes your amigurumi truly unique.
Embarking on creating an amigurumi lizard pattern is like setting out on a playful adventure. First, I gather my materials, selecting the softest yarn and the right-sized hook to ensure a perfect balance of sturdiness and cuddliness. 🧶 The next step involves sketching a simple design or finding inspiration from existing patterns, tweaking them to capture the essence of a lizard’s elongated body and charming eyes. As I crochet, I delight in watching the creature take shape, from its delicate limbs to its expressive face. Stuffing it with care, I finish with those adorable details, like tiny embroidered eyes, bringing this little reptile to life. The entire process is not only fun but immensely rewarding, leaving me with a sense of accomplishment and a new, handmade companion.
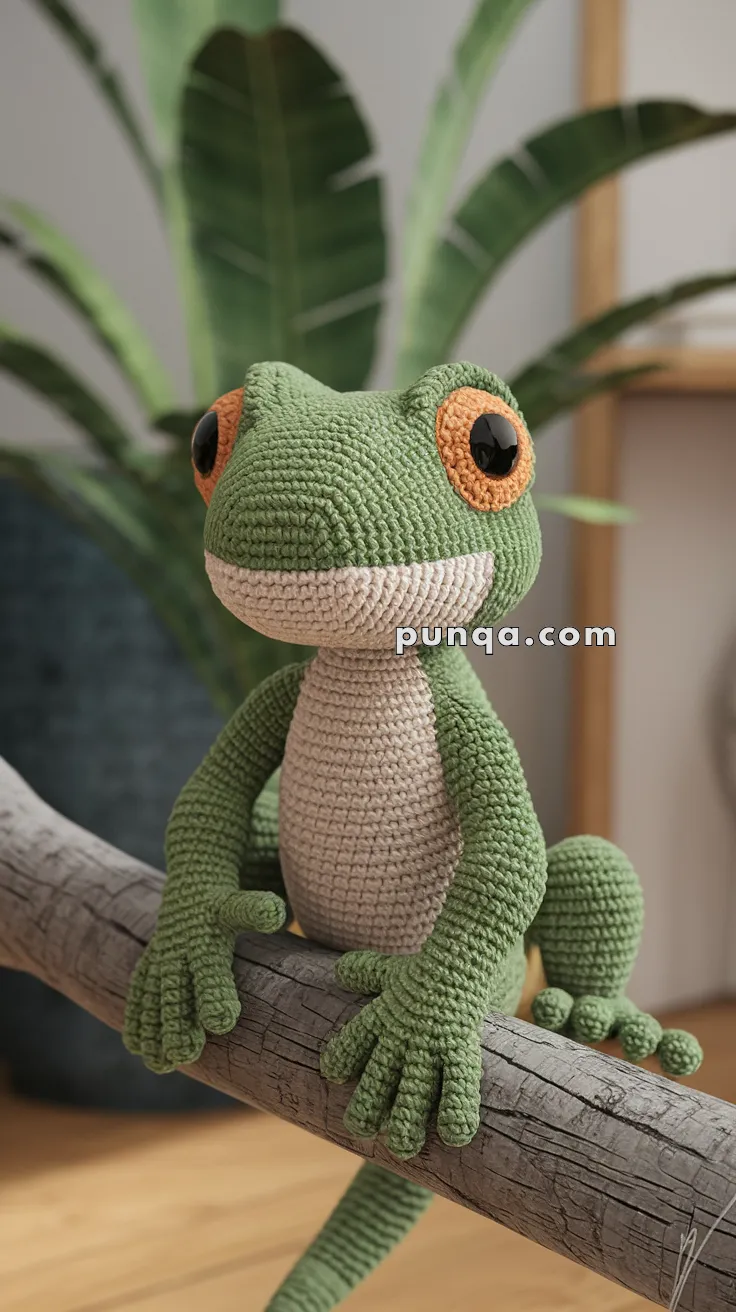
🦎 Lizard Amigurumi Crochet Pattern
🧶 Skill Level: Intermediate
📏 Finished Size: ~25–30 cm (10–12″) sitting
🧵 Yarn: Worsted/DK cotton
-
Green (body)
-
Beige (belly/mouth)
-
Orange (eyelid area)
-
Black safety eyes (14–16 mm or crochet/embroider eyes)
🪡 Abbreviations (US)
-
MR – Magic Ring
-
sc – Single Crochet
-
inc – Increase
-
dec – Decrease
-
BLO – Back Loop Only
-
ch – Chain
-
sl st – Slip Stitch
-
FO – Fasten Off
🧠 Head
Green Yarn
-
MR, 6 sc
-
inc x6 (12)
-
[sc, inc] x6 (18)
-
[2 sc, inc] x6 (24)
-
[3 sc, inc] x6 (30)
-
[4 sc, inc] x6 (36)
7–12. sc around (36) -
[4 sc, dec] x6 (30)
-
[3 sc, dec] x6 (24)
Insert eyes between R10–11, 12–14 sts apart -
[2 sc, dec] x6 (18)
Stuff firmly -
[sc, dec] x6 (12)
-
dec x6 (6), FO
😊 Mouthpiece
Beige Yarn
-
MR, 6 sc
-
inc x6 (12)
-
[sc, inc] x6 (18)
4–5. sc around (18)
Flatten to an oval shape and sew onto the lower front of the head.
👁 Eye Ridges (Make 2)
Orange Yarn
-
MR, 6 sc
-
[inc] x6 (12)
-
sc around (12)
FO and sew around the top/outer edge of each eye.
🐊 Body
Beige Yarn (belly):
-
MR, 6 sc
-
inc x6 (12)
-
[sc, inc] x6 (18)
-
[2 sc, inc] x6 (24)
Switch to green yarn
5–12. sc around (24) -
[2 sc, dec] x6 (18)
14–16. sc around (18)
Stuff and FO
✋ Arms (x2)
Green Yarn
-
MR, 6 sc
-
[sc, inc] x3 (9)
3–20. sc around (9)
Stuff lightly, bend slightly at middle
FO and sew under shoulder area
Toes:
Ch 4, sl st back down chain. Repeat 3–4 times per hand. Attach in a fan shape.
🦶 Legs (x2)
Green Yarn
-
MR, 6 sc
-
[sc, inc] x3 (9)
3–22. sc around (9)
Stuff and FO
Toes:
Same as arms. Chain 4–5, repeat for 3 toes. Attach in curve.
🦎 Tail
-
MR, 6 sc
2–4. sc around (6) -
[sc, inc] x3 (9)
6–12. sc around (9) -
[2 sc, inc] x3 (12)
14–25. sc around (12)
Stuff as you go, FO
🧩 Assembly
-
Sew head to body
-
Position arms outward; sew firmly
-
Sew legs in bent, seated pose
-
Attach tail at back base
-
Sew or embroider smile and nostrils if desired