Welcome to the fluffy and whimsical world of amigurumi! 🐰✨ Today, I’m excited to share my free crochet pattern for a Lionhead Rabbit—a cuddly and expressive creation perfect for bunny lovers, nature-inspired collections, or anyone who enjoys crafting soft and textured plush designs! 🌿 Whether you love stitching up adorable animals, creating lifelike and detailed figures, or simply want to add a charming Lionhead Rabbit to your handmade lineup, this pattern will guide you through crafting a beautifully sculpted plush with its signature fluffy mane, gentle features, and a touch of cozy charm! 🤍
This design embraces soft textures, delicate shaping, and playful details to bring a heartwarming and realistic presence to your crochet projects! 🧶🌾 I’ve carefully outlined each step to ensure your Amigurumi Lionhead Rabbit turns out just right—ready to hop into your collection or become a treasured handmade gift! 🎁 So grab your hooks, pick out warm browns, creamy whites, or soft grays, and let’s stitch up an irresistibly cute Lionhead Rabbit! ✨
🐇 Amigurumi Lionhead Rabbit Crochet Pattern
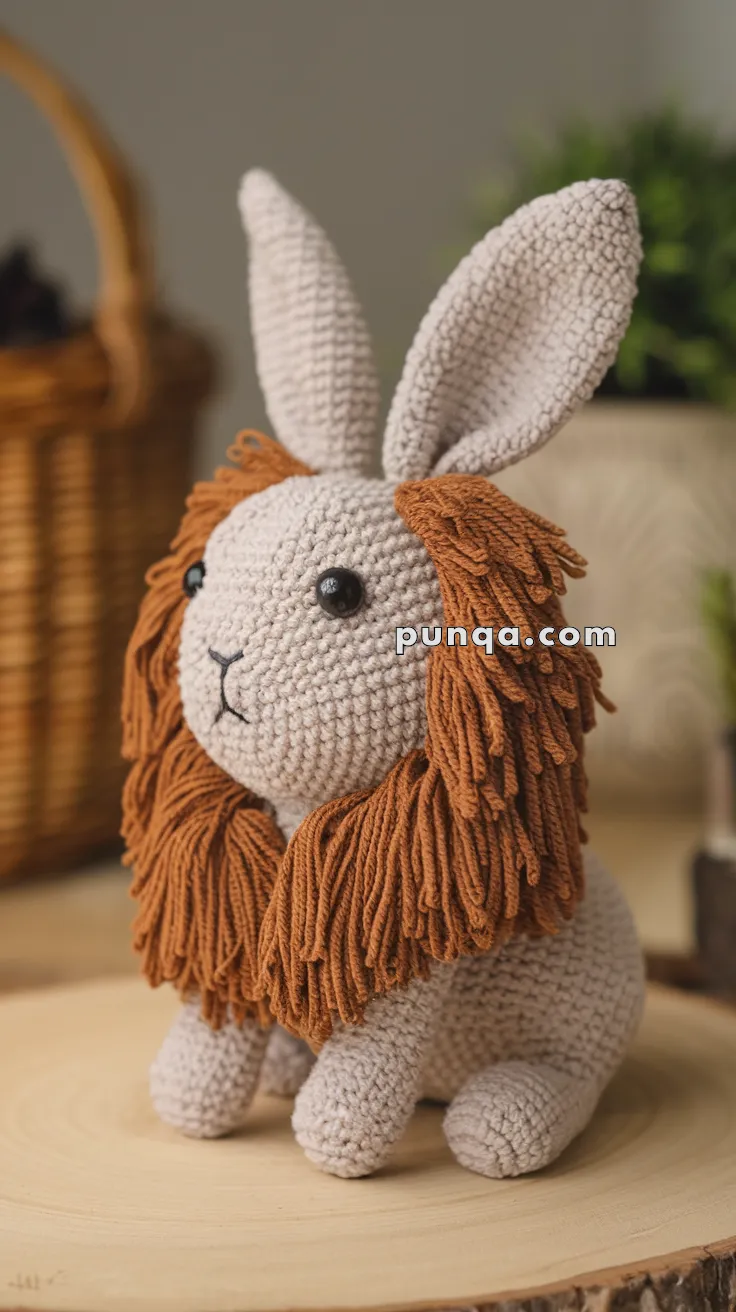
This amigurumi captures the charm of a lionhead rabbit, complete with tall upright ears, a soft round body, stubby legs, and its distinctive fluffy mane. With a layered mane that frames the face and chest, and the simple Y-shaped embroidered mouth, this bunny looks lifelike and full of personality.
✨ Skill Level
Intermediate – shaping, sewing, and layered mane assembly required.
📏 Finished Size
~22–25 cm tall including ears.
🧶 Materials
-
Worsted weight yarn:
-
Beige/light taupe (body, head, ears, tail, legs)
-
Brown (mane)
-
Black (mouth embroidery)
-
-
Crochet hook: 3.0 mm
-
10–12 mm black safety eyes
-
Yarn needle
-
Fiberfill stuffing
-
Scissors
-
Stitch marker
🧾 Abbreviations (US Terms)
MR = magic ring
sc = single crochet
inc = increase (2 sc in same st)
dec = decrease (sc2tog)
ch = chain
sl st = slip stitch
st(s) = stitch(es)
FO = fasten off
🧵 Pattern
Head (Beige)
-
MR, 6 sc (6)
-
inc × 6 (12)
-
(sc, inc) × 6 (18)
-
(2 sc, inc) × 6 (24)
-
(3 sc, inc) × 6 (30)
-
(4 sc, inc) × 6 (36)
7–12. sc around (36) -
(4 sc, dec) × 6 (30)
-
(3 sc, dec) × 6 (24)
-
(2 sc, dec) × 6 (18)
Stuff firmly. -
(sc, dec) × 6 (12)
-
dec × 6 (6). FO.
👉 Place safety eyes between Rnds 8–9, spaced ~7 sts apart but positioned more on the sides of head.
👉 Embroider a small Y-shaped mouth under eyes (tiny nose + line + two diagonals).
Body (Beige)
-
MR, 6 sc (6)
-
inc × 6 (12)
-
(sc, inc) × 6 (18)
-
(2 sc, inc) × 6 (24)
-
(3 sc, inc) × 6 (30)
6–12. sc around (30) -
(3 sc, dec) × 6 (24)
14–16. sc around (24) -
(2 sc, dec) × 6 (18)
Stuff firmly. FO, leaving tail for sewing.
Legs (×4, Beige)
-
MR, 6 sc (6)
-
inc × 6 (12)
3–6. sc around (12) -
(sc, dec) × 4 (8). FO, stuff lightly.
👉 Sew front legs angled outward (slightly apart).
👉 Sew back legs wide, creating a sitting posture as in the photo.
Ears (×2, Beige)
-
MR, 6 sc (6)
-
(sc, inc) × 3 (9)
-
(2 sc, inc) × 3 (12)
4–17. sc around (12) → making tall slender ears -
(2 sc, dec) × 3 (9). FO.
👉 Lightly stuff the base only so ears stay upright.
👉 Sew close together at top of head.
Tail (Beige)
-
MR, 6 sc (6)
-
inc × 6 (12)
3–4. sc around (12). FO, stuff.
👉 Sew to back.
Mane (Brown)
-
Cut yarn strands ~8–10 cm long.
-
Use a crochet hook to attach strands (like latch hook) around head.
👉 Work in 3 layers:
-
First layer: around the neck base.
-
Second layer: under chin and cheeks.
-
Third layer: down chest area for fullness.
👉 Trim mane to shape: keep front strands longer to form a lion-like beard, shorter around back.
🪡 Assembly
-
Sew head to body firmly.
-
Attach legs: front angled outward, back wide for stability.
-
Add tail at back.
-
Attach ears upright, close together.
-
Add mane strands in layers, brushing and trimming for shape.
-
Embroider Y-shaped mouth carefully to match the gentle rabbit expression.
🌟 Final Touch
And your Lionhead Rabbit Amigurumi is ready! 🐇✨ With its majestic mane, upright ears, and gentle embroidered face, it perfectly captures the look of a real lionhead rabbit. This plushie will be the centerpiece of any handmade collection.
Try making it in different mane colors (cream, gray, black) for unique bunny personalities!