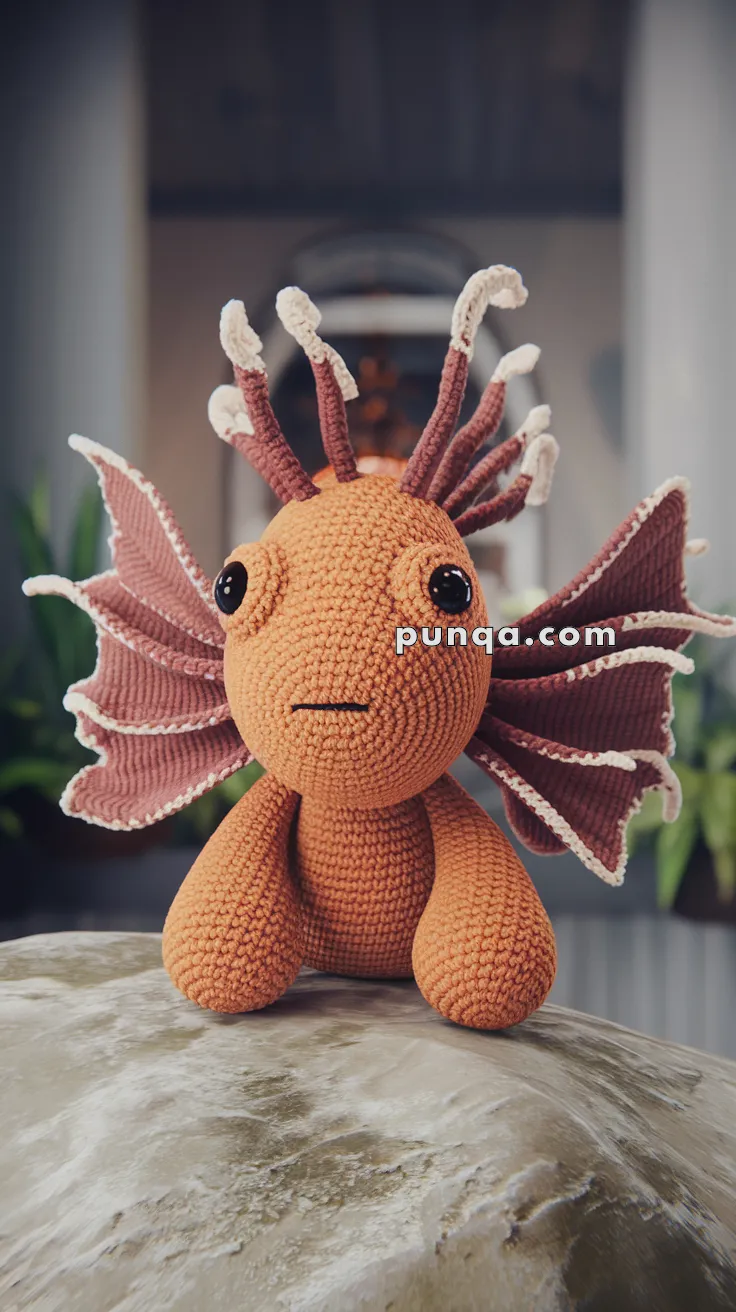
Bring the striking beauty of a Lionfish to life with this Amigurumi Lionfish crochet pattern! 🦑✨ With its flowing fins, bold stripes, and elegant shape, this design captures the essence of this mesmerizing sea creature in yarn form. Whether you’re crafting for an ocean-inspired décor piece, a heartfelt gift, or simply love marine-themed amigurumi, this FREE pattern is a fantastic addition to your collection.
Designed for intermediate crocheters, this pattern allows for customization in fin textures, color variations, and even tiny accessories like embroidered details or a miniature coral reef setting to enhance its personality. Choose classic reds and whites for a realistic look or experiment with vibrant hues for a whimsical twist! Whether displayed as part of an underwater setup or gifted to a fellow crochet enthusiast, this amigurumi lionfish is sure to impress.
Grab your hook, select your favorite yarn, and let’s bring this stunning sea creature to life—one stitch at a time! 🧶✨
🐠 Amigurumi Lionfish Crochet Pattern
Dive into the reef with this stunning amigurumi lionfish! With flowing pectoral fins, dramatic spines, and gentle eyes, this crochet creature captures the mesmerizing beauty of one of the ocean’s most unique inhabitants. Perfect for marine life lovers or whimsical underwater decor!
✨ Skill Level
Advanced – includes sculptural shaping, ruffled fins, multi-part assembly, and careful placement.
📏 Finished Size
Approx. 24–26 cm (9.5–10 in) wide including fins, using worsted-weight yarn and a 3.5 mm hook.
🧶 Materials
Worsted Weight Yarn
-
Burnt orange / rust – body, head, base limbs
-
Muted burgundy – fins and spines
-
Soft cream – fin edging and spine tips
-
Black – mouth embroidery
Other Supplies
-
3.5 mm crochet hook
-
10–12 mm safety eyes (glossy black)
-
Polyester fiberfill
-
Tapestry needle
-
Stitch marker
🧵 Abbreviations (US Terms)
MR – magic ring
sc – single crochet
inc – increase
dec – decrease
sl st – slip stitch
ch – chain
hdc – half double crochet
dc – double crochet
FO – fasten off
🧡 Body
Worked in continuous rounds with burnt orange.
-
R1: 6 sc in MR (6)
-
R2: inc ×6 (12)
-
R3: (sc, inc) ×6 (18)
-
R4: (2 sc, inc) ×6 (24)
-
R5: (3 sc, inc) ×6 (30)
-
R6: (4 sc, inc) ×6 (36)
-
R7–R15: sc around (36)
Insert safety eyes between R9–R10, spaced 7 stitches apart, centered on the face.
-
R16: (4 sc, dec) ×6 (30)
-
R17: (3 sc, dec) ×6 (24)
-
R18: (2 sc, dec) ×6 (18)
Stuff firmly, shaping into a smooth upright oval.
-
R19: (sc, dec) ×6 (12)
-
R20: dec ×6 (6)
FO and close.
Embroider a short straight mouth line in black just below the eyes.
🪶 Large Pectoral Fins (Make 2)
These fins are wide, fan-shaped, and softly ribbed.
With burgundy yarn:
-
Ch 16
-
R1: sc in 2nd ch, hdc ×4, dc ×8, hdc ×2
-
R2: ch 1, turn, sc across
-
R3–R6: repeat R2 (5 rows total)
Fin Edging (Cream)
Join cream yarn along outer edge:
Work (sl st, sc, hdc, dc, hdc, sc) in each row end to create a crisp ruffled outline.
FO.
Sew fins to each side of the body so they flare outward and slightly forward.
🪶 Dorsal Fin (Back Fan)
With burgundy yarn:
-
Ch 18
-
R1: sc in 2nd ch, hdc ×4, dc ×8, hdc ×2
-
R2–R4: ch 1, turn, sc across
Edging (Cream)
Work the same ruffled edging along one long side only.
FO.
Sew along the upper back, starting behind the head and stopping before the base.
🎋 Head Spines (Make 7)
Tall, upright, slightly curved.
With burgundy yarn:
-
Ch 12
-
Sc in 2nd ch and back (11)
Switch to cream:
-
Sc 2 stitches at the tip only
FO.
Sew spines upright in a fan on the top of the head, centered and evenly spaced.
🎋 Side Spines (Make 6)
Shorter decorative spines.
With burgundy yarn:
-
Ch 8
-
Sc in 2nd ch and back (7)
Switch to cream:
-
Sc 1 stitch at tip
FO.
Attach 3 on each side of the upper body behind the eyes.
🐾 Lower Fins (Make 2)
These act as small resting fins.
With burnt orange yarn:
-
R1: 6 sc in MR (6)
-
R2: inc ×6 (12)
-
R3: (sc, inc) ×6 (18)
-
R4: sc around (18)
Edging (Cream)
Work (sl st, sc, hdc) evenly around.
FO.
Sew low on the body near the front underside.
🧷 Assembly & Shaping
-
Sew eyes and embroider mouth
-
Attach large side fins, angling outward
-
Sew dorsal fin along back
-
Attach head spines upright
-
Add side spines symmetrically
-
Sew lower fins underneath
-
Shape fins and spines gently by hand
🌟 Finished Lionfish
Your lionfish should have:
-
A smooth rounded orange body
-
Large flowing fins with crisp cream edging
-
Upright dramatic head spines with pale tips
-
Gentle wide-set eyes and a calm expression
Elegant, whimsical, and instantly recognizable, this amigurumi lionfish is a striking ocean-inspired piece perfect for display, gifting, or marine-themed décor 🐠🧶