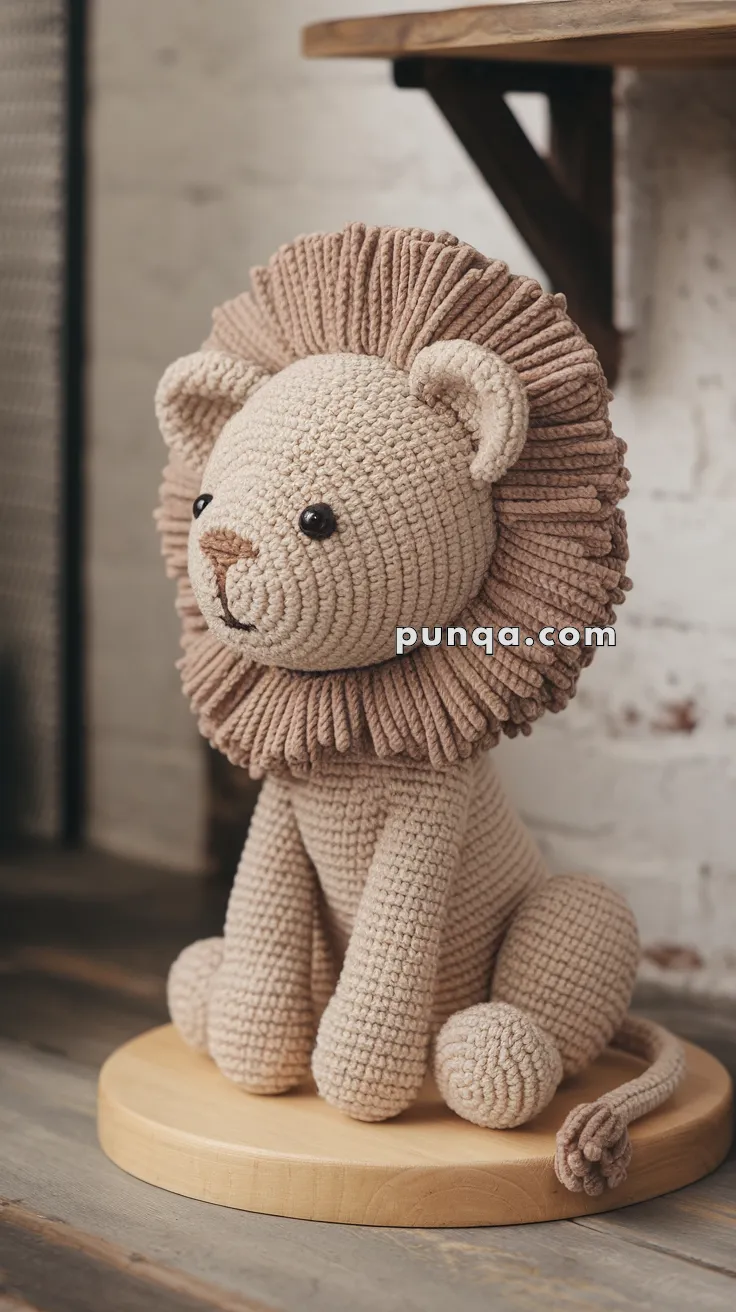
Bring the majestic charm of a Lion to life with this Amigurumi Lion crochet pattern! 🦁✨ With its fluffy mane, powerful stance, and expressive face, this design captures the essence of the king of the jungle in yarn form. Whether you’re crafting for a wildlife-inspired décor piece, a heartfelt gift, or simply love lion-themed amigurumi, this FREE pattern is a fantastic addition to your collection.
Designed for crocheters of all skill levels, this pattern allows for customization in mane textures, facial details, and even tiny accessories like embroidered whiskers or a miniature savanna setting to enhance its personality. Choose classic golden yellows and browns for a realistic look or experiment with pastel hues for a whimsical twist! Whether displayed as part of a nature-themed setup or gifted to a fellow crochet enthusiast, this amigurumi lion is sure to impress.
Grab your hook, select your favorite yarn, and let’s bring this majestic feline to life—one stitch at a time! 🧶✨
🦁 Amigurumi Lion Crochet Pattern
Roar into your next project with this adorable, majestic amigurumi lion! Featuring long, looped mane strands, a detailed sitting pose, and a sweet face, this lion is perfect as a nursery gift, shelf decoration, or cuddly toy.
✨ Skill Level
Intermediate – Involves shaping, sewing, loop stitch technique, and crocheting body and limbs both separately and together.
📏 Finished Size
Approx. 10–12 inches (25–30 cm) tall when using worsted weight yarn and a 3.5 mm hook.
🧶 Materials
-
Worsted weight yarn in:
-
Beige or tan (Body, Head, Legs, Tail)
-
Brown (Mane and tail tip)
-
Dark brown/black (Nose & embroidery)
-
-
3.5 mm crochet hook
-
Safety eyes (10–12 mm)
-
Fiberfill stuffing
-
Stitch marker
-
Yarn needle
-
Scissors
🧵 Abbreviations (US Terms)
MR – Magic Ring
sc – Single Crochet
inc – Increase (2 sc in one stitch)
dec – Decrease (sc 2 together)
sl st – Slip Stitch
ch – Chain
BLO – Back Loop Only
FLO – Front Loop Only
LOOP – Loop Stitch
FO – Fasten Off
🧠 Head
With beige yarn:
-
MR, 6 sc (6)
-
inc x6 (12)
-
(1 sc, inc) x6 (18)
-
(2 sc, inc) x6 (24)
-
(3 sc, inc) x6 (30)
-
(4 sc, inc) x6 (36)
-
(5 sc, inc) x6 (42)
8–17. sc around (42)
Place safety eyes between rounds 12–13, about 9 sts apart. -
(5 sc, dec) x6 (36)
-
(4 sc, dec) x6 (30)
-
(3 sc, dec) x6 (24)
-
(2 sc, dec) x6 (18)
Stuff head firmly -
(1 sc, dec) x6 (12)
-
dec x6 (6)
FO, close.
🐾 Front Legs (Make 2)
With beige yarn:
-
MR, 6 sc (6)
-
inc x6 (12)
-
(1 sc, inc) x6 (18)
4–5. sc around (18) -
(1 sc, dec) x6 (12)
7–20. sc around (12)
Stuff firmly. FO, leave long tail for sewing or joining.
🐾 Back Legs (Make 2)
With beige yarn:
-
MR, 6 sc (6)
-
inc x6 (12)
-
(1 sc, inc) x6 (18)
-
(2 sc, inc) x6 (24)
5–7. sc around (24) -
(2 sc, dec) x6 (18)
-
(1 sc, dec) x6 (12)
10–16. sc around (12)
Stuff firmly. FO, leave long tail for sewing.
🦁 Body (Crochet front legs together)
With beige yarn:
-
MR, 6 sc (6)
-
inc x6 (12)
-
(1 sc, inc) x6 (18)
-
(2 sc, inc) x6 (24)
-
sc around (24)
-
Attach first front leg: sc through both leg and body for 6 sts, sc 6
-
Attach second leg: sc through both leg and body for 6 sts, sc 6 (24 sts total)
8–18. sc around, continuing full body tube -
(2 sc, dec) x6 (18)
-
(1 sc, dec) x6 (12)
Stuff body -
dec x6 (6)
FO and close
Optional: you can sew legs separately instead of joining during body round.
🐾 Tail
With beige yarn:
-
Ch 16
-
sc into 2nd ch from hook, sc across (15)
-
FO and switch to brown yarn
-
Attach 6–8 strands of brown yarn to end and knot/tie to form tuft
Trim to puff.
👂 Ears (Make 2)
-
MR, 6 sc
-
inc x6 (12)
-
(1 sc, inc) x6 (18)
-
sc around
-
Fold in half and sl st to close
FO, leave tail to sew to head.
🦁 Mane Instructions
With brown yarn (loop stitch technique):
-
Attach brown yarn around the base of the head in FLO or through surface slip stitch
-
Loop Stitch Round:
-
Insert hook, wrap yarn over finger to form loop on front side, draw up loop and finish sc.
-
Repeat all around base of head and again higher on the crown for fuller mane.
-
-
Create multiple layers of loop stitch rows around head to build volume.
-
Gently trim loop strands to even length if desired (optional).
🧵 Assembly
-
Sew head to body.
-
Sew ears to either side of the mane.
-
Attach back legs to sides of lower body.
-
Stitch tail to back.
-
Embroider nose with brown and smile with black thread.
-
Shape the mane by hand if needed and fluff lightly.
💡 Customization Tips
-
Use velvet yarn for a softer, plush lion
-
Add safety nose instead of embroidery
-
Make a lioness by omitting the mane
This cuddly lion is ready to rule your crochet kingdom with courage and cuteness! 🧶🦁