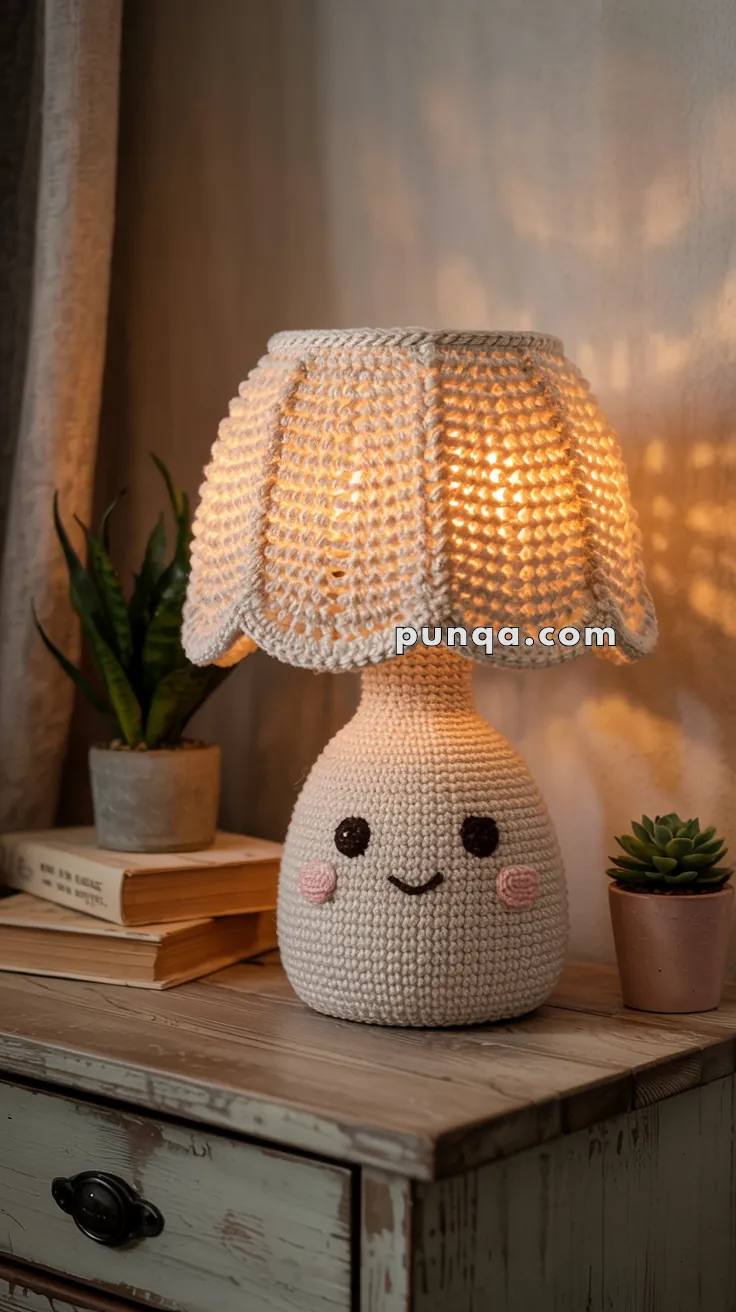
Light up your crochet collection with this Amigurumi Lamp pattern! Inspired by the cozy glow of a classic lamp, this charming design captures its elegant shape, soft textures, and warm personality in every stitch. With a sturdy base, a beautifully crafted shade, and delightful details, this crochet lamp is perfect for adding a whimsical touch to your handmade projects. Whether you’re crafting for home decor, creating a unique gift, or simply enjoy making quirky amigurumi designs, this pattern lets you stitch up a miniature lamp bursting with charm! 🏮✨
Designed for customization, this pattern allows you to experiment with different colors, embroidered details, or even tiny accessories like a miniature pull chain or glowing effect for extra flair. Craft a classic lamp with neutral tones, create a vibrant version with bold hues, or even stitch up a full set of cozy-inspired amigurumi for a charming display! Whether gifted as a thoughtful keepsake, displayed as a stylish accent, or made simply for the joy of crafting, this Amigurumi Lamp is a fun and creative project—perfect for bringing a touch of handmade warmth to every stitch! 🧶💖
💡 Amigurumi Kawaii Lamp Crochet Pattern
Light up your room with this adorable amigurumi lamp! With its softly glowing scalloped lampshade and a sweet smiley face on the base, this design blends cozy decor with cute character. Use it as a plush lamp decor or convert it into a functioning nightlight with a battery LED base!
✨ Skill Level
Intermediate – Includes shaping, structure, and scalloped edging.
📏 Finished Size
Approx. 9–12 inches (23–30 cm) tall using worsted weight yarn and a 3.5–4 mm hook.
🧶 Materials
- Yarn (Worsted weight):
- Color A: Cream or off-white (main lamp base + shade)
- Color B: Black (eyes and smile)
- Color C: Soft pink (cheeks)
- Crochet hook: 3.5–4 mm
- 10 mm safety eyes or black felt
- Tapestry needle
- Stitch marker
- Polyfill stuffing
- Optional: LED puck light or fairy lights for inside the shade
- Optional: plastic mesh or cardboard for added stiffness in the base
🧵 Abbreviations (US Terms)
- MR – Magic Ring
- sc – Single Crochet
- inc – Increase
- dec – Decrease
- sl st – Slip Stitch
- ch – Chain
- FO – Fasten Off
- BLO – Back Loop Only
🪔 Lamp Base (Body)
With Color A
- MR, 6 sc (6)
- inc x6 (12)
- (1 sc, inc) x6 (18)
- (2 sc, inc) x6 (24)
- (3 sc, inc) x6 (30)
- (4 sc, inc) x6 (36)
- (5 sc, inc) x6 (42)
8–20. sc around (42) - (5 sc, dec) x6 (36)
- (4 sc, dec) x6 (30)
- (3 sc, dec) x6 (24)
24–26. sc around (24) – narrow neck
Stuff bottom half firmly - (2 sc, dec) x6 (18)
- (1 sc, dec) x6 (12)
- sc around (12), FO – leave tail for sewing to shade later
Face Embroidery (before stuffing fully):
- Sew on safety eyes or black felt between Rounds 11–12, about 7 stitches apart
- Embroider a curved smile using Color B
- Add cheeks with small pink circles (see below)
🌸 Cheeks (Make 2)
With Color C
- MR, 6 sc
- inc x6 (12)
FO, leave tail, sew just below the eyes
🪆 Lampshade (Scalloped Top)
With Color A
Main Shade Panel:
- MR, 6 sc (6)
- inc x6 (12)
- (1 sc, inc) x6 (18)
- (2 sc, inc) x6 (24)
- (3 sc, inc) x6 (30)
- (4 sc, inc) x6 (36)
- (5 sc, inc) x6 (42)
- (6 sc, inc) x6 (48)
9–12. sc around (48)
Scalloped Edge:
(1 sc, skip next st, 5 dc in next st, skip 1 st, sl st in next) repeat around
FO and weave in ends
✂️ Assembly
- Lightly stuff the top of the lamp base if needed
- Attach the lampshade to the top of the neck securely
- Insert LED puck light or fairy light under the shade if desired (do not use hot bulbs!)
- Optionally add a weight (e.g., beanbag or pebble pouch) in the bottom to keep it upright
💡 Customization Ideas
- Make it in pastel rainbow yarn for a whimsical nightlight
- Add a ruffle or pom-pom trim to the bottom of the shade
- Use velvet or chenille yarn for extra coziness
This amigurumi lamp is both adorable and ambient—perfect for nurseries, nightstands, or as a sweet handmade gift that’s sure to bring smiles and soft light! 🌙🧶