Ah, the delightful world of amigurumi! There’s something truly magical about turning a simple ball of yarn into adorable, whimsical creations. One of my favorite projects is crafting a lamia amigurumi pattern. There’s an enchanting charm in bringing these mythical creatures to life with just a crochet hook and some colorful yarn. The beauty of making amigurumi is that it’s both a relaxing and rewarding process 🧶✨. You get to see your little character forming right before your eyes, row by row, stitch by stitch. Plus, the lamia’s serpentine shape adds an extra layer of creativity and challenge!
Creating a lamia amigurumi pattern is like embarking on a miniature adventure. First, I gather my materials: yarn in enchanting colors, a trusty crochet hook, safety eyes, and stuffing to give my lamia a cuddly form. Then, I dive into the process, starting with the head and working my way down the body, ensuring that every detail reflects the whimsical nature of this creature. There’s a special joy in experimenting with different color patterns and textures to bring out the lamia’s personality. And the best part? Seeing the finished creation, with its tiny eyes and mischievous grin, ready to bring a touch of magic to anyone who sees it! 🐍💖
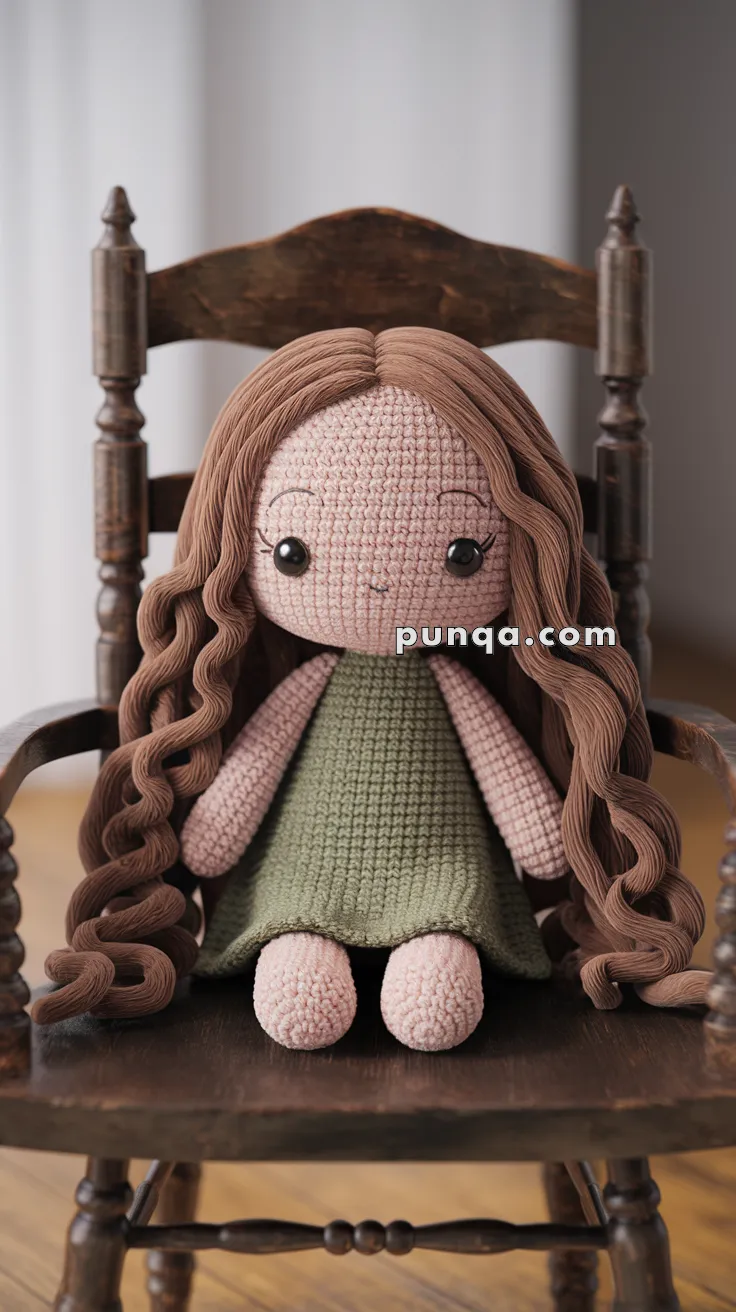
🧸 Amigurumi Lamia Doll – Free Crochet Pattern
This graceful amigurumi doll features long spiral curls and a classic handmade charm. Customize her dress color and hair for your own version of Lamia! 💖
🧵 Skill Level: Intermediate
📏 Finished Size: ~11–13 inches (28–33 cm)
🧶 Materials
-
Worsted weight yarn in:
-
Skin tone (pale pink or beige)
-
Brown (hair)
-
Olive green (dress)
-
-
2.5–3.0 mm crochet hook
-
10–12 mm safety eyes
-
Yarn needle
-
Fiberfill stuffing
-
Stitch markers
-
Black thread (for eyebrows and lashes)
-
Optional: wire for shaping the curls
✨ Abbreviations (US Terms)
-
MR – Magic Ring
-
sc – Single Crochet
-
inc – Increase (2 sc in one stitch)
-
dec – Decrease (invisible if preferred)
-
ch – Chain
-
sl st – Slip Stitch
-
BLO – Back Loop Only
-
FO – Fasten Off
🪆 Head (Skin Tone)
-
MR, 6 sc
-
inc x6 = 12
-
(1 sc, inc) x6 = 18
-
(2 sc, inc) x6 = 24
-
(3 sc, inc) x6 = 30
-
(4 sc, inc) x6 = 36
-
(5 sc, inc) x6 = 42
8–18. sc around -
(5 sc, dec) x6 = 36
-
(4 sc, dec) x6 = 30
-
(3 sc, dec) x6 = 24
-
(2 sc, dec) x6 = 18
Insert safety eyes between rounds 11–12, ~10 stitches apart
Stuff firmly -
(1 sc, dec) x6 = 12
-
dec x6 = 6, FO
🧍 Body (Skin Tone → Dress Color)
-
MR, 6 sc
-
inc x6 = 12
-
(1 sc, inc) x6 = 18
-
(2 sc, inc) x6 = 24
-
(3 sc, inc) x6 = 30
6–10. sc around (skin tone)
Switch to green for dress:
11–24. sc around
Stuff firmly -
(3 sc, dec) x6 = 24
-
(2 sc, dec) x6 = 18
FO and leave long tail for sewing to head
🦵 Legs (Make 2 – Skin Tone)
-
MR, 6 sc
-
inc x6 = 12
3–15. sc around
Lightly stuff
FO one leg. Do not FO second leg — continue to body
Join legs with ch 3, then work around both legs (and ch) to form round base of body
💪 Arms (Make 2 – Skin Tone)
-
MR, 6 sc
-
inc x6 = 12
3–18. sc around
Lightly stuff
FO and sew to sides of body
👗 Dress Skirt (Green)
Join yarn to bottom round of body
-
sc around in BLO
-
(2 sc, inc) repeat
3–8. sc around
FO and weave in end
💇 Hair Cap Base (Brown)
-
MR, 6 sc
-
inc x6 = 12
-
(1 sc, inc) x6 = 18
-
(2 sc, inc) x6 = 24
-
(3 sc, inc) x6 = 30
-
(4 sc, inc) x6 = 36
-
(5 sc, inc) x6 = 42
8–12. sc around
FO, sew to head
🌀 Spiral Hair Strands (Make 20–30 or more)
Ch 45–55
In 2nd ch from hook: 2 sc in each stitch to end
This will cause the yarn to curl
Make long and short pieces
Sew strands around the wig cap base from bottom up in overlapping layers
🧵 Facial Details
-
Embroider eyelashes and brows with black thread
-
Light blush may be added with fabric crayon or pastel
-
Optional: tiny V stitch for the mouth
🪡 Assembly
-
Sew head onto body securely
-
Attach arms on each side, ~1 row below neck
-
Position hair strands in even rows around head
-
Trim and curl as desired
💡 Tips
-
For extra bouncy curls, use acrylic yarn and block lightly
-
You can brush out strands for a fluffier hairstyle
-
Add ribbon, lace, or embroidery to the dress for a custom look
-
To help Lamia sit, insert small weights in her bottom or stitch legs at a forward angle


Cute!!