Meet the Amigurumi Kitsune, a crochet project that’s full of mystical charm and cozy character! 🦊🧶 Inspired by the legendary fox spirit of Japanese folklore, this design brings the Kitsune to life in soft yarn form, complete with expressive features and a magical aura. With its playful proportions and enchanting details, this fox makes a delightful companion that feels straight out of a storybook.
Perfect as a handmade gift, a whimsical décor piece, or a unique addition to your amigurumi collection, the Amigurumi Kitsune radiates personality and wonder. Fun to stitch and even more fun to display, this project is a joyful way to crochet creativity, culture, and a sprinkle of handmade magic—one loop at a time! ✨🌙🧵
🦊 Amigurumi Kitsune (Fox Spirit) Crochet Pattern
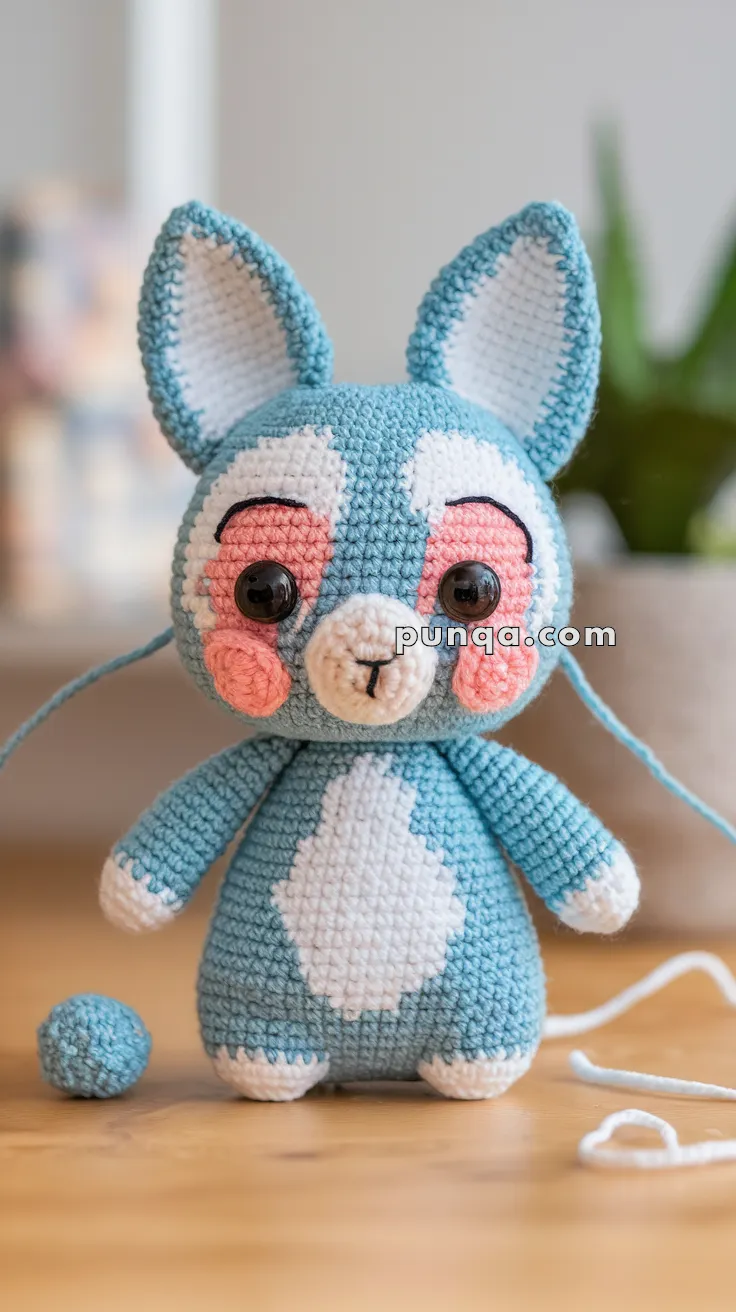
This adorable chibi-style kitsune features a large rounded head, oversized upright ears, soft blush cheek circles, curved white eye markings, a rounded white muzzle, and a centered diamond belly panel. The proportions are intentionally sweet and compact, with a slightly larger head and a small sturdy body for a balanced standing pose.
Finished Size: Approx. 18–20 cm (7–8 inches)
Skill Level: Intermediate
🧶 Materials & Yarn Amount
DK weight yarn:
Pastel Teal Blue – approx. 110 g (head, body, outer ears, arms, upper legs, tail)
White – approx. 70 g (muzzle, eye markings, inner ears, belly panel, feet tips)
Soft Pink – approx. 30 g (cheek circles)
Black embroidery thread – small amount (mouth, eyebrows)
12 mm safety eyes
Polyester fiberfill
3.0 mm crochet hook
Tapestry needle
Stitch marker
🧵 Abbreviations (US Terms)
MR – magic ring
sc – single crochet
inc – increase (2 sc in one stitch)
dec – decrease (sc2tog)
ch – chain
sl st – slip stitch
FO – fasten off
🦊 Head (Smooth Color, Separate Face Pieces)
With teal:
R1 MR 6 (6)
R2 inc ×6 (12)
R3 (1 sc, inc) ×6 (18)
R4 (2 sc, inc) ×6 (24)
R5 (3 sc, inc) ×6 (30)
R6 (4 sc, inc) ×6 (36)
R7 (5 sc, inc) ×6 (42)
R8–15 sc around (42)
Insert 12 mm safety eyes between R11–12, spaced 8 stitches apart.
R16 (5 sc, dec) ×6 (36)
R17 (4 sc, dec) ×6 (30)
Stuff firmly.
R18 (3 sc, dec) ×6 (24)
R19 (2 sc, dec) ×6 (18)
R20 (1 sc, dec) ×6 (12)
R21 dec ×6 (6) FO and close.
🤍 White Eye Markings (Make 2 – Mirror Shape)
These curved patches frame the upper eye area.
With white:
Ch 7
Row 1 sc across (6)
Row 2 inc, 4 sc, inc (8)
Row 3 sc across
Row 4 dec, 4 sc, dec (6)
Row 5 sc across
Shape into a soft curved crescent.
Sew above and slightly around each eye, forming a gentle mask effect.
🐽 Rounded Muzzle
With white:
R1 MR 6
R2 inc ×6 (12)
R3 (1 sc, inc) ×6 (18)
R4 (2 sc, inc) ×6 (24)
R5–6 sc around (24)
Stuff lightly so it remains rounded but soft.
Sew centered below the eyes.
Embroider a small vertical nose line and a short “Y” shaped mouth.
🌸 Cheek Circles (Make 2)
With soft pink:
R1 MR 6
R2 inc ×6 (12)
R3 (1 sc, inc) ×6 (18)
FO, flatten slightly.
Sew directly below each eye, overlapping the lower edge of the white eye marking and touching the muzzle slightly.
🐾 Body
With teal:
R1 MR 6
R2 inc ×6 (12)
R3 (1 sc, inc) ×6 (18)
R4 (2 sc, inc) ×6 (24)
R5 (3 sc, inc) ×6 (30)
R6–11 sc around (30)
R12 (3 sc, dec) ×6 (24)
R13 (2 sc, dec) ×6 (18)
Stuff firmly for stability.
R14 (1 sc, dec) ×6 (12)
FO and close.
🤍 Diamond Belly Panel
With white:
Ch 7
Row 1 sc across (6)
Row 2 inc, 4 sc, inc (8)
Row 3 inc, 6 sc, inc (10)
Row 4 sc across
Row 5 dec, 6 sc, dec (8)
Row 6 dec, 4 sc, dec (6)
FO.
Sew centered on body, forming a vertical diamond shape that widens mid-body and narrows at top and bottom.
🐾 Arms (Make 2)
Start with white:
R1 MR 6
R2 (1 sc, inc) ×3 (9)
R3 sc around (9)
Switch to teal:
R4–9 sc around (9)
Lightly stuff lower half only.
Flatten top and sew to sides of body just below head.
🐾 Legs (Make 2)
Start with white:
R1 MR 6
R2 inc ×6 (12)
R3 sc around (12)
Switch to teal:
R4–8 sc around (12)
Stuff firmly.
Sew slightly forward at base so the figure stands balanced.
👂 Large Upright Ears (Make 2)
Outer Ear – Teal:
R1 MR 6
R2 (1 sc, inc) ×3 (9)
R3 (2 sc, inc) ×3 (12)
R4 (3 sc, inc) ×3 (15)
R5 (4 sc, inc) ×3 (18)
R6–7 sc around (18)
Inner Ear – White:
Work same pattern but stop at R4 (15).
Place white inner piece inside teal outer and stitch neatly around edges.
Flatten slightly at base and sew high on head, angled outward for alert expression.
🦊 Tail
With teal:
R1 MR 6
R2 inc ×6 (12)
R3 (1 sc, inc) ×6 (18)
R4–12 sc around (18)
Stuff lightly.
R13 (1 sc, dec) ×6 (12)
R14 dec ×6 (6)
FO and close.
Attach low at back, allowing tail to rest gently behind or slightly to one side.
🪡 Assembly & Details
Sew muzzle securely and shape gently with fingers.
Attach eye panels evenly for symmetry.
Position pink cheeks level with lower eye edge.
Embroider short curved eyebrows above eyes.
Sew ears high and upright.
Attach head firmly to body.
Sew arms slightly angled downward.
Attach legs evenly so the figure stands upright.
Secure tail at center back.
✨ Final Look
With its oversized ears, bold face markings, soft blush cheeks, and centered diamond belly, this pastel kitsune has a charming, expressive personality. The compact body and rounded features give it a sweet chibi silhouette while maintaining clean shaping and smooth color contrast.
A delightful handmade companion that brings a touch of whimsical woodland magic to any collection. 🦊💙