Pucker up for some crochet fun with this Amigurumi Kissable Lips pattern! 💋✨ With their plump shape, playful curves, and vibrant hues, these lips bring a touch of whimsy to your amigurumi collection. Whether you’re crafting for Valentine’s Day, a quirky décor piece, or simply love bold and expressive designs, this FREE pattern is a delightful addition to your projects.
Designed for crocheters of all skill levels, this pattern allows for customization in lip size, color variations, and even tiny accessories like embroidered highlights or a keychain loop to enhance its charm. Choose classic reds and pinks for a traditional look or experiment with glittery yarn for a dazzling twist! Whether displayed as part of a romantic setup or gifted to a fellow crochet enthusiast, these amigurumi kissable lips are sure to spread smiles.
Grab your hook, select your favorite yarn, and let’s bring this playful design to life—one stitch at a time! 🧶✨
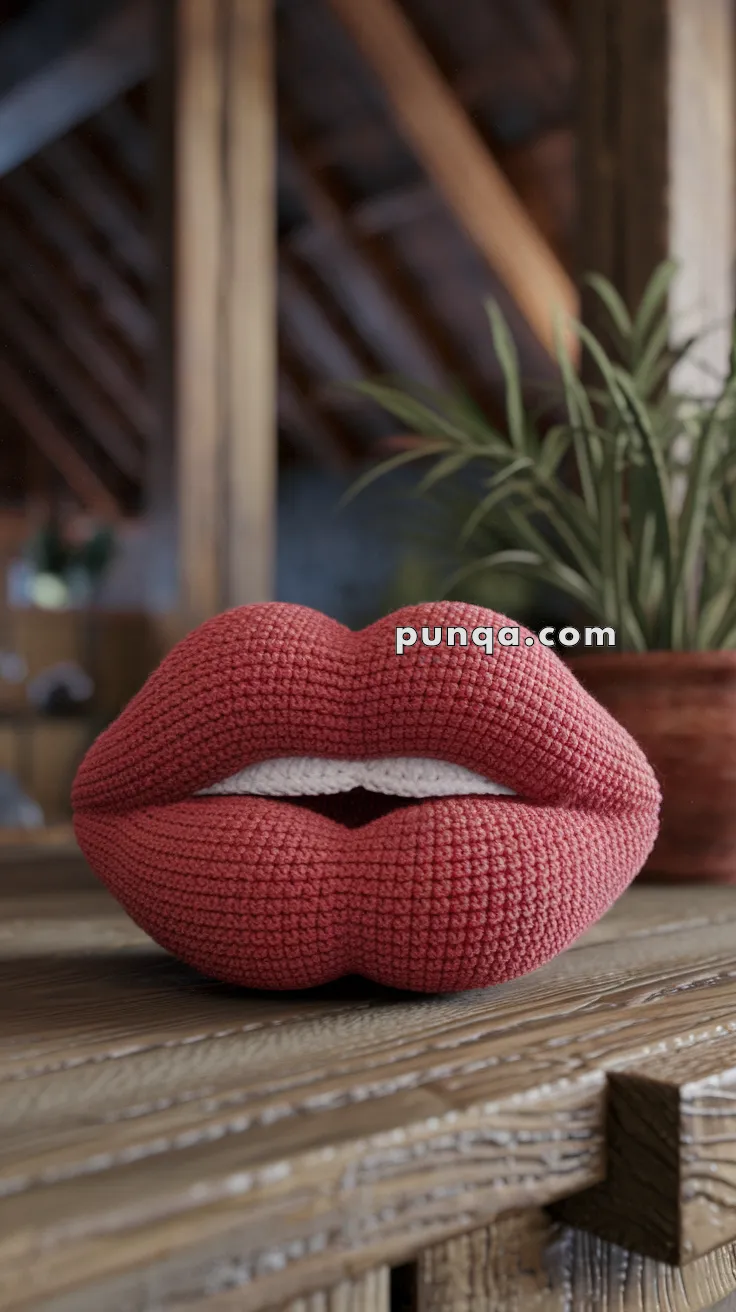
💋 Plush Crochet Lips Amigurumi Pattern
Bring bold personality into your home décor with these plush crochet lips! Soft, sculpted, and irresistibly plump, this fun amigurumi project makes an eye-catching accent pillow, a quirky desk companion, or a playful handmade gift. The lips feature smooth 3D shaping, a defined upper ridge, a rounded lower pout, and a soft white inner mouth that gives the piece depth and character. Optional wire reinforcement helps the outer curves hold a crisp silhouette.
✨ Skill Level
Intermediate — includes shaping, working in the round, and light sculpting.
📏 Finished Size
Approximately 20–22 cm wide using worsted weight yarn and a 3.5 mm hook.
🧶 Materials
-
Worsted weight yarn:
-
Red or deep pink (lips)
-
White (inner mouth)
-
-
3.5 mm crochet hook
-
Fiberfill stuffing
-
Tapestry needle
-
Stitch markers
-
Optional: 2–3 mm craft wire (80–90 cm)
-
Optional: floral tape or yarn for wrapping wire
🔁 Abbreviations (US Terms)
MR – Magic Ring
sc – single crochet
inc – increase (2 sc in same stitch)
dec – decrease (sc2tog)
st – stitch
FO – fasten off
💋 Upper Lip
Worked in the round.
Main Curve
-
MR, 6
-
inc ×6 → 12
-
(sc, inc) ×6 → 18
-
(2 sc, inc) ×6 → 24
-
(3 sc, inc) ×6 → 30
-
(4 sc, inc) ×6 → 36
-
(5 sc, inc) ×6 → 42
-
(6 sc, inc) ×6 → 48
9–16) sc around (48) -
(6 sc, dec) ×6 → 42
-
(5 sc, dec) ×6 → 36
-
(4 sc, dec) ×6 → 30
-
(3 sc, dec) ×6 → 24
Stuff firmly, shaping the center fullness.
Edge Curve
-
(3 sc, inc) ×6 → 30
22–26) sc (30) -
(3 sc, dec) ×6 → 24
FO with long tail.
💋 Lower Lip
Also worked in the round.
Main Curve
-
MR, 6
-
inc ×6 → 12
-
(sc, inc) ×6 → 18
-
(2 sc, inc) ×6 → 24
-
(3 sc, inc) ×6 → 30
-
(4 sc, inc) ×6 → 36
-
(5 sc, inc) ×6 → 42
8–18) sc around (42) -
(5 sc, dec) ×6 → 36
-
(4 sc, dec) ×6 → 30
-
(3 sc, dec) ×6 → 24
Stuff well for a rounded pout.
Edge Curve
-
(3 sc, inc) ×6 → 30
23–27) sc (30) -
(3 sc, dec) ×6 → 24
FO with long tail.
🤍 Inner Mouth Panel (White)
Worked flat.
-
Ch 26
-
sc in 2nd ch from hook and across → 25 sts
3–8) sc across (25)
FO.
You may gently curve the panel by hand or lightly stuff the lower half to create natural depth.
🌀 Optional Wire Reinforcement
This keeps the outer curves firm and well-defined.
Materials
-
80–90 cm of 2–3 mm flexible craft wire
-
Yarn or floral tape for wrapping
Instructions
-
Wrap the wire completely to prevent it from poking through stitches.
-
Shape the wire into an oval matching the outer edge of each lip piece.
-
Insert it inside the outermost rounds before closing.
-
Add stuffing so the wire sits inside the edge without being visible.
-
Adjust the shape as desired.
🧷 Assembly
-
Lay the white inner mouth panel horizontally.
-
Sew the upper lip along the top long edge of the panel.
-
Sew the lower lip along the bottom edge.
-
Close side seams, adding extra stuffing for full volume.
-
Shape the lips:
-
pinch the upper center ridge,
-
smooth the lower lip forward,
-
round the sides outward.
-
💡 Customization Ideas
-
Use velvet yarn for a plush, dramatic texture.
-
Install a zipper on the back to turn it into a pouch.
-
Create a miniature keychain version with sport-weight yarn.
-
Add embroidered sparkles, gloss lines, or a tiny beauty mark for flair.