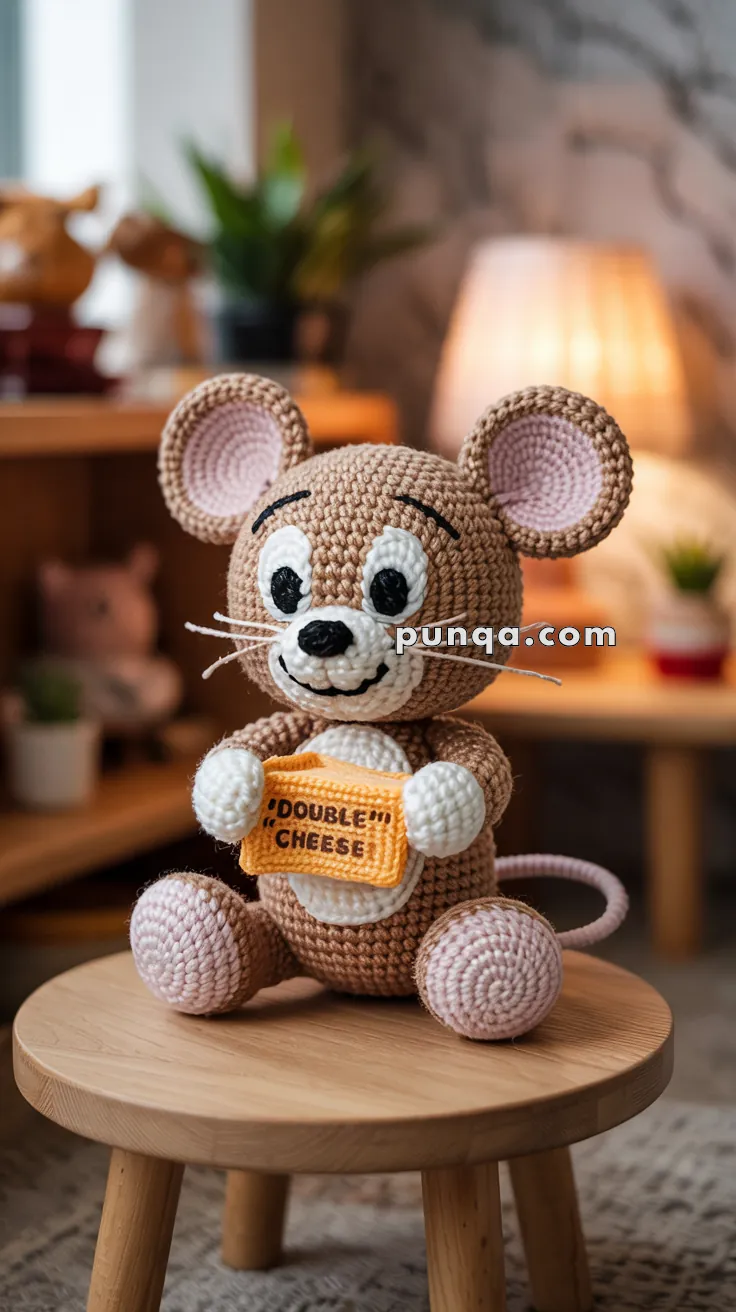
Welcome to the mischievous and nostalgic world of classic cartoon amigurumi! 🎬🧀 Today, I’m delighted to share my FREE crochet pattern for an Amigurumi Jerry Mouse—a playful tribute to the quick-witted star of Tom and Jerry. Whether you’re crafting a gift for an animation fan, creating a childhood nostalgia display, or simply love this clever little mouse, this design features Jerry’s signature ears, cheeky smile, and energetic pose ready for his next adventure.
This design blends cartoon charm with cozy craftsmanship, with step-by-step instructions for Jerry’s smooth body, expressive face, and optional accessories like a crochet slice of cheese or tiny mallet. Choose warm browns and cream yarns for his classic look, or experiment with different colors for a unique twist! 🧀 So grab your hooks, channel your inner mischief-maker, and let’s crochet a mouse who’s always one step ahead. “Sew clever, so fast, so irresistibly cute!” 🧶✨
🧀 Amigurumi Jerry Mouse Crochet Pattern
Cheeky, playful, and always hungry for cheese – this Jerry Mouse amigurumi is the perfect cartoon-inspired project. With his oversized head, puffed cheeks, big oval eyes, and a “DOUBLE CHEESE” block in hand, he’s ready to bring mischief to your crochet collection.
✨ Skill Level
Intermediate – shaping, embroidery, and sewing parts together.
📏 Finished Size
Approx. 9–11 in (23–28 cm) tall with DK or worsted yarn and a 2.5–3 mm hook.
🧶 Materials
- DK or worsted weight yarn:
- Light brown – main body, head, arms, outer ears
- Pale pink – inner ears, paw pads, soles, tail
- White – belly patch, muzzle, hands, cheeks, eyes
- Black – nose, pupils, eyebrows, whiskers
- Yellow/Orange – cheese block
- 2.5–3 mm crochet hook
- 9–12 mm safety eyes (optional, or crochet pupils)
- Fiberfill stuffing
- Black embroidery thread/floss
- Tapestry needle, stitch markers, scissors
🔤 Abbreviations (US Terms)
MR = Magic Ring
sc = single crochet
inc = increase (2 sc in same st)
dec = decrease (sc2tog)
ch = chain
sl st = slip stitch
FO = fasten off
BLO/FLO = back/front loop only
🐭 Head (Light Brown – Oversized)
- MR, 6 sc (6)
- inc x6 (12)
- (sc, inc) x6 (18)
- (2 sc, inc) x6 (24)
- (3 sc, inc) x6 (30)
- (4 sc, inc) x6 (36)
- (5 sc, inc) x6 (42)
- (6 sc, inc) x6 (48) ← extra round for large cartoon head
9–18. sc around (48) - (6 sc, dec) x6 (42)
- (5 sc, dec) x6 (36)
- (4 sc, dec) x6 (30)
- (3 sc, dec) x6 (24)
- (2 sc, dec) x6 (18)
Stuff firmly. - (sc, dec) x6 (12)
- dec x6 (6), FO and close.
🐭 Cheeks (White – Make 2)
- MR, 6 sc (6)
- inc x6 (12)
- sc around (12)
FO, stuff lightly.
👉 When attaching, tuck cheeks partly under the muzzle so they blend smoothly.
🐭 Body (Light Brown – Smaller than Head)
- MR, 6 sc (6)
- inc x6 (12)
- (sc, inc) x6 (18)
- (2 sc, inc) x6 (24)
- (3 sc, inc) x6 (30)
6–12. sc around (30) - (3 sc, dec) x6 (24)
- (2 sc, dec) x6 (18)
- (sc, dec) x6 (12)
Stuff. - dec x6 (6), FO and close.
🐭 Belly Patch (White)
MR, 6 sc (6)
2. inc x6 (12)
3. (sc, inc) x6 (18)
4. (2 sc, inc) x6 (24)
FO. Sew to body front.
🐾 Arms (2 – Brown + White Hands)
Start with White:
- MR, 6 sc (6)
- inc x6 (12)
3–4. sc around (12)
Switch to Brown:
5–12. sc around (12)
Stuff lightly. FO, leave tail.
🐾 Legs + Feet (Brown + Pink Soles)
Soles (Pink, Make 2):
- MR, 6 sc (6)
- inc x6 (12)
- (sc, inc) x6 (18)
FO, flatten.
Legs (Brown, Make 2):
- MR, 6 sc (6)
- (sc, inc) x6 (12)
3–6. sc around (12)
Stuff lightly. FO.
👉 Sew pink soles flat under brown legs.
🐭 Ears (2 Brown + 2 Pink Inners)
Outer (Brown):
- MR, 6 sc (6)
- inc x6 (12)
- (sc, inc) x6 (18)
- (2 sc, inc) x6 (24) FO.
Inner (Pink):
Repeat to Round 3 (18). FO.
Sew pink inner onto brown outer. Attach ears high on head.
🧼 Muzzle (White – Oval, Protruding)
- MR, 6 sc (6)
- inc x6 (12)
- (sc, inc) x6 (18)
- (2 sc, inc + 2 extra sc at sides) (20)
5–6. sc around (20)
Stuff firmly to protrude. FO.
Sew to lower face, overlapping cheeks slightly. Add small black oval nose at top and a simple black embroidered smile under muzzle.
👀 Eyes (White Ovals + Black Pupils – Taller Shape)
Sclera (White – Make 2):
- Ch 7, sc in 2nd ch, sc 4, 3 sc in last st. Rotate: sc 4, 2 sc in last st (14).
- sc 5, inc x3, sc 5, inc x2 (20). FO.
Pupils (Black):
MR, 6 sc, FO. Sew vertically onto white sclera.
Attach eyes very close together, almost touching, above muzzle. Add small white embroidery highlights.
🧑🎨 Eyebrows + Whiskers
- Eyebrows: Embroider arched black lines above eyes.
- Whiskers: Stitch 3 thin black whiskers on each cheek.
🐀 Tail (Pink)
Ch 30–35, sc across. FO. Sew to lower back.
🧀 Cheese Block (Stuffed & Bold)
Panels (2, Yellow/Orange):
Ch 10, sc across (9).
Rows 2–7: sc across (9). FO.
Side Strip:
Ch 28, sc across (1–2 rows tall). FO.
Sew strip around first panel, then attach second. Stuff firmly for thick cartoon look.
Embroider “DOUBLE CHEESE” with black thread on front.
Attach securely between Jerry’s hands.
🪡 Assembly
- Sew head to body (head should look oversized).
- Attach arms forward to hold cheese.
- Sew legs to base with pink soles flat.
- Attach ears high on head.
- Add cheeks, then muzzle overlapping them.
- Sew nose, embroider smile.
- Attach eyes close together above muzzle.
- Add eyebrows and whiskers.
- Sew tail to back.
- Position cheese block in hands.
🌟 Final Look
Now Jerry Mouse is complete! With his oversized head, puffed cheeks, tall oval eyes, pink soles, and stuffed DOUBLE CHEESE block, he looks like he stepped straight out of the cartoon. Mischievous, cute, and full of character – this amigurumi is a true showstopper. 🐭🧀