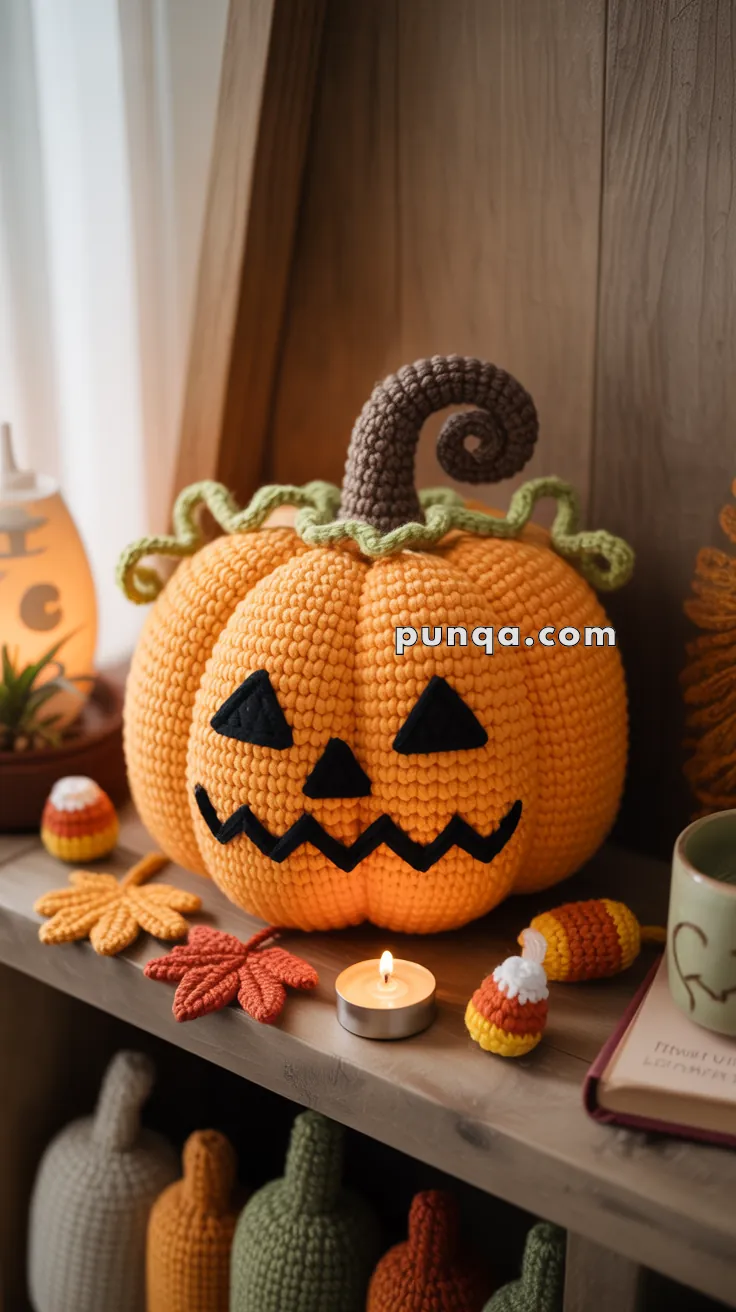
Get into the spooky spirit with this Amigurumi Jack-O’-Lantern crochet pattern! Inspired by the festive charm of Halloween, this adorable design captures the round pumpkin shape, carved face, and playful personality in every stitch. Whether you’re crafting for seasonal decor, adding a whimsical touch to your collection, or simply enjoy making holiday-inspired amigurumi designs, this pattern lets you stitch up a delightful Jack-O’-Lantern bursting with character! Perfect for brightening up your space with a cozy autumn vibe, this crochet creation brings a touch of handmade Halloween magic to your collection. 🎃✨
Designed for customization, this pattern allows you to experiment with different shades of orange, embroidered details, or even tiny accessories like a miniature witch hat or spooky bat for extra flair. Craft a classic Jack-O’-Lantern with bold hues, create a pastel version for a softer aesthetic, or even stitch up a full set of Halloween-inspired amigurumi for a festive display! Whether gifted as a quirky keepsake, displayed as a spooky accent, or made simply for the joy of crafting, this Amigurumi Jack-O’-Lantern is a fun and creative project—perfect for bringing a touch of handmade autumn magic to every stitch! 🧶💖✨
🎃 Amigurumi Jack-O’-Lantern & Fall Decorations Crochet Pattern
Get into the cozy spirit of autumn with this adorable amigurumi Jack-O’-Lantern surrounded by candy corns, fall leaves, and plush pumpkins! This Halloween-themed set brings warmth and playfulness to your shelf, mantel, or entryway. Whether you’re decorating for trick-or-treaters or just love the season, this crochet collection is a must-make! 🧡🍁
✨ Skill Level
Beginner to Intermediate – basic stitches, shaping, sewing, and a bit of felt work.
📏 Finished Sizes
- Jack-O’-Lantern: 8–9 in (20–23 cm) wide
- Candy Corns: 2.5–3 in (6–7 cm) tall
- Leaves: 3–4 in (7–10 cm) wide
- Mini Pumpkins: 3–4 in (7–10 cm) tall
🧶 Materials
- DK or worsted weight yarn:
- Orange (main pumpkin)
- Brown (stem)
- Green (vines)
- Yellow, White, Orange (candy corn)
- Red, Mustard, Beige (leaves)
- Crochet hook: 2.5–3.5 mm
- Fiberfill stuffing
- Black felt (for face) + hot glue or sewing thread
- Yarn needle & scissors
- Stitch markers
🔤 Abbreviations (US Terms)
MR – Magic Ring
sc – Single Crochet
inc – Increase (2 sc in same st)
dec – Decrease (sc2tog)
sl st – Slip Stitch
ch – Chain
FO – Fasten Off
BLO – Back Loop Only
🎃 Jack-O’-Lantern Pumpkin
Pumpkin Body (Orange)
- MR, 6 sc (6)
- inc x6 (12)
- (1 sc, inc) x6 (18)
- (2 sc, inc) x6 (24)
- (3 sc, inc) x6 (30)
- (4 sc, inc) x6 (36)
- (5 sc, inc) x6 (42)
- (6 sc, inc) x6 (48)
- (7 sc, inc) x6 (54)
- (8 sc, inc) x6 (60)
- (9 sc, inc) x6 (66)
- (10 sc, inc) x6 (72)
- (11 sc, inc) x6 (78)
14–26. sc around (78) – stuff gradually
- (11 sc, dec) x6 (72)
- (10 sc, dec) x6 (66)
- (9 sc, dec) x6 (60)
- (8 sc, dec) x6 (54)
- (7 sc, dec) x6 (48)
- (6 sc, dec) x6 (42)
- (5 sc, dec) x6 (36)
- (4 sc, dec) x6 (30)
- (3 sc, dec) x6 (24)
- (2 sc, dec) x6 (18)
- (1 sc, dec) x6 (12)
- dec x6 (6)
FO, weave in.
Pumpkin Ridges
Cut 6 long strands of orange yarn. Thread from top center to bottom center, pulling tightly to indent. Tie off underneath.
Stem (Brown)
- MR, 6 sc
- (1 sc, inc) x3 (9)
3–12. sc around (9)
Curly Tip: Ch 18, 2 sc in each chain back → spirals naturally.
Stuff lightly, sew to top.
Curly Vines (Green, Make 3)
- Ch 25
- 2 sc in each chain → coil forms
- FO and sew near stem.
Face (Black felt)
Cut:
- 2 triangles (eyes)
- 1 triangle (nose)
- Zigzag strip (mouth)
Glue or stitch onto front.
🍬 Chunky Candy Corn (Make 2–3)
With White:
- MR, 6 sc (6)
- inc x6 (12)
- (1 sc, inc) x6 (18)
4–5. sc around (18)
Switch to Yellow:
6–8. sc around (18)
Switch to Orange:
9–12. sc around (18)
13. (1 sc, dec) x6 (12)
14. dec x6 (6)
Stuff, FO, close.
🍁 Maple-Style Leaves (Make 3–4)
With Red, Mustard, or Beige:
- Ch 9
- Row 1: sc, hdc, dc, tr, dc, hdc, sc, sl st (working into chain)
- Ch 1, rotate → mirror stitches down other side
Add points: (sl st, ch 3, sl st in same st) at 3–4 spots to make jagged edges.
Stem: ch 6, sl st back, FO.
Optional: embroider veins with contrasting yarn.
🎃 Mini Pumpkins (Make 2–3)
- MR, 6 sc
- inc x6 (12)
- (1 sc, inc) x6 (18)
4–6. sc around (18) - (1 sc, dec) x6 (12) – stuff
- dec x6 (6)
Stem: ch 4, sl st back, sew on top.
✂️ Assembly & Display
- Attach stem + vines to pumpkin.
- Place felt face pieces evenly and secure.
- Scatter candy corns, leaves, and mini pumpkins around centerpiece.
- For extra Halloween magic, add a battery tea light behind or inside the pumpkin.
🌟 Final Look
Your Amigurumi Jack-O’-Lantern & Fall Decorations Set is finished! 🎃🍂✨ With its plump ridged pumpkin, tall spiraled stem, curly vines, chunky candy corns, and maple-style leaves, this set makes a whimsical centerpiece for Halloween or cozy fall displays. Handmade charm, festive fun, and spooky-cute style all in one!