Welcome to the sweet and whimsical world of amigurumi! 🍦✨ Today, I’m excited to share my free crochet pattern for an Amigurumi Ice Cream Cone—a delightful and colorful creation perfect for summer lovers, dessert enthusiasts, or anyone who enjoys crafting adorable and playful plush designs! 🧶 Whether you love stitching up tiny treats, experimenting with textured scoops, or simply want to add a cheerful ice cream cone to your handmade lineup, this pattern will guide you through crafting a beautifully sculpted plush with a crisp waffle cone, fluffy scoops, and a touch of sugary charm! 🍨
This design embraces pastel hues, soft textures, and intricate shaping to bring a fun and joyful presence to your crochet projects! 🧶✨ I’ve carefully outlined each step to ensure your Amigurumi Ice Cream Cone turns out just right—ready to brighten up your collection or become a treasured handmade gift! 🎁 So grab your hooks, pick out delicious hues, and let’s stitch up a fantastic ice cream cone! 🍦
🍦 Amigurumi Ice Cream Cone Crochet Pattern
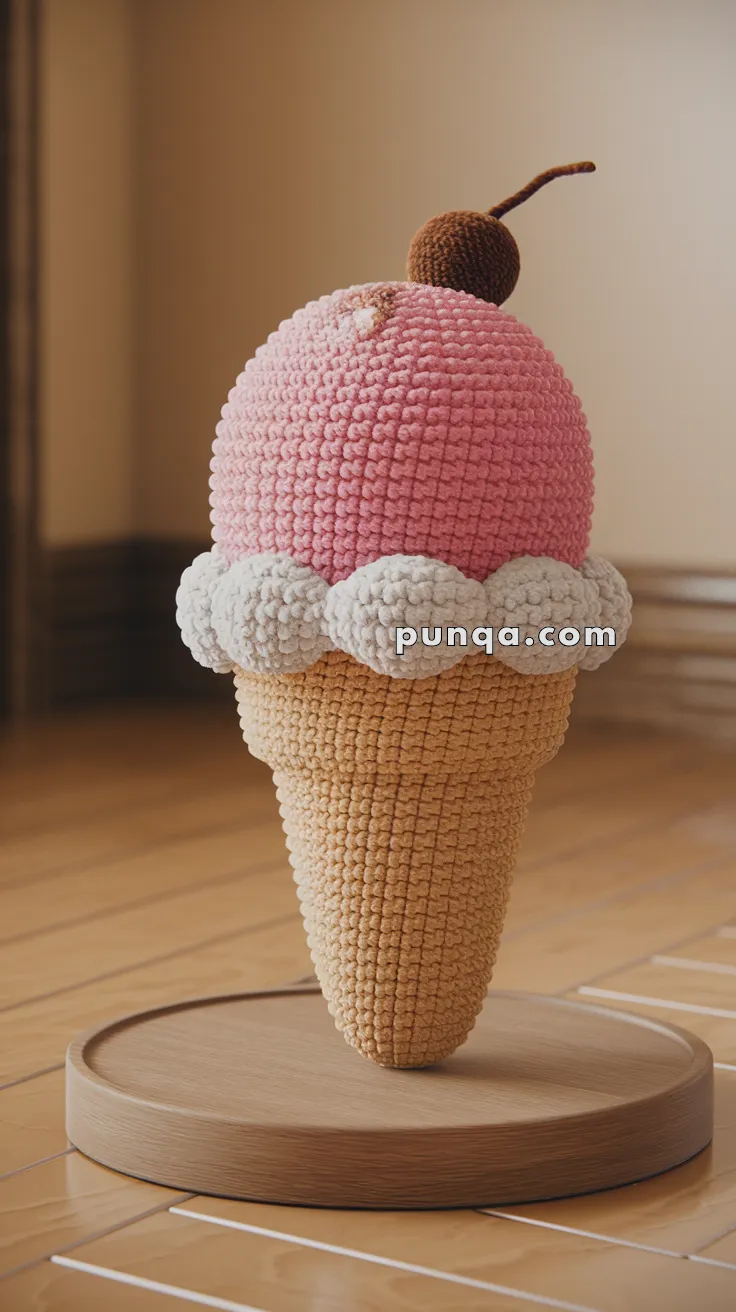
This soft and oversized amigurumi ice cream cone features a tall textured cone, smooth scalloped topping, a plush strawberry scoop, and a cute cherry with a curved stem. Made with velvety yarn for a gentle, fluffy finish, it’s a sweet décor piece perfect for nurseries, playrooms, and dessert-themed displays.
✨ Skill Level
Beginner to Intermediate – simple shaping and consistent round work.
📏 Finished Size
Approximately 28–32 cm (11–13 inches) tall when made with plush yarn and a 4–5 mm hook.
🧶 Materials
Yarn (plush/chenille recommended):
• Tan/Beige – cone
• White/Cream – topping
• Pink – scoop
• Brown – cherry + stem
Tools:
• 4–5 mm crochet hook
• Fiberfill stuffing
• Tapestry needle
• Stitch marker
• Scissors
🧵 Abbreviations (US Terms)
MR – Magic Ring
sc – Single crochet
inc – Increase (2 sc in one stitch)
dec – Decrease
sl st – Slip stitch
FO – Fasten off
🍦 Cone
The cone is tall and narrow with smooth single crochet fabric.
Yarn: Tan/Beige
Work in continuous rounds.
Round 1: MR, 6 sc
Round 2: sc around (6)
Round 3: (1 sc, inc) × 3 → 9
Rounds 4–5: sc around (9)
Round 6: (2 sc, inc) × 3 → 12
Rounds 7–9: sc around (12)
Round 10: (3 sc, inc) × 3 → 15
Rounds 11–14: sc around (15)
Round 15: (4 sc, inc) × 3 → 18
Rounds 16–22: sc around (18)
Round 23: (5 sc, inc) × 3 → 21
Rounds 24–32: sc around (21)
Round 33: (6 sc, inc) × 3 → 24
Rounds 34–44: sc around (24)
Stuff firmly as you go, shaping into a long tapered cone.
Do not close the top. Leave the opening to attach the topping.
🤍 Topping Edge (Large Scallops)
These soft rounded scallops sit between the cone and the ice cream scoop.
Yarn: White/Cream
Worked in a single strip.
Row 1: Ch 36
Row 2: sc in each ch across (35)
Scallops:
Row 3: sl st, skip 1, 6 dc in next stitch, skip 1 — repeat across the strip.
You should get 8 large scallops.
FO with a long tail.
Wrap the strip around the cone’s opening and sew the ends together.
Stitch the scallops evenly around the rim.
🍓 Strawberry Ice Cream Scoop (Pink)
Yarn: Pink
Work as a large, smooth sphere.
Round 1: MR, 6 sc
Round 2: inc × 6 → 12
Round 3: (1 sc, inc) × 6 → 18
Round 4: (2 sc, inc) × 6 → 24
Round 5: (3 sc, inc) × 6 → 30
Round 6: (4 sc, inc) × 6 → 36
Round 7: (5 sc, inc) × 6 → 42
Rounds 8–18: sc around (42)
Round 19: (5 sc, dec) × 6 → 36
Round 20: (4 sc, dec) × 6 → 30
Round 21: (3 sc, dec) × 6 → 24
Round 22: (2 sc, dec) × 6 → 18
Stuff very firmly
Round 23: (1 sc, dec) × 6 → 12
Round 24: dec × 6 → 6
FO and close tightly.
Sew the scoop centered on top of the scalloped topping.
Optional Scoop Detail
Using cream yarn, embroider a small uneven patch high on the scoop to resemble a creamy textured spot.
🍒 Cherry With Curved Stem
Cherry Body
Yarn: Brown
Round 1: MR, 6 sc
Round 2: inc × 6 → 12
Rounds 3–5: sc around (12)
Round 6: (1 sc, dec) × 4 → 8
Stuff lightly
Round 7: dec × 4 → 4
FO and close neatly.
Stem
Yarn: Brown
Ch 14
sl st back along chain (13)
FO, leave a long tail.
Attach the stem to the top of the cherry, letting it curve naturally.
Sew the cherry slightly off-center on the top of the scoop.
✨ Final Touches
• Adjust scallops so they puff outward evenly.
• Shape the scoop by rolling it gently between your hands.
• Position the cherry so the stem leans gracefully backward.
This plush ice cream cone makes a charming display piece and a delightful handmade gift for dessert lovers of all ages.