Welcome to the wild and playful world of amigurumi! 🐆✨ Today, I’m excited to share my free crochet pattern for a Hyena—a bold and mischievous creature full of personality, charm, and unmistakable spots! 🌿 Whether you love crafting unique wildlife-inspired designs, enjoy making expressive animal figures, or simply want to stitch up a lovable hyena with character, this pattern will guide you through creating a beautifully detailed plush companion with textured fur and striking features! 🤎
This design embraces earthy tones, dynamic shaping, and playful expressions to bring this cunning and charismatic creature to life! 🧶🏞️ I’ve carefully outlined each step to ensure your Amigurumi Hyena turns out just right—ready to add a touch of the savanna to your collection or become a treasured handmade gift! 🎁 So grab your hooks, pick out warm browns, golden yellows, and bold black accents, and let’s stitch up a fierce and lovable hyena friend! ✨
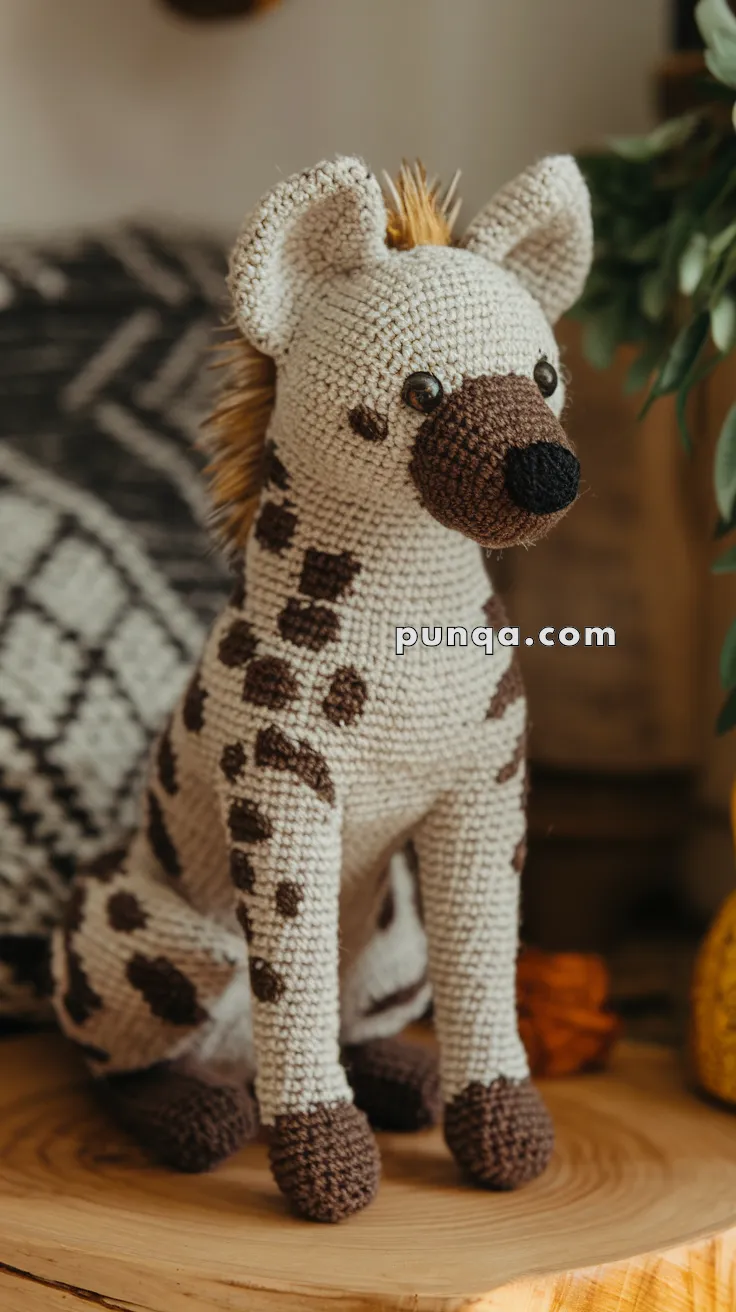
🐾 Amigurumi Hyena Crochet Pattern
Capture the wild charm of the savannah with this realistic Amigurumi Hyena, featuring tall upright ears, a long slender neck, a rounded snout, detailed brown paw tips, and a distinctive mane. With expressive eyes and natural body posture, this hyena looks ready to prowl — or just sit proudly as a handmade showpiece.
✨ Skill Level
Intermediate to Advanced – Includes shaping, color changes, sewing, and texturing (mane + spots).
📏 Finished Size
Approximately 28–30 cm (11–12 in) tall when seated, using DK or light-worsted yarn and a 3.0 mm hook.
🧶 Materials
Yarn (DK or Light-Worsted Weight):
-
Color A – Beige / Cream (main body and head)
-
Color B – Dark Brown (paws, muzzle, and spots)
-
Color C – Black (nose and eye detail)
-
Color D – Golden / Caramel (mane)
Tools & Supplies:
-
3.0 mm crochet hook
-
10–12 mm brown safety eyes
-
Yarn needle
-
Stitch markers
-
Polyfill stuffing
-
Small wire brush or pet slicker (for mane fluffing)
🧵 Abbreviations (US Terms)
MR – Magic Ring
sc – Single Crochet
inc – Increase (2 sc in same st)
dec – Decrease (sc2tog)
ch – Chain
sl st – Slip Stitch
FO – Fasten Off
( ) – repeat within parentheses
🪄 Pattern Instructions
🦴 Head (Color A)
R1 – 6 sc in MR (6)
R2 – inc ×6 (12)
R3 – (1 sc, inc) ×6 (18)
R4 – (2 sc, inc) ×6 (24)
R5 – (3 sc, inc) ×6 (30)
R6–R10 – sc around (30)
R11 – (4 sc, inc) ×6 (36)
R12–R16 – sc around (36)
R17 – (4 sc, dec) ×6 (30)
R18 – (3 sc, dec) ×6 (24)
R19 – (2 sc, dec) ×6 (18)
Insert safety eyes between R9–R10, spaced about 8 stitches apart.
Stuff the head firmly as you shape it slightly oval (longer snout).
FO, leaving a long tail for sewing.
🐽 Muzzle (Color B)
R1 – 6 sc in MR (6)
R2 – inc ×6 (12)
R3 – (1 sc, inc) ×6 (18)
R4–R6 – sc around (18)
R7 – (1 sc, dec) ×6 (12)
Stuff lightly and FO.
Sew centered to the head, extending halfway down the snout as in the photo.
Use black yarn (Color C) to embroider a rounded nose tip and a short vertical line below it.
🐾 Ears (Make 2 – Color A)
R1 – 6 sc in MR (6)
R2 – (1 sc, inc) ×3 (9)
R3 – (2 sc, inc) ×3 (12)
R4 – (3 sc, inc) ×3 (15)
R5 – sc around (15)
Flatten the ear and sc across the top to close.
Sew on top sides of the head with a slight inward tilt (as shown in the photo).
🦁 Mane (Color D)
Cut 6 cm strands of golden yarn. Using the latch-hook method, attach along the center back of the head and down the upper neck.
Once attached, brush out with a pet slicker to achieve a fuzzy, upright mane.
Trim slightly to match the photo’s tousled mohawk look.
🐾 Body (Color A)
R1 – 6 sc in MR (6)
R2 – inc ×6 (12)
R3 – (1 sc, inc) ×6 (18)
R4 – (2 sc, inc) ×6 (24)
R5 – (3 sc, inc) ×6 (30)
R6–R10 – sc around (30)
R11 – (4 sc, inc) ×6 (36)
R12–R18 – sc around (36)
R19 – (4 sc, dec) ×6 (30)
R20 – (3 sc, dec) ×6 (24)
R21–R25 – sc around (24)
Stuff firmly, shaping the upper body slightly forward-leaning.
FO and leave a tail for sewing.
🦵 Front Legs (Make 2 – start Color B, then A)
With Color B:
R1 – 6 sc in MR (6)
R2 – (1 sc, inc) ×3 (9)
R3–R4 – sc around (9)
Switch to Color A:
R5–R18 – sc around (9)
Stuff lightly and FO.
Sew slightly forward on the chest so the hyena sits upright.
🐾 Back Legs (Make 2 – start Color B, then A)
With Color B:
R1 – 6 sc in MR (6)
R2 – inc ×6 (12)
R3 – (1 sc, inc) ×6 (18)
R4 – (2 sc, dec) ×4, sc ×2 (14)
Switch to Color A:
R5–R12 – sc around (14)
FO and stuff.
Attach to sides toward the back in a bent “seated” pose like the photo.
🌀 Tail (Color A with tuft D)
R1 – 6 sc in MR (6)
R2–R6 – sc around (6)
FO and sew to lower back.
Add a small tuft of Color D at the tip.
🟤 Spots (Color B)
For realistic patterning, vary between 1–4 sc “patches.”
-
Use surface slip stitching or small crocheted circles (3–6 sc in MR).
-
Attach asymmetrically on body, neck, and legs — denser at the shoulders, lighter on the belly.
🌿 Finishing Touches
-
Assembly Order:
-
Sew head to top of body.
-
Attach front and back legs in sitting position.
-
Add mane and tail last.
-
-
Face & Expression:
-
Shape muzzle slightly forward.
-
Pull light tension around eyes to form subtle cheek curves.
-
Embroider short eyebrows for a curious look.
-
-
Mane & Fur Detailing:
-
Gently brush the mane upward to keep it fluffy and natural.
-
Optionally, use a small amount of clear hair gel to shape it.
-
💬 Final Thoughts
This Amigurumi Hyena combines playful realism with handmade warmth. The expressive face, sturdy legs, and signature mane make it a striking piece in any wildlife collection. With patience and shaping, you’ll create a true safari star that looks just as lifelike as the one in the photo! 🐾🦁


