Take a journey back in time with this Amigurumi Horse Carriage with Driver crochet pattern! Inspired by the elegance of traditional horse-drawn carriages, this charming design captures the beauty of a noble steed, a detailed carriage, and a skilled driver guiding the way. With intricate details like decorative wheels, reins, and a cozy seat for the driver, this crochet creation is perfect for adding a touch of historical charm to your handmade collection. Whether you’re crafting for history lovers, creating a whimsical display piece, or simply enjoy making transport-inspired amigurumi designs, this pattern lets you stitch up a delightful scene bursting with character! 🐎✨
Designed for customization, this pattern allows you to experiment with different horse colors, embroidered details, or even tiny accessories like a miniature lantern or luggage for extra flair. Craft a classic horse carriage with rich hues, create a whimsical version with pastel tones, or even stitch up a full set of vintage-inspired amigurumi for a stunning display! Whether gifted as a cherished keepsake, displayed as a nostalgic accent, or made simply for the joy of crafting, this Amigurumi Horse Carriage with Driver is a fun and creative project—perfect for bringing a touch of handmade historical magic to every stitch! 🧶💖
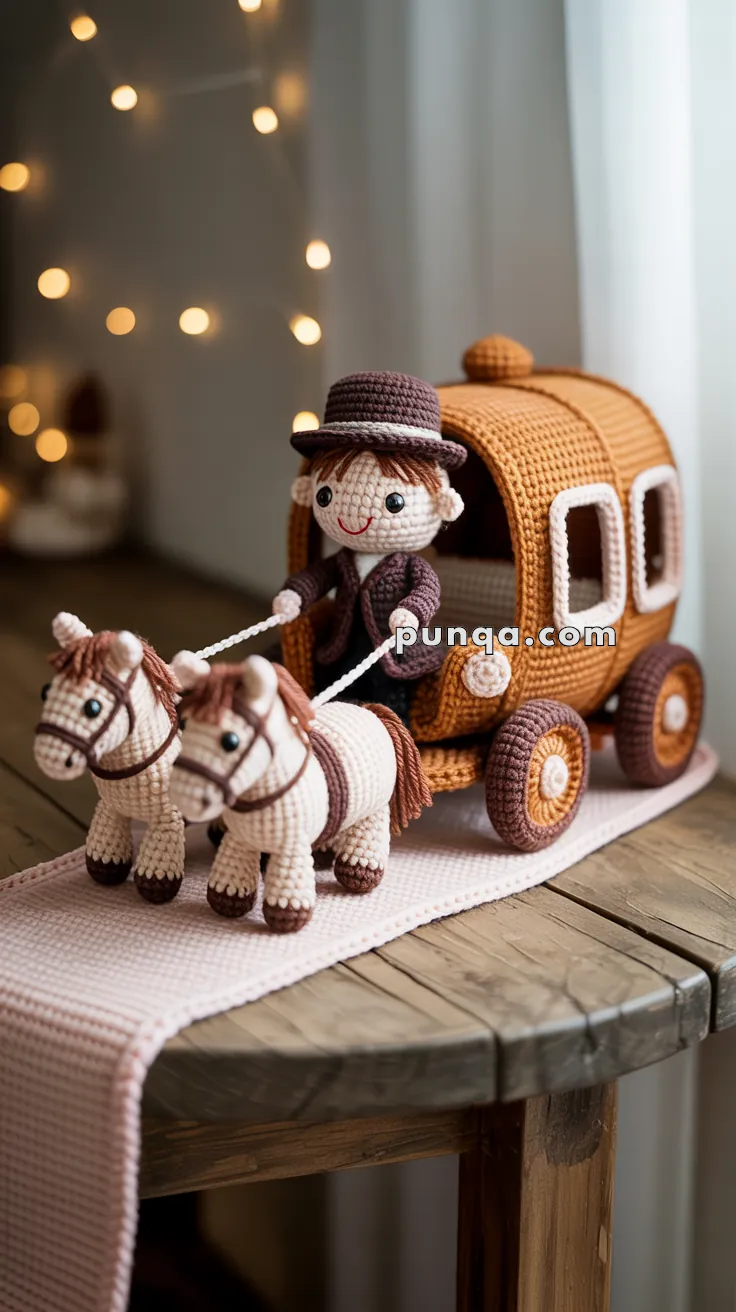
Amigurumi Horse Carriage with Driver Crochet Pattern
Bring a storybook scene to life with this detailed amigurumi horse carriage set. Two small horses pull a rounded pumpkin-style carriage while a cheerful driver guides them from a cozy bench seat. This pattern focuses on smooth shaping, stable construction, and decorative details to create a polished display piece.
✨ Skill Level
Advanced Intermediate
Includes structural shaping, reinforced base construction, layered appliqué, and multi-piece assembly.
📏 Finished Size
Length: approx. 32–36 cm
Height: approx. 22–24 cm
Using sport or light worsted yarn and a 2.5–3.0 mm hook.
🧶 Materials & Yarn Amount
Sport or light worsted weight yarn:
Cream (horses) – 120 g
Chestnut brown (manes, tails, hooves, harness accents) – 60 g
Caramel / golden brown (carriage body) – 190 g
Dark brown (wheels, trim, hat) – 100 g
Burgundy (driver jacket) – 40 g
Beige (skin) – 25 g
White (windows, shirt trim) – 40 g
Black (reins, embroidery) – 10 g
2.5–3.0 mm hook
6 mm safety eyes (horses)
8 mm safety eyes (driver)
Polyester fiberfill
Thin cardboard or plastic canvas (carriage base + wheels)
Optional floral wire (reins stability)
Tapestry needle
Work tightly throughout to maintain structure.
🐎 Horses (Make 2)
The horses are compact and slightly stocky, with short sturdy legs and rounded muzzles.
Body (Oval, Low Profile)
Rnd 1: MR 6
Rnd 2: inc ×6 (12)
Rnd 3: (sc, inc) ×6 (18)
Rnd 4: (2 sc, inc) ×6 (24)
Rnd 5–11: sc 24
Rnd 12: (2 sc, dec) ×6 (18)
Rnd 13: (sc, dec) ×6 (12)
Stuff firmly
Rnd 14: dec ×6 (6)
FO.
The body should be slightly elongated horizontally.
Neck (Short, Upright)
Rnd 1: MR 6
Rnd 2: (sc, inc) ×3 (9)
Rnd 3–7: sc 9
Stuff lightly. Sew forward-leaning to body.
Head
Rnd 1: MR 6
Rnd 2: inc ×6 (12)
Rnd 3: (sc, inc) ×6 (18)
Rnd 4: (2 sc, inc) ×6 (24)
Rnd 5–7: sc 24
Insert 6 mm eyes between R5–6.
Rnd 8: (2 sc, dec) ×6 (18)
Rnd 9: (sc, dec) ×6 (12)
Stuff
Rnd 10: dec ×6
FO.
Muzzle (Chestnut Accent)
Rnd 1: MR 6
Rnd 2: (sc, inc) ×3 (9)
Rnd 3–4: sc 9
Lightly stuff and sew.
Legs (Make 8)
Hoof (Chestnut):
MR 6
Rnd 2: sc 6
Switch to Cream:
Rnd 3: (sc, inc) ×3 (9)
Rnd 4–8: sc 9
Stuff firmly.
Attach evenly underneath for balance.
Mane & Tail
Attach short chestnut strands along the neck crest.
Tail slightly longer and fuller.
Harness & Reins
Surface crochet thin brown straps around chest and muzzle.
Attach black chained reins leading to driver’s hands.
👦 Driver
Small seated figure wearing a burgundy jacket and brown bowler hat.
Head
Rnd 1: MR 6
Rnd 2: inc ×6 (12)
Rnd 3: (sc, inc) ×6 (18)
Rnd 4–8: sc 18
Insert 8 mm eyes between R5–6.
Rnd 9: (sc, dec) ×6 (12)
Stuff
Rnd 10: dec ×6
FO.
Embroider small smile.
Body
White shirt base:
Rnd 1: MR 6
Rnd 2: inc ×6 (12)
Rnd 3: (sc, inc) ×6 (18)
Switch to Burgundy:
Rnd 4–10: sc 18
Stuff and close.
Arms
MR 6 in Beige
Switch to Burgundy
Rnd 2–6: sc 6
Light stuffing in hands only.
Attach forward to hold reins.
Legs
Dark brown:
MR 6
Rnd 2–5: sc 6
Attach seated position.
Hat (Rounded Crown with Defined Brim)
Rnd 1: MR 6
Rnd 2: inc ×6 (12)
Rnd 3: (sc, inc) ×6 (18)
Rnd 4–6: sc 18
Rnd 7: (2 sc, inc) ×6 (24)
FO.
Lightly flatten brim edge and sew centered.
🚃 Carriage Body
The carriage is a rounded rectangular coach with enclosed sides, framed windows, curved roof, and reinforced underside platform.
Underside Platform (Flat & Reinforced)
Caramel yarn
Ch 18
Rnd 1: sc across, 3 sc in last st, sc back across, 3 sc in first st
Continue increasing evenly at curve points for 3–4 rounds until oval measures approx. 18 x 10 cm.
Work 1 round even.
Insert a matching cardboard oval.
Place a second crocheted oval on top and single crochet edges together to fully encase the insert.
This creates a firm, flat base that prevents sagging.
Side Walls (Built from Platform Edge)
Join yarn at platform edge.
Work upward:
Rnd 1–12: sc evenly around
Maintain vertical walls without increasing.
This creates smooth enclosed sides.
Creating Front Opening
Mark front 1/3 section.
Work back and forth in rows across remaining 2/3 for 8–10 rows to create arched doorway.
Fasten off and reinforce edges with a round of slip stitches.
Window Frames (Make 4)
White yarn
Ch 10
Work 6 rows sc
Round corners slightly by decreasing edge stitches.
Sew onto side panels evenly.
Roof (Curved Top Section)
Work separate curved panel:
Ch 16
Row 1–12: sc across
Slightly increase 1 stitch at each end every 3rd row to create gentle arch.
Sew across top edges forming rounded roof.
Top Knob
MR 6
Rnd 2: sc 6
Attach at roof center.
🛞 Wheels (Layered & Textured)
Make 4.
Outer Wheel (Dark Brown)
Rnd 1: MR 6
Rnd 2: inc ×6 (12)
Rnd 3: (sc, inc) ×6 (18)
Rnd 4: (2 sc, inc) ×6 (24)
Rnd 5–7: sc 24
Inner Hub (Caramel)
Rnd 1: MR 6
Rnd 2: inc ×6 (12)
Rnd 3: sc 12
Insert cardboard circle between layers before closing.
Attach two wheels per side.
Ensure bottom of wheels aligns with underside platform for stability.
🪑 Interior Bench
Ch 14
Work 6 rows sc
Sew firmly inside against back wall.
🔧 Assembly
Position horses parallel with slight gap.
Attach reins securely.
Sew carriage body firmly onto underside platform.
Attach wheels evenly.
Seat driver slightly forward in opening.
Ensure flat underside allows entire carriage to rest evenly.
🎉Done
The finished set features:
• Structured oval base for stability
• Smooth enclosed side walls
• Framed rectangular windows
• Curved roof with center knob
• Layered decorative wheels
• Two compact ponies
• Seated smiling driver
🌟 Final Thoughts
This handcrafted horse carriage scene blends soft texture and playful detail into a whimsical decorative piece. The rounded carriage, gentle horses, and cheerful driver create a warm fairytale atmosphere full of charm.
With careful shaping and sturdy assembly, the finished set becomes a delightful centerpiece perfect for gifting or display. 🧶🐴✨