Ever since I picked up my crochet hook, I’ve been enchanted by the magic of bringing yarn to life, and creating an Amigurumi Hercules has been one of my most delightful adventures yet! 🧶✨ Hercules, with his legendary strength and heroic tales, inspired me to infuse a bit of mythological charm into my crochet world. There’s something uniquely satisfying about watching this tiny, muscular hero emerge from a ball of yarn, his little lion-skin cloak and sword crafted with meticulous detail. The best part? Each stitch feels like a tribute to the bravery and adventures that Hercules represents. It’s not just a crochet project; it’s a journey through mythology and creativity stitched together with love.
Gifting an Amigurumi Hercules is like sharing a piece of handmade joy wrapped in yarn magic! 🎁 His charming, smiling face is sure to bring a smile to anyone who receives him. Whether it’s for a birthday, a baby shower, or a holiday surprise, this little hero makes a standout gift that speaks volumes about care and thoughtfulness. Just imagine the delight on a child’s face as they open this one-of-a-kind present, or the nostalgic joy it could bring to a mythology-loving friend. With an Amigurumi Hercules, you’re not only giving a gift but also sharing a story, a spark of creativity, and a dash of heroic fun. 😊
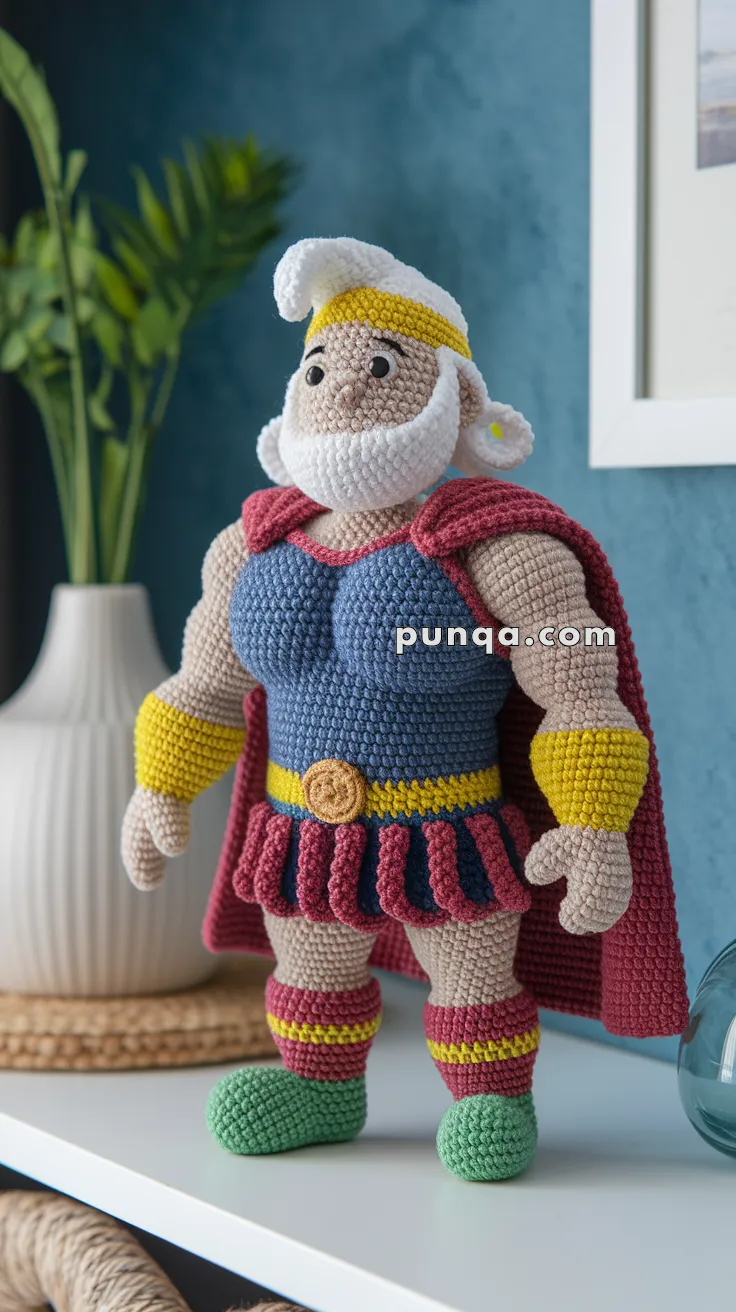
🦸♂️ Amigurumi Hercules FREE Crochet Pattern
Skill Level: Advanced
Finished Size: Approx. 13–15 inches tall
🧶 Materials
-
Worsted weight yarn in:
– Beige (skin)
– Blue (armor top)
– Burgundy (skirt, cape, trim)
– Yellow (belt, headband, cuffs)
– Green (boots)
– White (hair and beard) -
Crochet hook (2.5–3 mm)
-
Safety eyes (10–12 mm)
-
Stuffing
-
Yarn needle, scissors, stitch markers
✨ Abbreviations (US Terms)
MR – Magic Ring
sc – Single Crochet
inc – Increase
dec – Decrease
ch – Chain
sl st – Slip Stitch
BLO/FLO – Back/Front Loop Only
🦴 Head (Beige Yarn)
MR, 6 sc
(inc) x6 = 12
(1 sc, inc) x6 = 18
(2 sc, inc) x6 = 24
(3 sc, inc) x6 = 30
(4 sc, inc) x6 = 36
Rnds 6–15: sc around
(4 sc, dec) x6 = 30
(3 sc, dec) x6 = 24
Insert eyes between Rnds 11–12
(2 sc, dec) x6 = 18
Stuff
(1 sc, dec) x6 = 12
dec x6 = 6, FO
👂 Ears (Make 2 – Beige)
MR, 6 sc
(inc, 1 sc) x3 = 9
Sew to side of head
🧔 Beard & Hair (White Yarn)
-
Beard: ch 13, sc across, then add textured bobble rows or popcorn stitches for fullness.
-
Hair: create base cap in white and attach curled strands or short bobbles for volume.
Sew both securely
👑 Headband (Yellow Yarn)
Ch 30, sl st to first ch to form a ring
Sew across forehead
Optional: add embroidered swirl detail
🧍 Body (Start with Blue for armor)
MR, 6 sc
(inc) x6 = 12
(1 sc, inc) x6 = 18
(2 sc, inc) x6 = 24
(3 sc, inc) x6 = 30
Work 4 rounds even
Switch to yellow (waist belt)
sc 2 rounds
Switch to beige for legs (split body)
🦵 Legs (Make 2 – Beige → Burgundy → Green)
Start with beige
MR, 6 sc
(inc) x6 = 12
sc even 5 rounds
Switch to burgundy and work for 2 rounds
Add yellow stripe
Switch to green for boots
sc even 4 rounds
Stuff and sew to body
💪 Arms (Make 2 – Beige → Yellow Cuffs → Burgundy Cape)
Start with beige
MR, 6 sc
(inc) x6 = 12
Work 6 rounds
Switch to yellow for wrist cuffs
Work 2 rounds
Optional: add bobble for muscle bicep
Stuff lightly, sew to shoulders
🦸 Skirt Panels (Burgundy and Blue Alternating)
Make approx. 12 individual strips:
Ch 8, sc 7 back, FO
Alternate color per strip
Sew evenly around waist
🧣 Cape (Burgundy)
Ch 26
Rows 1–18: sc across
Add taper or curve for cape shape if desired
Sew to back shoulders
🟡 Belt Buckle (Yellow)
MR, 6 sc
(inc) x6 = 12
sl st and FO
Sew over center of belt
🧵 Assembly
-
Sew head to body
-
Attach arms and legs
-
Secure cape to back
-
Add beard, hair, headband
-
Place belt and buckle
-
Embroider facial details if needed
💡 Tips
-
Use safety pins or stitch markers to align arms before sewing
-
Use a small wire in arms for poseability
-
Add blusher to cheeks for character
-
Work skirt panels first and attach before final assembly
✨ Finishing Touches
-
Embroider eyebrows and a fierce grin
-
Use invisible thread to secure cape flow if needed
-
Embroider muscle outlines with a darker beige yarn for definition
-
Lightly stuff cape bottom for heroic lift
-
Pose with one hand on hip for a classic Hercules stance 💥